Welcome to the Terraform series. In the previous part we learned about A/B Testing Deployment. In this part we’ll learn about a fairly interesting topic: combining Terraform with Ansible.
The problem
Before learning how to use Ansible with Terraform, let’s discuss a problem we run into when using Terraform: after we create infrastructure with Terraform, how do we configure it? For example, after using Terraform to create an EC2 on AWS, how do we install the things we commonly use, such as nano, net-tools, and docker?
For EC2 we can use user_data, but if we use user_data, whether the script in it succeeds or fails, Terraform still reports that the EC2 resource was created successfully. But what we want is: after creating the EC2, we want Terraform to report success only once we’re sure all the scripts we need to run on that EC2 have succeeded.
To solve that problem, Terraform provides a feature called Provisioners.
Provisioners
A heads-up: HashiCorp considers provisioners a last resort. Prefer cloud-native options first —
user_data/ cloud-init for bootstrapping, or a pre-baked image built with Packer. Provisioners are still the right tool when you specifically need Terraform to block until a remote configuration step succeeds, which is what we demonstrate here.
Provisioners are a feature that lets us execute a script on the local machine or run a script on a remote resource. They’re usually used to configure infrastructure after it’s created. There are two kinds of provisioner:
- local-exec: used to run a script on the local machine where Terraform is running — we’ll use this to run Ansible.
- remote-exec: used to run a script on a remote machine. For example, after creating an EC2 we use remote-exec to run a script on the newly created EC2.
For example, we’ll use remote-exec to install Apache HTTP Server on the EC2; create a file named main.tf.
terraform {
  required_version = ">= 1.9"

  required_providers {
    aws = {
      source  = "hashicorp/aws"
      version = "~> 6.0"
    }
    tls = {
      source  = "hashicorp/tls"
      version = "~> 4.0"
    }
  }
}

provider "aws" {
  region = "us-west-2"
}
Next, we create an SSH key pair for the EC2 we need to create.
provider "aws" {
  region = "us-west-2"
}

resource "tls_private_key" "key" {
  algorithm = "RSA"
}

resource "aws_key_pair" "key_pair" {
  key_name   = "ansible-key"
  public_key = tls_private_key.key.public_key_openssh
}
Configure a Security Group to allow SSH into the EC2.
...
resource "aws_security_group" "allow_ssh" {
  ingress {
    from_port   = 22
    to_port     = 22
    protocol    = "tcp"
    cidr_blocks = ["0.0.0.0/0"]
  }

  ingress {
    from_port   = 80
    to_port     = 80
    protocol    = "tcp"
    cidr_blocks = ["0.0.0.0/0"]
  }

  egress {
    from_port   = 0
    to_port     = 0
    protocol    = "-1"
    cidr_blocks = ["0.0.0.0/0"]
  }
}
Create the EC2.
...
data "aws_ami" "ami" {
  most_recent = true

  filter {
    name   = "name"
    values = ["al2023-ami-2023.*-x86_64"]
  }

  owners = ["amazon"]
}

resource "aws_instance" "ansible_server" {
  ami                    = data.aws_ami.ami.id
  instance_type          = "t3.micro"
  vpc_security_group_ids = [aws_security_group.allow_ssh.id]
  key_name               = aws_key_pair.key_pair.key_name

  tags = {
    Name = "Apache Server"
  }
}
OK, now we’ll use remote-exec as follows.
...
resource "aws_instance" "ansible_server" {
  ami                    = data.aws_ami.ami.id
  instance_type          = "t3.micro"
  vpc_security_group_ids = [aws_security_group.allow_ssh.id]
  key_name               = aws_key_pair.key_pair.key_name

  provisioner "remote-exec" {
    inline = [
      "sudo dnf update -y",
      "sudo dnf install -y httpd",
      "sudo systemctl start httpd",
      "sudo systemctl enable httpd"
    ]

    connection {
      type        = "ssh"
      user        = "ec2-user"
      private_key = tls_private_key.key.private_key_pem
      host        = self.public_ip
    }
  }

  tags = {
    Name = "Apache Server"
  }
}
Above we use a provisioner of type remote-exec. For the provisioner to connect to the remote machine, we need to configure authentication for it in the connection block.
provisioner "remote-exec" {
    ...

    connection {
      type        = "ssh"
      user        = "ec2-user"
      private_key = tls_private_key.key.private_key_pem
      host        = self.public_ip
    }
}
The inline block contains the commands we need to execute on the remote machine — above are the CLI commands to install Apache Server.
provisioner "remote-exec" {
    inline = [
      "sudo dnf update -y",
      "sudo dnf install -y httpd",
      "sudo systemctl start httpd",
      "sudo systemctl enable httpd"
    ]

    ...
}
Now let’s run init and apply.
$ terraform init && terraform apply
Now you’ll see that after the EC2 is created, Terraform connects to it and runs the CLI commands, and only after all the commands succeed does Terraform report that the EC2 was created successfully.
...
aws_instance.ansible_server: Provisioning with 'remote-exec'...
aws_instance.ansible_server (remote-exec): Connecting to remote host via SSH...
aws_instance.ansible_server (remote-exec):   Host: 35.86.209.174
aws_instance.ansible_server (remote-exec):   User: ec2-user
aws_instance.ansible_server (remote-exec):   Password: false
aws_instance.ansible_server (remote-exec):   Private key: true
aws_instance.ansible_server (remote-exec):   Certificate: false
aws_instance.ansible_server (remote-exec):   SSH Agent: false
aws_instance.ansible_server (remote-exec):   Checking Host Key: false
aws_instance.ansible_server (remote-exec):   Target Platform: unix
aws_instance.ansible_server (remote-exec): Connected!
...
Apply complete! Resources: 2 added, 0 changed, 0 destroyed.

Outputs:

ec2 = "44.235.74.32"
OK, we’ve successfully used a provisioner to configure the EC2. If our EC2 only needs simple configuration, we can just use remote-exec to run simple CLI commands like this. But if our EC2 needs much more complex configuration, we can’t just use CLI commands — we need a tool called Configuration Management.
Ansible
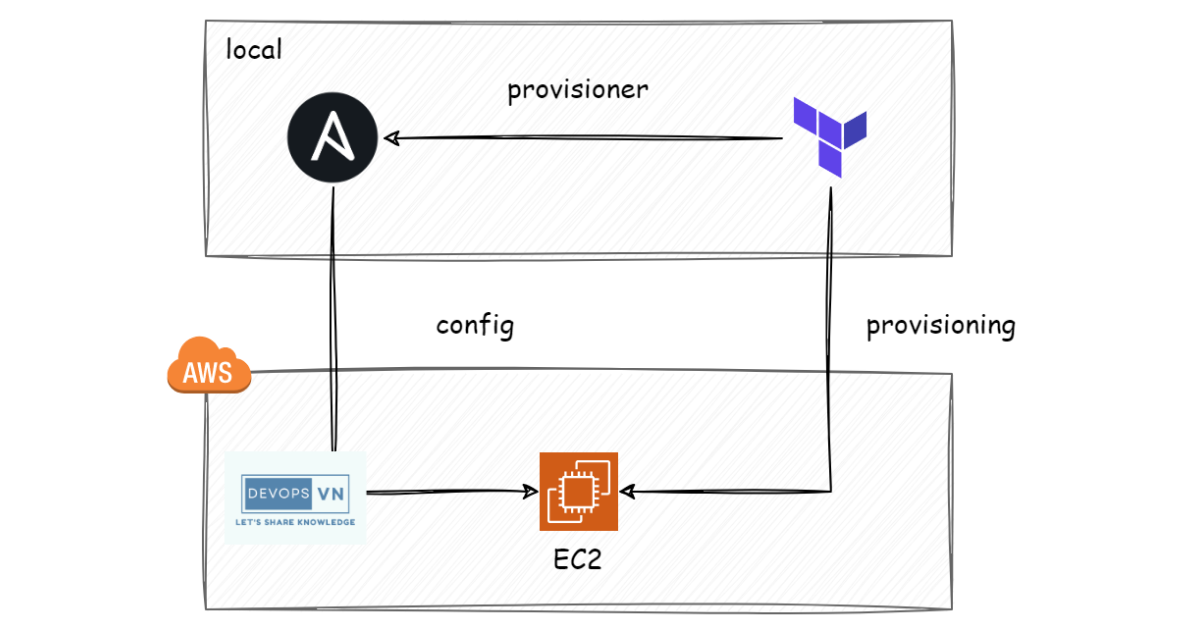
When we use Terraform, we use it only for provisioning infrastructure; for configuring infrastructure we shouldn’t use Terraform, because that’s not its domain — we should use configuration management. Among configuration management tools, Ansible is probably the most widely used. The common model is as follows.
To use Ansible with Terraform, first we use remote-exec to install Ansible on the remote server, then we use local-exec to execute the Ansible playbook on the local machine.
For example, we create an EC2 and use Ansible to install Nginx on it; create two files named main.tf and playbook.yaml.
provider "aws" {
  region  = "us-west-2"
}

resource "tls_private_key" "key" {
  algorithm = "RSA"
}

resource "local_sensitive_file" "private_key" {
  filename        = "${path.module}/ansible.pem"
  content         = tls_private_key.key.private_key_pem
  file_permission = "0400"
}

resource "aws_key_pair" "key_pair" {
  key_name   = "ansible"
  public_key = tls_private_key.key.public_key_openssh
}

resource "aws_security_group" "allow_ssh" {
  ingress {
    from_port   = 22
    to_port     = 22
    protocol    = "tcp"
    cidr_blocks = ["0.0.0.0/0"]
  }

  ingress {
    from_port   = 80
    to_port     = 80
    protocol    = "tcp"
    cidr_blocks = ["0.0.0.0/0"]
  }

  egress {
    from_port   = 0
    to_port     = 0
    protocol    = "-1"
    cidr_blocks = ["0.0.0.0/0"]
  }
}

data "aws_ami" "ubuntu" {
  most_recent = true

  filter {
    name   = "name"
    values = ["ubuntu/images/hvm-ssd-gp3/ubuntu-noble-24.04-amd64-server-*"]
  }

  owners = ["099720109477"]
}

resource "aws_instance" "ansible_server" {
  ami                    = data.aws_ami.ubuntu.id
  instance_type          = "t3.micro"
  vpc_security_group_ids = [aws_security_group.allow_ssh.id]
  key_name               = aws_key_pair.key_pair.key_name

  provisioner "remote-exec" {
    inline = [
      "sudo apt update -y",
      "sudo apt install -y software-properties-common",
      "sudo apt-add-repository --yes --update ppa:ansible/ansible",
      "sudo apt install -y ansible"
    ]

    connection {
      type        = "ssh"
      user        = "ubuntu"
      private_key = tls_private_key.key.private_key_pem
      host        = self.public_ip
    }
  }

  tags = {
    Name = "Ansible Server"
  }
}

output "ec2" {
  value = aws_instance.ansible_server.public_ip
}
The code above is similar to before, differing only in that we add a local_sensitive_file resource, used to output the pem file we’ll use for Ansible.
...
resource "local_sensitive_file" "private_key" {
  filename        = "${path.module}/ansible.pem"
  content         = tls_private_key.key.private_key_pem
  file_permission = "0400"
}
...
Then, to use Ansible, we use local-exec as follows.
...
resource "aws_instance" "ansible_server" {
  ami                    = data.aws_ami.ubuntu.id
  instance_type          = "t3.micro"
  vpc_security_group_ids = [aws_security_group.allow_ssh.id]
  key_name               = aws_key_pair.key_pair.key_name

  provisioner "remote-exec" {
    inline = [
      "sudo apt update -y",
      "sudo apt install -y software-properties-common",
      "sudo apt-add-repository --yes --update ppa:ansible/ansible",
      "sudo apt install -y ansible"
    ]

    connection {
      type        = "ssh"
      user        = "ubuntu"
      private_key = tls_private_key.key.private_key_pem
      host        = self.public_ip
    }
  }

  provisioner "local-exec" {
    command = "ANSIBLE_HOST_KEY_CHECKING=False ansible-playbook -u ubuntu --key-file ansible.pem -T 300 -i '${self.public_ip},' playbook.yaml"
  }

  tags = {
    Name = "Ansible Server"
  }
}
This is the part where we execute Ansible.
provisioner "local-exec" {
    command = "ANSIBLE_HOST_KEY_CHECKING=False ansible-playbook -u ubuntu --key-file ansible.pem -T 300 -i '${self.public_ip},' playbook.yaml"
}
Remember that we need to install Ansible on our machine first. Then we update the playbook.yaml file to contain the Ansible code.
- name: Install Nginx
  hosts: all
  become: true
  tasks:
    - name: Install Nginx
      apt:
        name: nginx
        state: present
    - name: Add index page
      template:
        src: index.html
        dest: /var/www/html/index.html
    - name: Start Nginx
      service:
        name: nginx
        state: started
If you run Ansible on CentOS, change apt to yum. Next we create an index.html file for Ansible to copy to the server.
<!DOCTYPE html>
<html>
  <style>
    body {
      background-color: green;
      color: white;
    }
  </style>
  <body>
    <h1>Ansible</h1>
  </body>
</html>
Now let’s run init and apply.
terraform init && terraform apply
You’ll see local-exec execute Ansible.
...
aws_instance.ansible_server: Provisioning with 'local-exec'...
aws_instance.ansible_server (local-exec): Executing: ["/bin/sh" "-c" "ANSIBLE_HOST_KEY_CHECKING=False ansible-playbook -u ubuntu --key-file ansible.pem -T 300 -i '35.87.91.3,', playbook.yaml"]

aws_instance.ansible_server (local-exec): PLAY [Install Nginx] ***********************************************************

aws_instance.ansible_server (local-exec): TASK [Gathering Facts] *********************************************************
aws_instance.ansible_server: Still creating... [1m30s elapsed]
aws_instance.ansible_server (local-exec): ok: [35.87.91.3]

aws_instance.ansible_server (local-exec): TASK [Install Nginx] ***********************************************************
aws_instance.ansible_server: Still creating... [1m40s elapsed]
aws_instance.ansible_server: Still creating... [1m50s elapsed]
aws_instance.ansible_server (local-exec): changed: [35.87.91.3]

aws_instance.ansible_server (local-exec): TASK [Add index page] **********************************************************
aws_instance.ansible_server: Still creating... [2m0s elapsed]
aws_instance.ansible_server (local-exec): changed: [35.87.91.3]

aws_instance.ansible_server (local-exec): TASK [Start Nginx] *************************************************************
aws_instance.ansible_server (local-exec): ok: [35.87.91.3]

aws_instance.ansible_server (local-exec): PLAY RECAP *********************************************************************
aws_instance.ansible_server (local-exec): 35.87.91.3                 : ok=4    changed=2    unreachable=0    failed=0    skipped=0    rescued=0    ignored=0

aws_instance.ansible_server: Creation complete after 2m7s [id=i-0fd0e63361c597de1]

Apply complete! Resources: 2 added, 0 changed, 0 destroyed.

Outputs:

ec2 = "35.87.91.3"
After it finishes, visit the IP of the EC2 we just created and you’ll see the Nginx server hosting our index.html file.
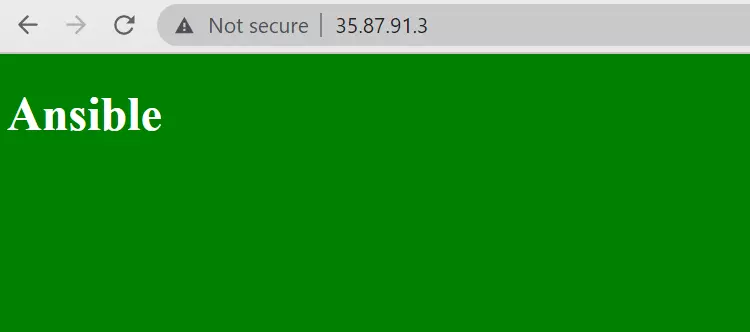
OK, so we’ve combined Terraform and Ansible.
Deep into provisioners
Let’s talk a bit more about provisioners. Since this part’s title is about Terraform with Ansible, talking too much theory would probably bore you, so I did the main example first and will cover the theory in detail now — read it if you need it for interviews.
Creation-time and destruction-time
Above we used provisioners to execute CLI commands, and most of them run when Terraform creates a resource. Provisioners can also be configured to run when Terraform destroys a resource, to clean up the server. A provisioner runs at these two lifecycle points:
- Creation-time provisioners
- Destruction-time provisioners
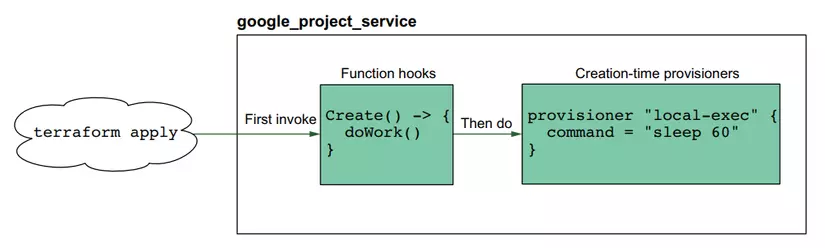
Creation-time provisioners run when the resource is created, and destruction-time provisioners run when the resource is deleted.
For example:
resource "google_project_service" "enabled_service" {
  for_each = toset(local.services)
  project  = var.project_id
  service  = each.key

  provisioner "local-exec" {
    command = "sleep 60"
  }

  provisioner "local-exec" {
    when    = destroy
    command = "sleep 15"
  }
}
Creation-time provisioners.
Destruction-time provisioners.
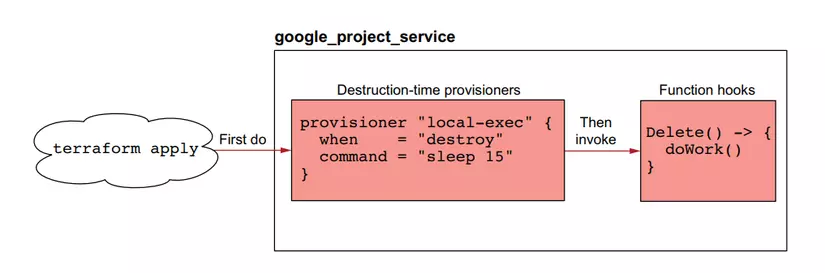
For destruction-time provisioners we add the field when = destroy, at which point Terraform understands we want to run this provisioner when the resource is destroyed.
Failure behavior
What if our provisioner fails? By default, if we use a provisioner and it fails, our resource is marked as failed. We can configure whether, if the provisioner fails, Terraform considers the resource failed, or whether Terraform still marks the resource as created successfully and continues.
We use the provisioner’s on_failure attribute to configure this; it has two values, continue and fail, with fail being the default. For example, we configure it as follows so that even if the provisioner fails, Terraform still considers it successful.
resource "aws_instance" "web" {
  ...

  provisioner "local-exec" {
    command    = "echo The server's IP address is ${self.private_ip}"
    on_failure = continue
  }
}
Conclusion
So we’ve learned about provisioners and how to use them to combine Terraform with Ansible.