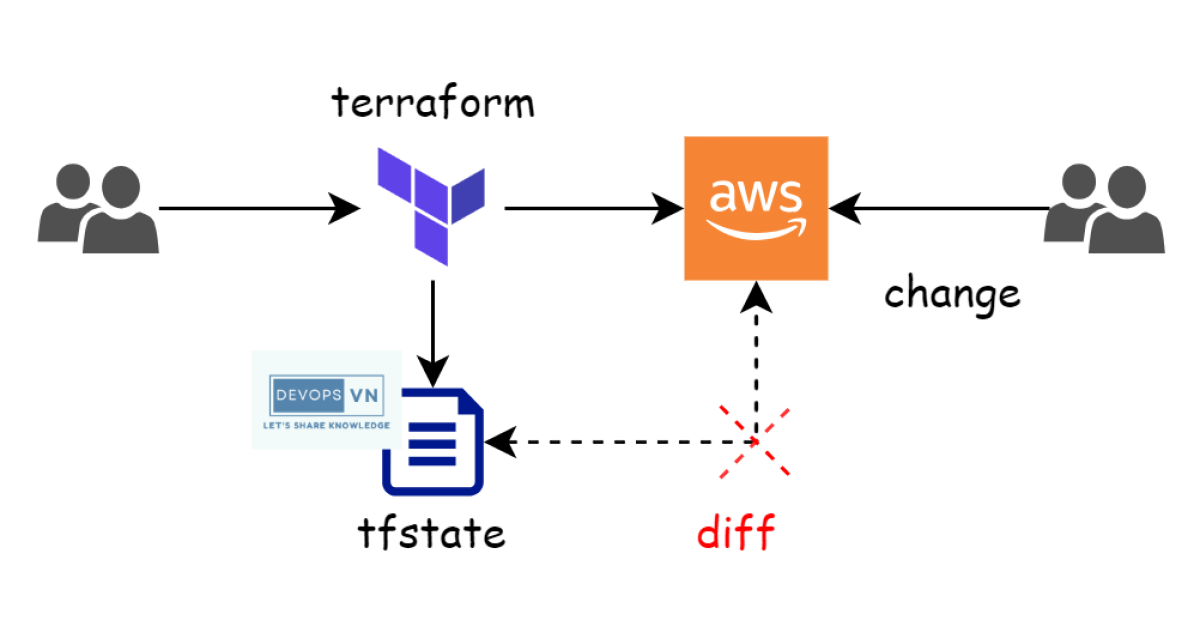
In this part we’ll learn about a very important issue: how to handle it when the Terraform State differs from the real infrastructure.
For example, we use Terraform to create infrastructure on AWS; after Terraform finishes, it creates a state file to record the infrastructure’s state. If someone doesn’t use Terraform and instead goes directly to the AWS Web Console to change the infrastructure, then the infrastructure’s state in the state file differs from the real infrastructure. How do we solve this problem?
Creating the infrastructure
Let’s do a small example creating an EC2 and a Security Group allowing access to the EC2’s port 22. Then we simulate a change outside Terraform by using the AWS CLI to create another SG allowing access to port 80 and attaching it to the EC2.
Create a file named main.tf with the following code.
terraform {
  required_version = ">= 1.9"

  required_providers {
    aws = {
      source  = "hashicorp/aws"
      version = "~> 6.0"
    }
  }
}

provider "aws" {
  region = "us-west-2"
}

data "aws_ami" "ubuntu" {
  most_recent = true
  owners      = ["099720109477"]

  filter {
    name   = "name"
    values = ["ubuntu/images/hvm-ssd-gp3/ubuntu-noble-24.04-amd64-server-*"]
  }
}

resource "aws_security_group" "allow_ssh" {
  name   = "allow-ssh"

  ingress {
    from_port = "22"
    to_port   = "22"
    protocol  = "tcp"
    cidr_blocks = [
      "0.0.0.0/0",
    ]
  }

  egress {
    from_port   = 0
    to_port     = 0
    protocol    = "-1"
    cidr_blocks = ["0.0.0.0/0"]
  }

  tags = {
    Name  = "allow-ssh"
  }
}

resource "aws_instance" "server" {
  ami           = data.aws_ami.ubuntu.id
  instance_type = "t3.medium"

  vpc_security_group_ids = [
    aws_security_group.allow_ssh.id
  ]

  lifecycle {
    create_before_destroy = true
  }

  tags = {
    Name  = "Server"
  }
}

output "instance_id" {
  value = aws_instance.server.id
}
Run the Terraform commands to create the resources above.
terraform init && terraform apply -auto-approve
...
Apply complete! Resources: 2 added, 0 changed, 0 destroyed.

Outputs:

instance_id = "i-082e7dcd35b327dbb"
Open the AWS Console and we’ll see the EC2 we just created.

The change
Next we use the AWS CLI to create a Security Group and attach it to the EC2. Create the SG.
aws ec2 create-security-group --group-name "allow-http" --description "allow http" --region us-west-2 --output text
We’ll see the SG Id printed to the terminal; remember to copy that value.
sg-026401f9c4e93a37a
Update the SG to allow access to port 80.
aws ec2 authorize-security-group-ingress --group-name "allow-http" --protocol tcp --port 80 --cidr 0.0.0.0/0 --region us-west-2
Attach the SG to the EC2.
current_security_groups=$(aws ec2 describe-instances --instance-ids $(terraform output -raw instance_id) --query Reservations[*].Instances[*].SecurityGroups[*].GroupId --region us-west-2 --output text)
aws ec2 modify-instance-attribute --instance-id $(terraform output -raw instance_id) --groups $current_security_groups sg-026401f9c4e93a37a --region us-west-2
Now the infrastructure on AWS differs from the Terraform State; running plan will show it.
terraform plan
Terraform will perform the following actions:

  # aws_instance.server will be updated in-place
  ~ resource "aws_instance" "server" {
        id                                   = "i-0531f02acb4fa3c2b"
        tags                                 = {
            "Name" = "Server"
        }
      ~ vpc_security_group_ids               = [
          - "sg-026401f9c4e93a37a",
            # (1 unchanged element hidden)
        ]
        # (29 unchanged attributes hidden)

        # (7 unchanged blocks hidden)
    }

Plan: 0 to add, 1 to change, 0 to destroy.
If we run apply, Terraform reverts our infrastructure to before we added the SG sg-026401f9c4e93a37a, but what we want now is for the Terraform State to match the real infrastructure. We have two ways to do this:
terraform refreshterraform apply -refresh-only
Terraform Refresh
Don’t follow this approach.
The first way is to use the refresh command. When we run terraform refresh, Terraform reads the state of the infrastructure it manages, then updates the Terraform State to match the infrastructure.
terraform refresh
data.aws_ami.ubuntu: Reading...
aws_security_group.allow_ssh: Refreshing state... [id=sg-08326a64e6951fcbf]
data.aws_ami.ubuntu: Read complete after 0s [id=ami-0123376e204addb71]
aws_instance.server: Refreshing state... [id=i-0531f02acb4fa3c2b]

Outputs:

instance_id = "i-0531f02acb4fa3c2b"
Now the Terraform State matches the infrastructure on AWS. Next we update the code by hand, because Terraform has no command to change the code in the configuration file to match the infrastructure.
Update the main.tf file.
...
resource "aws_instance" "server" {
  ami           = data.aws_ami.ubuntu.id
  instance_type = "t3.medium"

  vpc_security_group_ids = [
    aws_security_group.allow_ssh.id,
    "sg-026401f9c4e93a37a"
  ]

  lifecycle {
    create_before_destroy = true
  }

  tags = {
    Name  = "Server"
  }
}
...
In vpc_security_group_ids we add the SG sg-026401f9c4e93a37a. Running the plan command, we’ll see the Terraform State now matches the current infrastructure.
terraform plan
data.aws_ami.ubuntu: Reading...
aws_security_group.allow_ssh: Refreshing state... [id=sg-08326a64e6951fcbf]
data.aws_ami.ubuntu: Read complete after 0s [id=ami-0123376e204addb71]
aws_instance.server: Refreshing state... [id=i-0531f02acb4fa3c2b]

No changes. Your infrastructure matches the configuration.
So we’ve handled the difference between the Terraform State and the real infrastructure. But terraform refresh is an old command and not recommended, because when we run refresh we don’t know which resources changed in the state file.
So from Terraform v0.15.4 there’s a newer command to help us solve this problem: the refresh only command. You should use it in real projects.
Terraform Refresh Only
Like the refresh command, refresh only also reads the state of the infrastructure it manages. But instead of immediately updating the Terraform State, it lets us see which resources will change and whether we accept updating the state. We run refresh only as follows.
terraform apply -refresh-only
Terraform detected the following changes made outside of Terraform since the last "terraform
apply" which may have affected this plan:

  # aws_instance.server has changed
  ~ resource "aws_instance" "server" {
        id                                   = "i-0531f02acb4fa3c2b"
        tags                                 = {
            "Name" = "Server"
        }
      ~ vpc_security_group_ids               = [
          + "sg-026401f9c4e93a37a",
            # (1 unchanged element hidden)
        ]
        # (29 unchanged attributes hidden)

        # (7 unchanged blocks hidden)
    }

This is a refresh-only plan, so Terraform will not take any actions to undo these. If you were
expecting these changes then you can apply this plan to record the updated values in the
Terraform state without changing any remote objects.

Would you like to update the Terraform state to reflect these detected changes?
  Terraform will write these changes to the state without modifying any real infrastructure.
  There is no undo. Only 'yes' will be accepted to confirm.

  Enter a value:
It shows us that the SG sg-026401f9c4e93a37a was added to the EC2, and asks whether we want to update the state to match the current infrastructure. If you type yes, it updates the state file.
Would you like to update the Terraform state to reflect these detected changes?
  Terraform will write these changes to the state without modifying any real infrastructure.
  There is no undo. Only 'yes' will be accepted to confirm.

  Enter a value: yes

Apply complete! Resources: 0 added, 0 changed, 0 destroyed.

Outputs:

instance_id = "i-0531f02acb4fa3c2b"
Next we also need to update the configuration file by hand.
vpc_security_group_ids = [
    aws_security_group.allow_ssh.id,
    "sg-026401f9c4e93a37a"
]
Running plan, we see the Terraform State now correctly reflects the current infrastructure. But right now we’ve set vpc_security_group_ids to the literal value sg-026401f9c4e93a37a. Is there a way to turn this into a resource in the configuration file?
The answer is yes. Note that the old claim that everything has to be done by hand no longer fully holds: since Terraform 1.5 there is config-driven import (the import block), and terraform plan -generate-config-out=<file> can even scaffold the resource configuration for you.
Terraform import
To manage an infrastructure resource that isn’t yet in the Terraform file, we do the following steps:
- Declare that resource’s configuration in the Terraform file
- Use
terraform importto import the resource into the state file
Update the main.tf file to add the SG sg-026401f9c4e93a37a.
...

resource "aws_security_group" "allow_http" {
  name        = "allow-http"
  description = "allow http"

  ingress {
    from_port = "80"
    to_port   = "80"
    protocol  = "tcp"
    cidr_blocks = [
      "0.0.0.0/0",
    ]
  }

  tags = {
    Name = "allow-http"
  }
}

...
Next we run import.
terraform import aws_security_group.allow_http sg-026401f9c4e93a37a
aws_security_group.allow_http: Importing from ID "sg-026401f9c4e93a37a"...
aws_security_group.allow_http: Import prepared!
  Prepared aws_security_group for import
aws_security_group.allow_http: Refreshing state... [id=sg-026401f9c4e93a37a]

Import successful!
Modern alternative (Terraform 1.5+): the
importblock. Instead of the imperative CLI command, you can declare the import in code, which is reviewable in version control and applied on the nextterraform apply:import { to = aws_security_group.allow_http id = "sg-026401f9c4e93a37a" }If you haven’t written the resource block yet, run
terraform plan -generate-config-out=generated.tfand Terraform scaffolds it for you. Remove theimportblock once the import is done.
To see how to import different resources, check the AWS provider docs.
Next we update the vpc_security_group_ids of aws_instance.server so we no longer need to hard-code the value.
...

  vpc_security_group_ids = [
    aws_security_group.allow_ssh.id,
    aws_security_group.allow_http.id,
  ]

...
The complete code.
terraform {
  required_version = ">= 1.9"

  required_providers {
    aws = {
      source  = "hashicorp/aws"
      version = "~> 6.0"
    }
  }
}

provider "aws" {
  region = "us-west-2"
}

data "aws_ami" "ubuntu" {
  most_recent = true
  owners      = ["099720109477"]

  filter {
    name   = "name"
    values = ["ubuntu/images/hvm-ssd-gp3/ubuntu-noble-24.04-amd64-server-*"]
  }
}

resource "aws_security_group" "allow_ssh" {
  name = "allow-ssh"

  ingress {
    from_port = "22"
    to_port   = "22"
    protocol  = "tcp"
    cidr_blocks = [
      "0.0.0.0/0",
    ]
  }

  egress {
    from_port   = 0
    to_port     = 0
    protocol    = "-1"
    cidr_blocks = ["0.0.0.0/0"]
  }

  tags = {
    Name = "allow-ssh"
  }
}

resource "aws_security_group" "allow_http" {
  name        = "allow-http"
  description = "allow http"

  ingress {
    from_port = "80"
    to_port   = "80"
    protocol  = "tcp"
    cidr_blocks = [
      "0.0.0.0/0",
    ]
  }

  tags = {
    Name = "allow-http"
  }
}

resource "aws_instance" "server" {
  ami           = data.aws_ami.ubuntu.id
  instance_type = "t3.medium"

  vpc_security_group_ids = [
    aws_security_group.allow_ssh.id,
    aws_security_group.allow_http.id,
  ]

  lifecycle {
    create_before_destroy = true
  }

  tags = {
    Name = "Server"
  }
}

output "instance_id" {
  value = aws_instance.server.id
}
Now when we run apply we see some small changes in the SG’s tags; don’t worry about these values, just type yes.
terraform apply
Terraform will perform the following actions:

  # aws_security_group.allow_http will be updated in-place
  ~ resource "aws_security_group" "allow_http" {
        id                     = "sg-026401f9c4e93a37a"
        name                   = "allow-http"
      + revoke_rules_on_delete = false
      ~ tags                   = {
          + "Name" = "allow-http"
        }
      ~ tags_all               = {
          + "Name" = "allow-http"
        }
        # (6 unchanged attributes hidden)

        # (1 unchanged block hidden)
    }

Plan: 0 to add, 1 to change, 0 to destroy.

Do you want to perform these actions?
  Terraform will perform the actions described above.
  Only 'yes' will be accepted to approve.

  Enter a value: yes

aws_security_group.allow_http: Modifying... [id=sg-026401f9c4e93a37a]
aws_security_group.allow_http: Modifications complete after 1s [id=sg-026401f9c4e93a37a]

Apply complete! Resources: 0 added, 1 changed, 0 destroyed.

Outputs:

instance_id = "i-0531f02acb4fa3c2b"
Done. Remember to destroy the resources.
terraform destroy -auto-approve
Conclusion
So we’ve learned how to handle the difference between the Terraform State and the real infrastructure. We should use the refresh only approach instead of refresh. This is the final part of the “Mastering Terraform” series. Thank you for following along.