In the previous part we learned about Zero-downtime Deployment, but we only learned how to do ZDD for a simple resource — an EC2. In this part we’ll learn how to do ZDD for a more complex resource — an Auto Scaling Group — using the Blue/Green Deployment method.
This part is based on the book Terraform in Action; you should give it a read because it’s excellent.
The book used a ready-made
terraform-in-action/aws/bluegreenmodule. That module is no longer maintained and doesn’t work with the current AWS provider, so the code below uses a small, self-contained equivalent built from today’s modules: a base module (VPC + ALB + two target groups + a weighted listener) and an autoscaling module (one ASG per color). The full working code is in the series’_resource/terraform-series/11-blue-green-deploymentfolder.
Blue/Green Deployment
Blue/Green Deployment is a method that helps us achieve zero-downtime when deploying a new version of an application. It’s the oldest method but also the most widely used; more advanced variants of Blue/Green Deployment are Rolling Blue/Green or Canary Deployment.
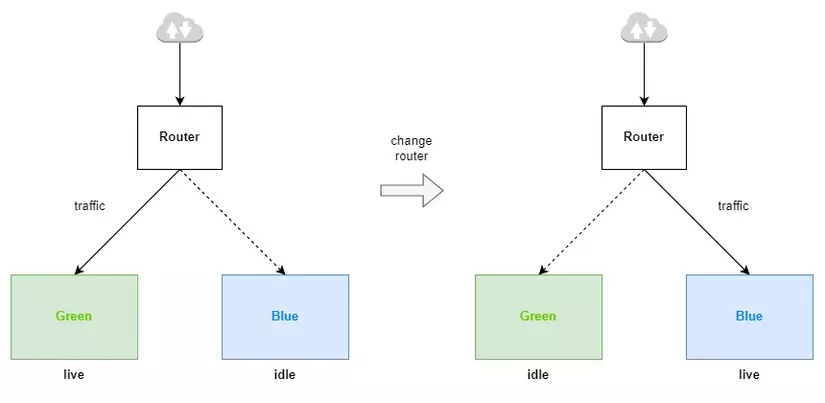
To perform Blue/Green Deployment, our application has two production environments — one called Blue and one called Green. Only one of the two is in the live state to receive user requests, while the other is in the idle state (not working).
When we want to deploy a new version of the application, we deploy it on the environment that’s currently idle (either Blue or Green), then we check that everything on the idle environment is working properly, and then we switch routing from the live environment to the idle one.
Auto Scaling Group
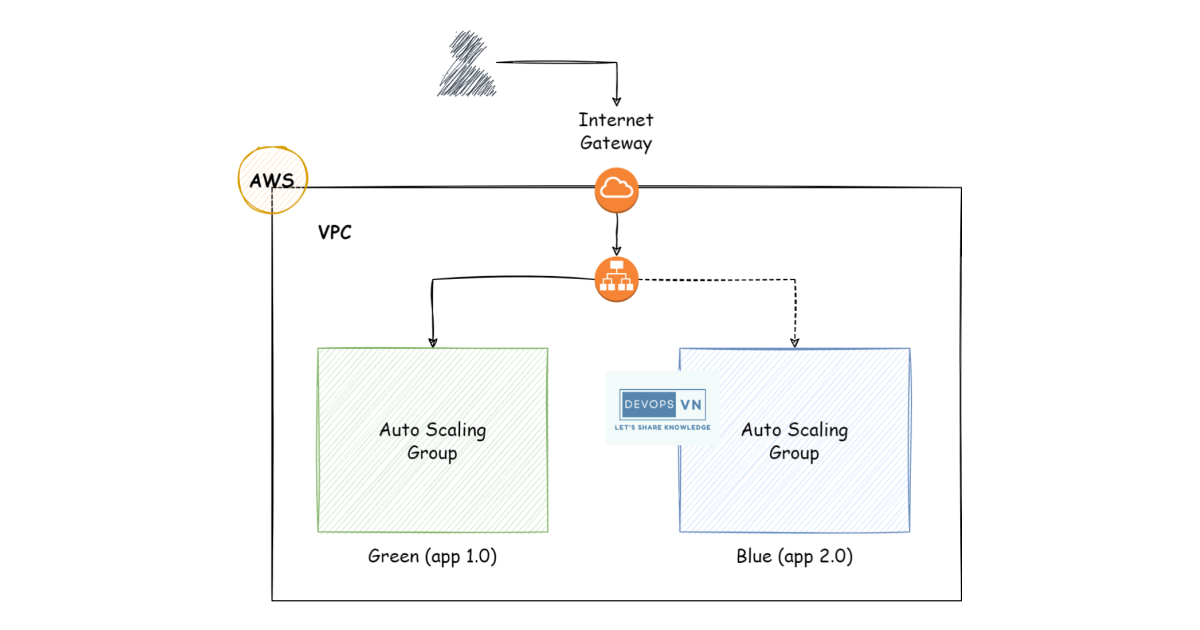
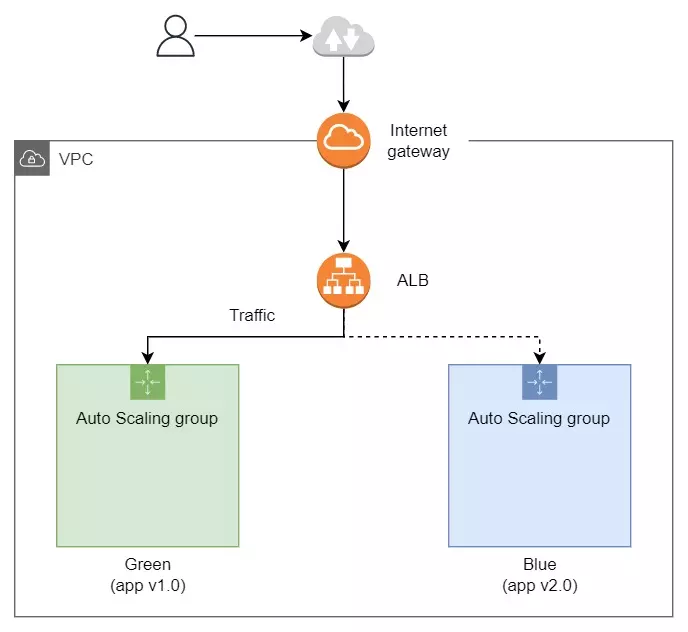
In this part we’ll do a Blue/Green Deployment example for the Auto Scaling Group resource on AWS. Our architecture consists of:
- Virtual Private Cloud (VPC)
- Application Load Balancer (ALB)
- 2 Auto Scaling Groups (Blue/Green)
Base and Application
When performing Blue/Green Deployment, the first thing we need to do is determine which resources are Base and which are Application. Base components are shared and don’t change much during deployment, whereas Application components can change a lot during deployment — you can even delete one and recreate a new one without affecting the system.
For example, with the Auto Scaling Group model above, the Base components are the VPC and ALB, while the Application is the Auto Scaling Group. When we deploy a new version of the application, our VPC certainly stays unchanged (there’s no reason to create a new VPC to deploy a new version of the application). The Auto Scaling Group, on the other hand, we can delete the old one and recreate a new one without impact.
For resources used to store data, such as a database, switching the database between environments is a very complex problem, so we usually classify the database as Base.
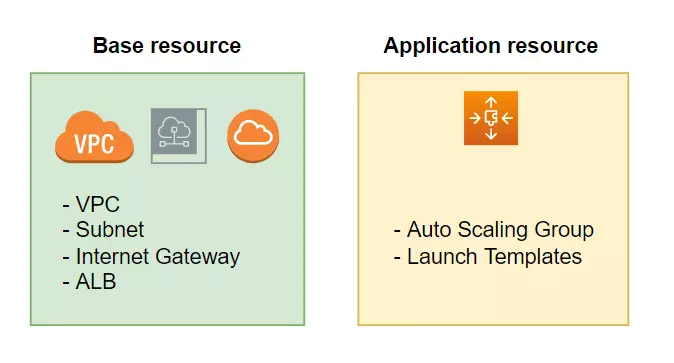
When deploying, we only need to touch the Application, then switch the Application’s requests from the live environment to the idle one (automatically or manually).
Execution
For example, we have an Auto Scaling Group version 1.0 and assign it as Green. Then our application has a new version, 2.0; we create another Auto Scaling Group for version 2.0 and assign it as Blue. Now Green is the live environment and Blue is the idle environment.
Next we switch routing for requests from Green to Blue manually (this kind of switch is called a cutover). Create a file named main.tf with the following code.
provider "aws" {
  region = "us-west-2"
}

variable "production" {
  default = "green"
}

module "base" {
  source     = "./modules/base"
  production = var.production
}

module "green" {
  source            = "./modules/autoscaling"
  label             = "green"
  app_version       = "v1.0"
  private_subnets   = module.base.private_subnets
  security_group_id = module.base.web_security_group_id
  target_group_arn  = module.base.target_group_arns["green"]
}

output "lb_dns_name" {
  value = module.base.lb_dns_name
}
Here the Base is the VPC + ALB + target groups from the ./modules/base submodule, and the Application is the Auto Scaling Group from the ./modules/autoscaling submodule. The base’s listener splits traffic by weight between the two color target groups; whichever color equals var.production gets 100%.
Our application version 1.0 is deployed using the terraform-in-action/aws/bluegreen//modules/autoscaling submodule, and we name it Green. Deploy version 1.0.
$ terraform apply -auto-approve
...
Plan: 34 to add, 0 to change, 0 to destroy.
...
Apply complete! Resources: 34 added, 0 changed, 0 destroyed.

Outputs:

lb_dns_name = "terraforminaction-ovgcpc-lb-909615962.us-west-2.elb.amazonaws.com"
When Terraform finishes, it prints the ALB’s URL; we visit it.

Next we’ll deploy version 2.0 of the application and name it Blue.
...
module "green" {
  source            = "./modules/autoscaling"
  label             = "green"
  app_version       = "v1.0"
  private_subnets   = module.base.private_subnets
  security_group_id = module.base.web_security_group_id
  target_group_arn  = module.base.target_group_arns["green"]
}

module "blue" {
  source            = "./modules/autoscaling"
  label             = "blue"
  app_version       = "v2.0"
  private_subnets   = module.base.private_subnets
  security_group_id = module.base.web_security_group_id
  target_group_arn  = module.base.target_group_arns["blue"]
}
...
Run the command.
$ terraform apply -auto-approve
...
Plan: 5 to add, 0 to change, 0 to destroy.
...
Apply complete! Resources: 5 added, 0 changed, 0 destroyed.

Outputs:

lb_dns_name = "terraforminaction-ovgcpc-lb-909615962.us-west-2.elb.amazonaws.com"
After checking that everything in the Blue environment is fine, we switch the application’s routing.
Blue/Green Cutover
We do this simply by changing the value of the production variable in the main.tf file.
Change the value from green.
...
variable "production" {
  default = "green"
}
...
To blue.
provider "aws" {
  region = "us-west-2"
}

variable "production" {
  default = "blue" // change here
}

module "base" {
  source     = "./modules/base"
  production = var.production
}

module "green" {
  source            = "./modules/autoscaling"
  label             = "green"
  app_version       = "v1.0"
  private_subnets   = module.base.private_subnets
  security_group_id = module.base.web_security_group_id
  target_group_arn  = module.base.target_group_arns["green"]
}

module "blue" {
  source            = "./modules/autoscaling"
  label             = "blue"
  app_version       = "v2.0"
  private_subnets   = module.base.private_subnets
  security_group_id = module.base.web_security_group_id
  target_group_arn  = module.base.target_group_arns["blue"]
}

output "lb_dns_name" {
  value = module.base.lb_dns_name
}
Run apply.
$ terraform apply -auto-approve
...
Plan: 0 to add, 2 to change, 0 to destroy.
...
Apply complete! Resources: 0 added, 2 changed, 0 destroyed.

Outputs:

lb_dns_name = "terraforminaction-ovgcpc-lb-909615962.us-west-2.elb.amazonaws.com"
After Terraform finishes, it switches the ALB’s Target Group from the Green Auto Scaling Group to Blue. Reload the page and you’ll see it switch to Blue with version 2.0.

We’ve successfully done a simple Blue/Green Deployment example. When we perform Blue/Green Deployment this way, we can minimize application downtime as much as possible.
Now we have two production environments, Green and Blue. If we get another new version of the application, 3.0, we just update the app_version value of module green to 3.0 and change the value of the production variable back to green.
Remember to run destroy to delete the resources.
Conclusion
So we’ve learned about Blue/Green Deployment — just one of the methods for performing Zero-downtime Deployment. You can also look into Rolling Blue/Green Deployment and Canary Deployment to have more options when deploying a new version of an application. In the next part we’ll learn about A/B Testing Deployment.