In the previous part we discussed how to deploy a website with Terraform. In this part we’ll build a Virtual Private Cloud (VPC) on AWS, and through it we’ll learn how to organize code effectively with Terraform Modules.
Creating a Virtual Private Cloud
The infrastructure we’ll build in this part is illustrated below.
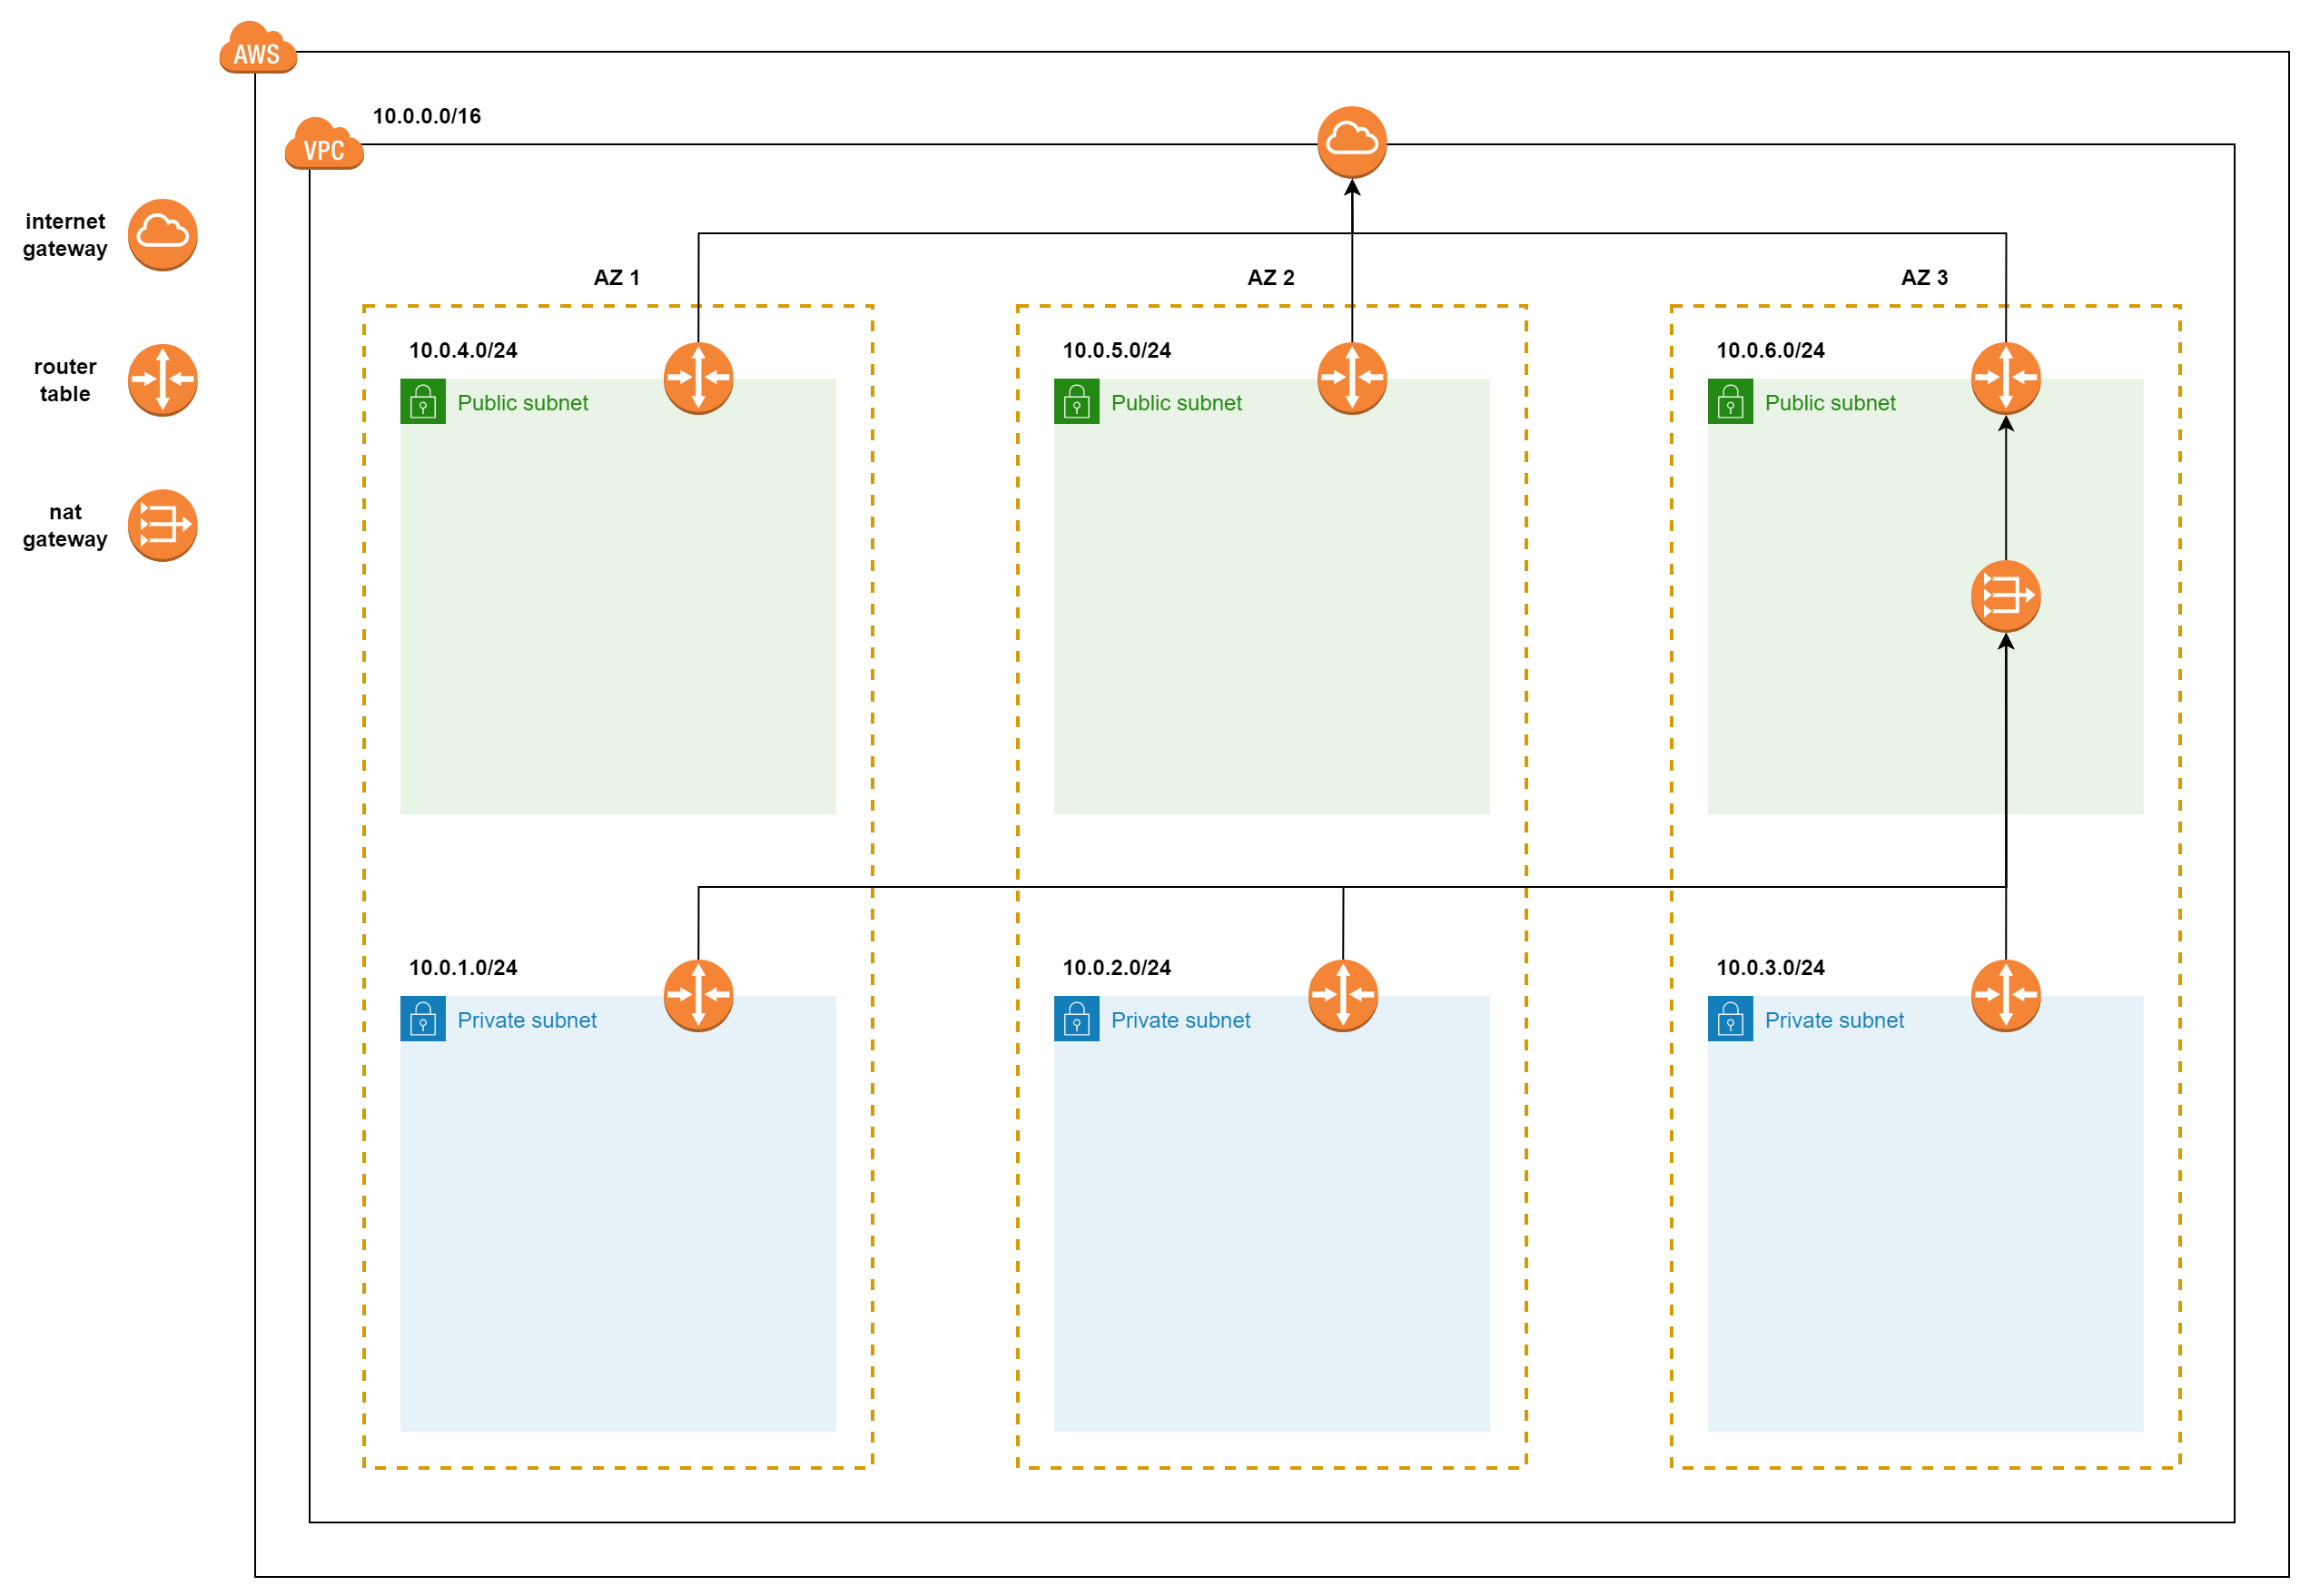
We’ll go through each resource Terraform uses to create an AWS VPC, and I’ll also briefly explain the theory of VPCs on AWS.
Create a file named main.tf.
terraform {
  required_version = ">= 1.9"

  required_providers {
    aws = {
      source  = "hashicorp/aws"
      version = "~> 6.0"
    }
  }
}

provider "aws" {
  region = "us-west-2"
}
Run init.
terraform init
Now let’s go through each AWS resource.
Virtual Private Cloud
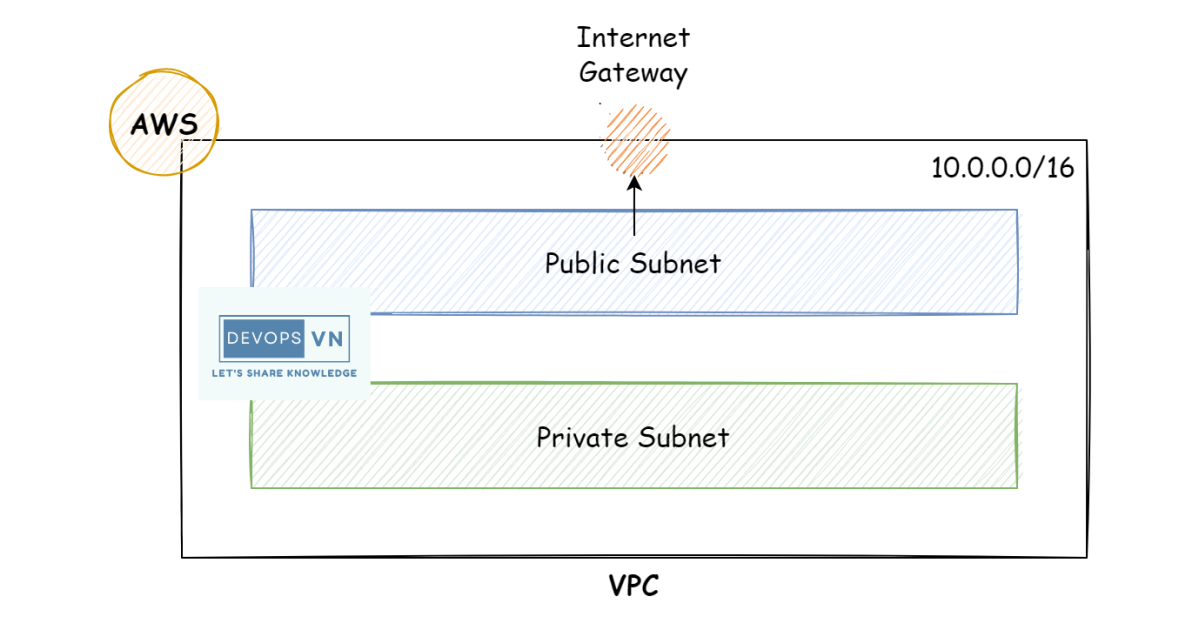
A Virtual Private Cloud (VPC) is simply a private network, as illustrated.
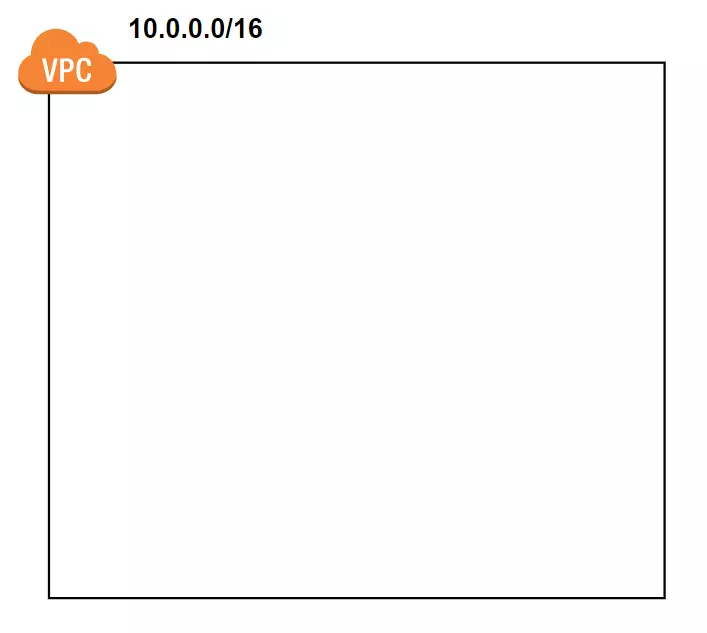
By default, each AWS region has a default VPC named default. To create a new VPC, we use Terraform’s aws_vpc resource.
...

provider "aws" {
  region = "us-west-2"
}

resource "aws_vpc" "vpc" {
  cidr_block = "10.0.0.0/16"
  enable_dns_hostnames = true

    tags = {
    "Name" = "custom"
  }
}
Above we create a new VPC with CIDR 10.0.0.0/16 and name custom. A VPC’s CIDR must fall within the following ranges:
- 10.0.0.0/16 -> 10.0.0.0/28
- 172.16.0.0/16 -> 172.16.0.0/28
- 192.168.0.0/16 -> 192.168.0.0/28
Subnet
A subnet divides our VPC into smaller sub-networks. Each subnet resides in an Availability Zone (AZ), and our AWS services are created inside these subnets.
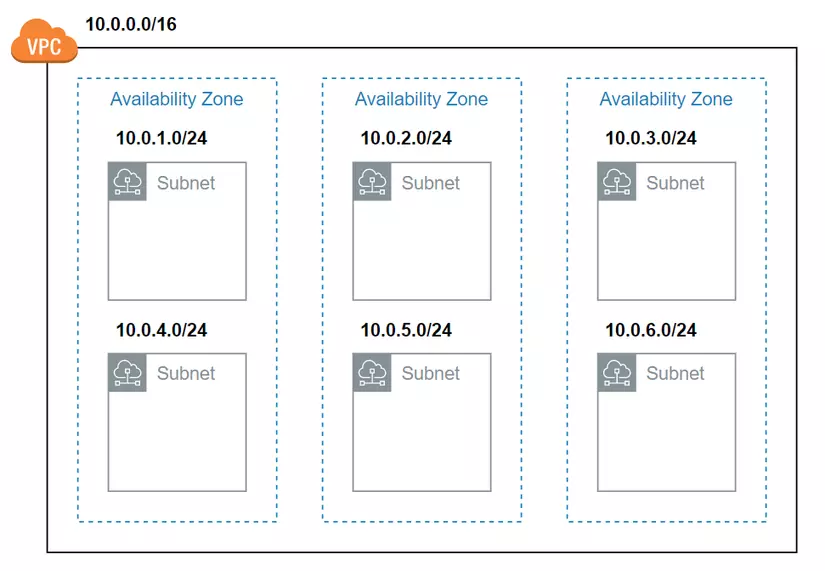
We use Terraform’s aws_subnet to create subnets.
...
resource "aws_subnet" "private_subnet_2a" {
  vpc_id     = aws_vpc.vpc.id
  cidr_block = "10.0.1.0/24"
  availability_zone = "us-west-2a"

  tags = {
    "Name" = "private-subnet"
  }
}

resource "aws_subnet" "private_subnet_2b" {
  vpc_id     = aws_vpc.vpc.id
  cidr_block = "10.0.2.0/24"
  availability_zone = "us-west-2b"

  tags = {
    "Name" = "private-subnet"
  }
}

resource "aws_subnet" "private_subnet_2c" {
  vpc_id     = aws_vpc.vpc.id
  cidr_block = "10.0.3.0/24"
  availability_zone = "us-west-2c"

  tags = {
    "Name" = "private-subnet"
  }
}
In the code above we create 3 subnets — 10.0.1.0/24, 10.0.2.0/24, 10.0.3.0/24 — in AZs a, b, and c. If we need more subnets, we could copy out another resource, but that makes our code quite long. We can shorten it as follows.
...
locals {
  private = ["10.0.1.0/24", "10.0.2.0/24", "10.0.3.0/24"]
  zone   = ["us-west-2a", "us-west-2b", "us-west-2c"]
}

resource "aws_subnet" "private_subnet" {
  count = length(local.private)

  vpc_id            = aws_vpc.vpc.id
  cidr_block        = local.private[count.index]
  availability_zone = local.zone[count.index % length(local.zone)]

  tags = {
    "Name" = "private-subnet"
  }
}
We’ll add 3 more subnets — 10.0.4.0/24, 10.0.5.0/24, 10.0.6.0/24 (I’ll explain below why these subnets are called Public or Private).
...
locals {
  private  = ["10.0.1.0/24", "10.0.2.0/24", "10.0.3.0/24"]
  public = ["10.0.4.0/24", "10.0.5.0/24", "10.0.6.0/24"]
  zone    = ["us-west-2a", "us-west-2b", "us-west-2c"]
}

resource "aws_subnet" "private_subnet" {
  count = length(local.private)

  vpc_id            = aws_vpc.vpc.id
  cidr_block        = local.private[count.index]
  availability_zone = local.zone[count.index % length(local.zone)]

  tags = {
    "Name" = "private-subnet"
  }
}

resource "aws_subnet" "public_subnet" {
  count = length(local.public)

  vpc_id            = aws_vpc.vpc.id
  cidr_block        = local.public[count.index]
  availability_zone = local.zone[count.index % length(local.zone)]

  tags = {
    "Name" = "public-subnet"
  }
}
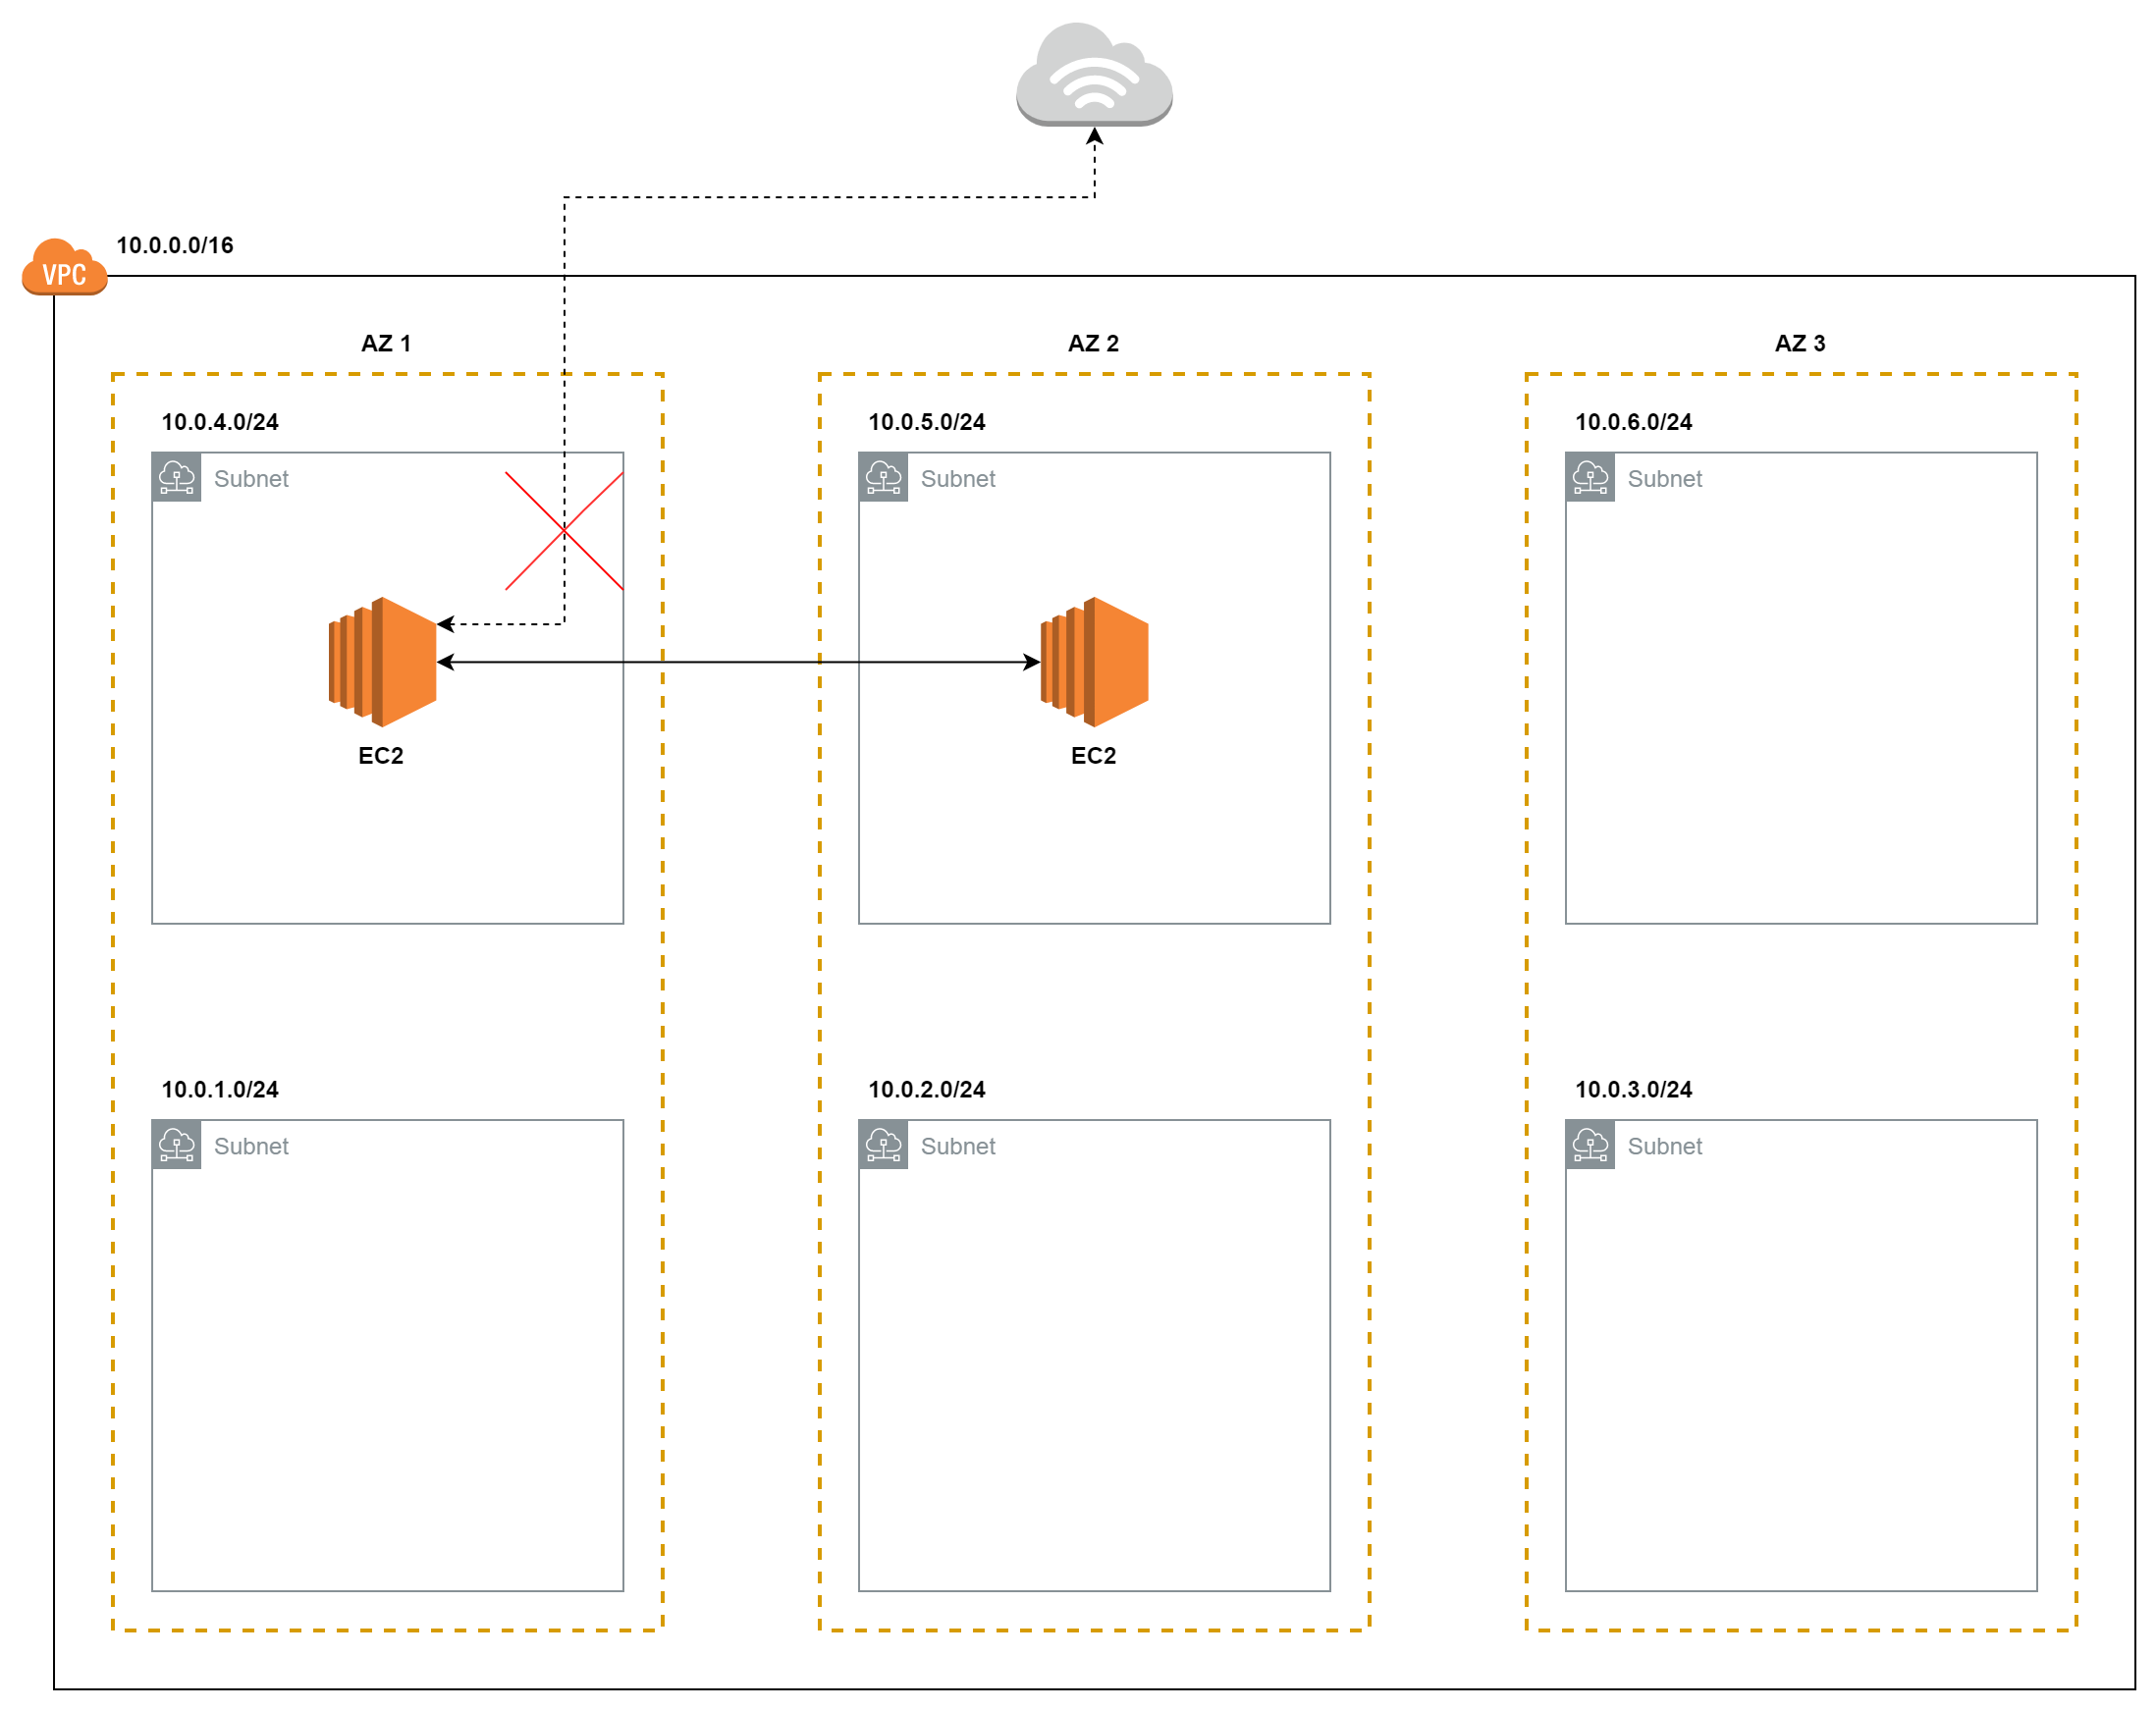
Now when our AWS services are created inside these subnets they can talk to each other. But if these AWS services want to talk to others out on the internet, they can’t — and vice versa.
That’s because we don’t yet have anything acting as a router so our AWS services can communicate with the internet.
Internet gateway
For the AWS services inside a subnet to communicate with the internet, we need something called an Internet Gateway (IG). We attach this IG to a Route Table, then attach that route table to whichever subnet we want to be able to communicate with the outside internet.
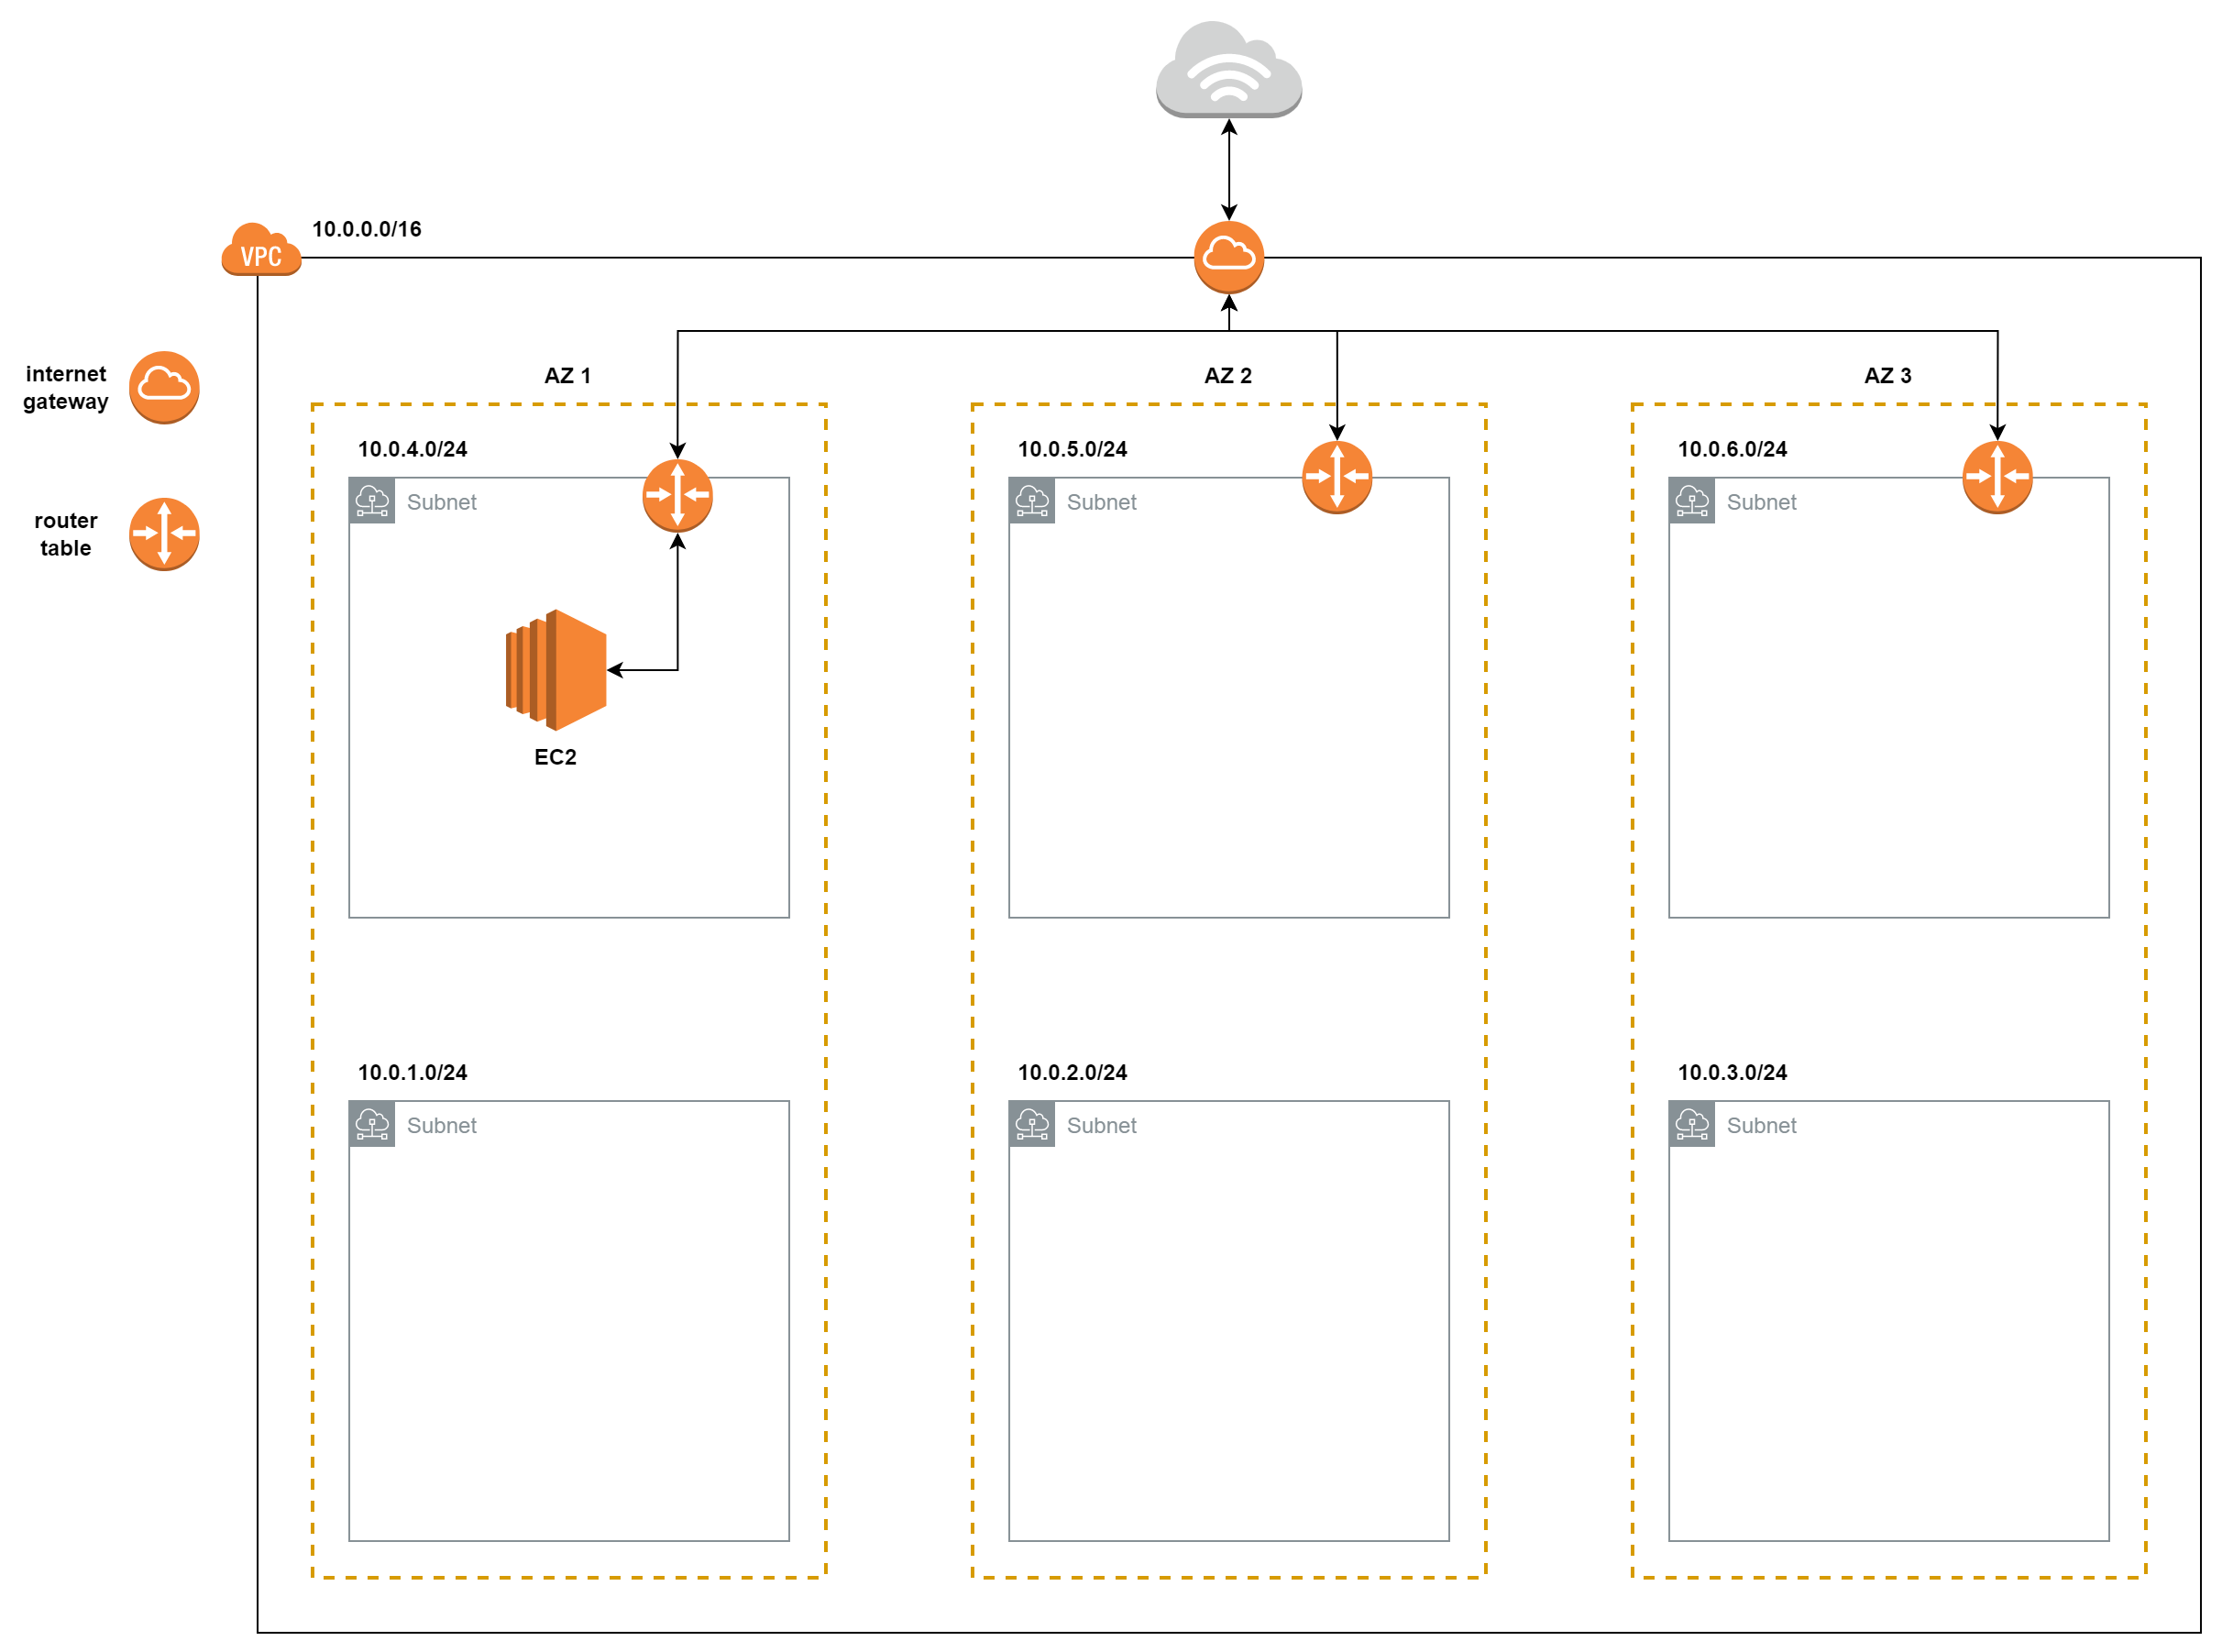
This is where the concepts of Public Subnet and Private Subnet come from.
A Public Subnet is a subnet whose services can interact with the outside internet and vice versa, through the IG.
For a Private Subnet, the services inside can interact with the outside, but not the other way around. We use the aws_internet_gateway resource to create the IG.
...
resource "aws_internet_gateway" "ig" {
  vpc_id = aws_vpc.vpc.id

  tags = {
    "Name" = "custom"
  }
}
Attach it to a Route Table.
...
resource "aws_internet_gateway" "ig" {
  vpc_id = aws_vpc.vpc.id

  tags = {
    "Name" = "custom"
  }
}

resource "aws_route_table" "public" {
  vpc_id = aws_vpc.vpc.id

  route {
    cidr_block = "0.0.0.0/0"
    gateway_id = aws_internet_gateway.ig.id
  }

  tags = {
    "Name" = "public"
  }
}
Attach the route table to the subnets.
...
resource "aws_route_table_association" "public_association" {
  for_each       = { for k, v in aws_subnet.public_subnet : k => v }
  subnet_id      = each.value.id
  route_table_id = aws_route_table.public.id
}
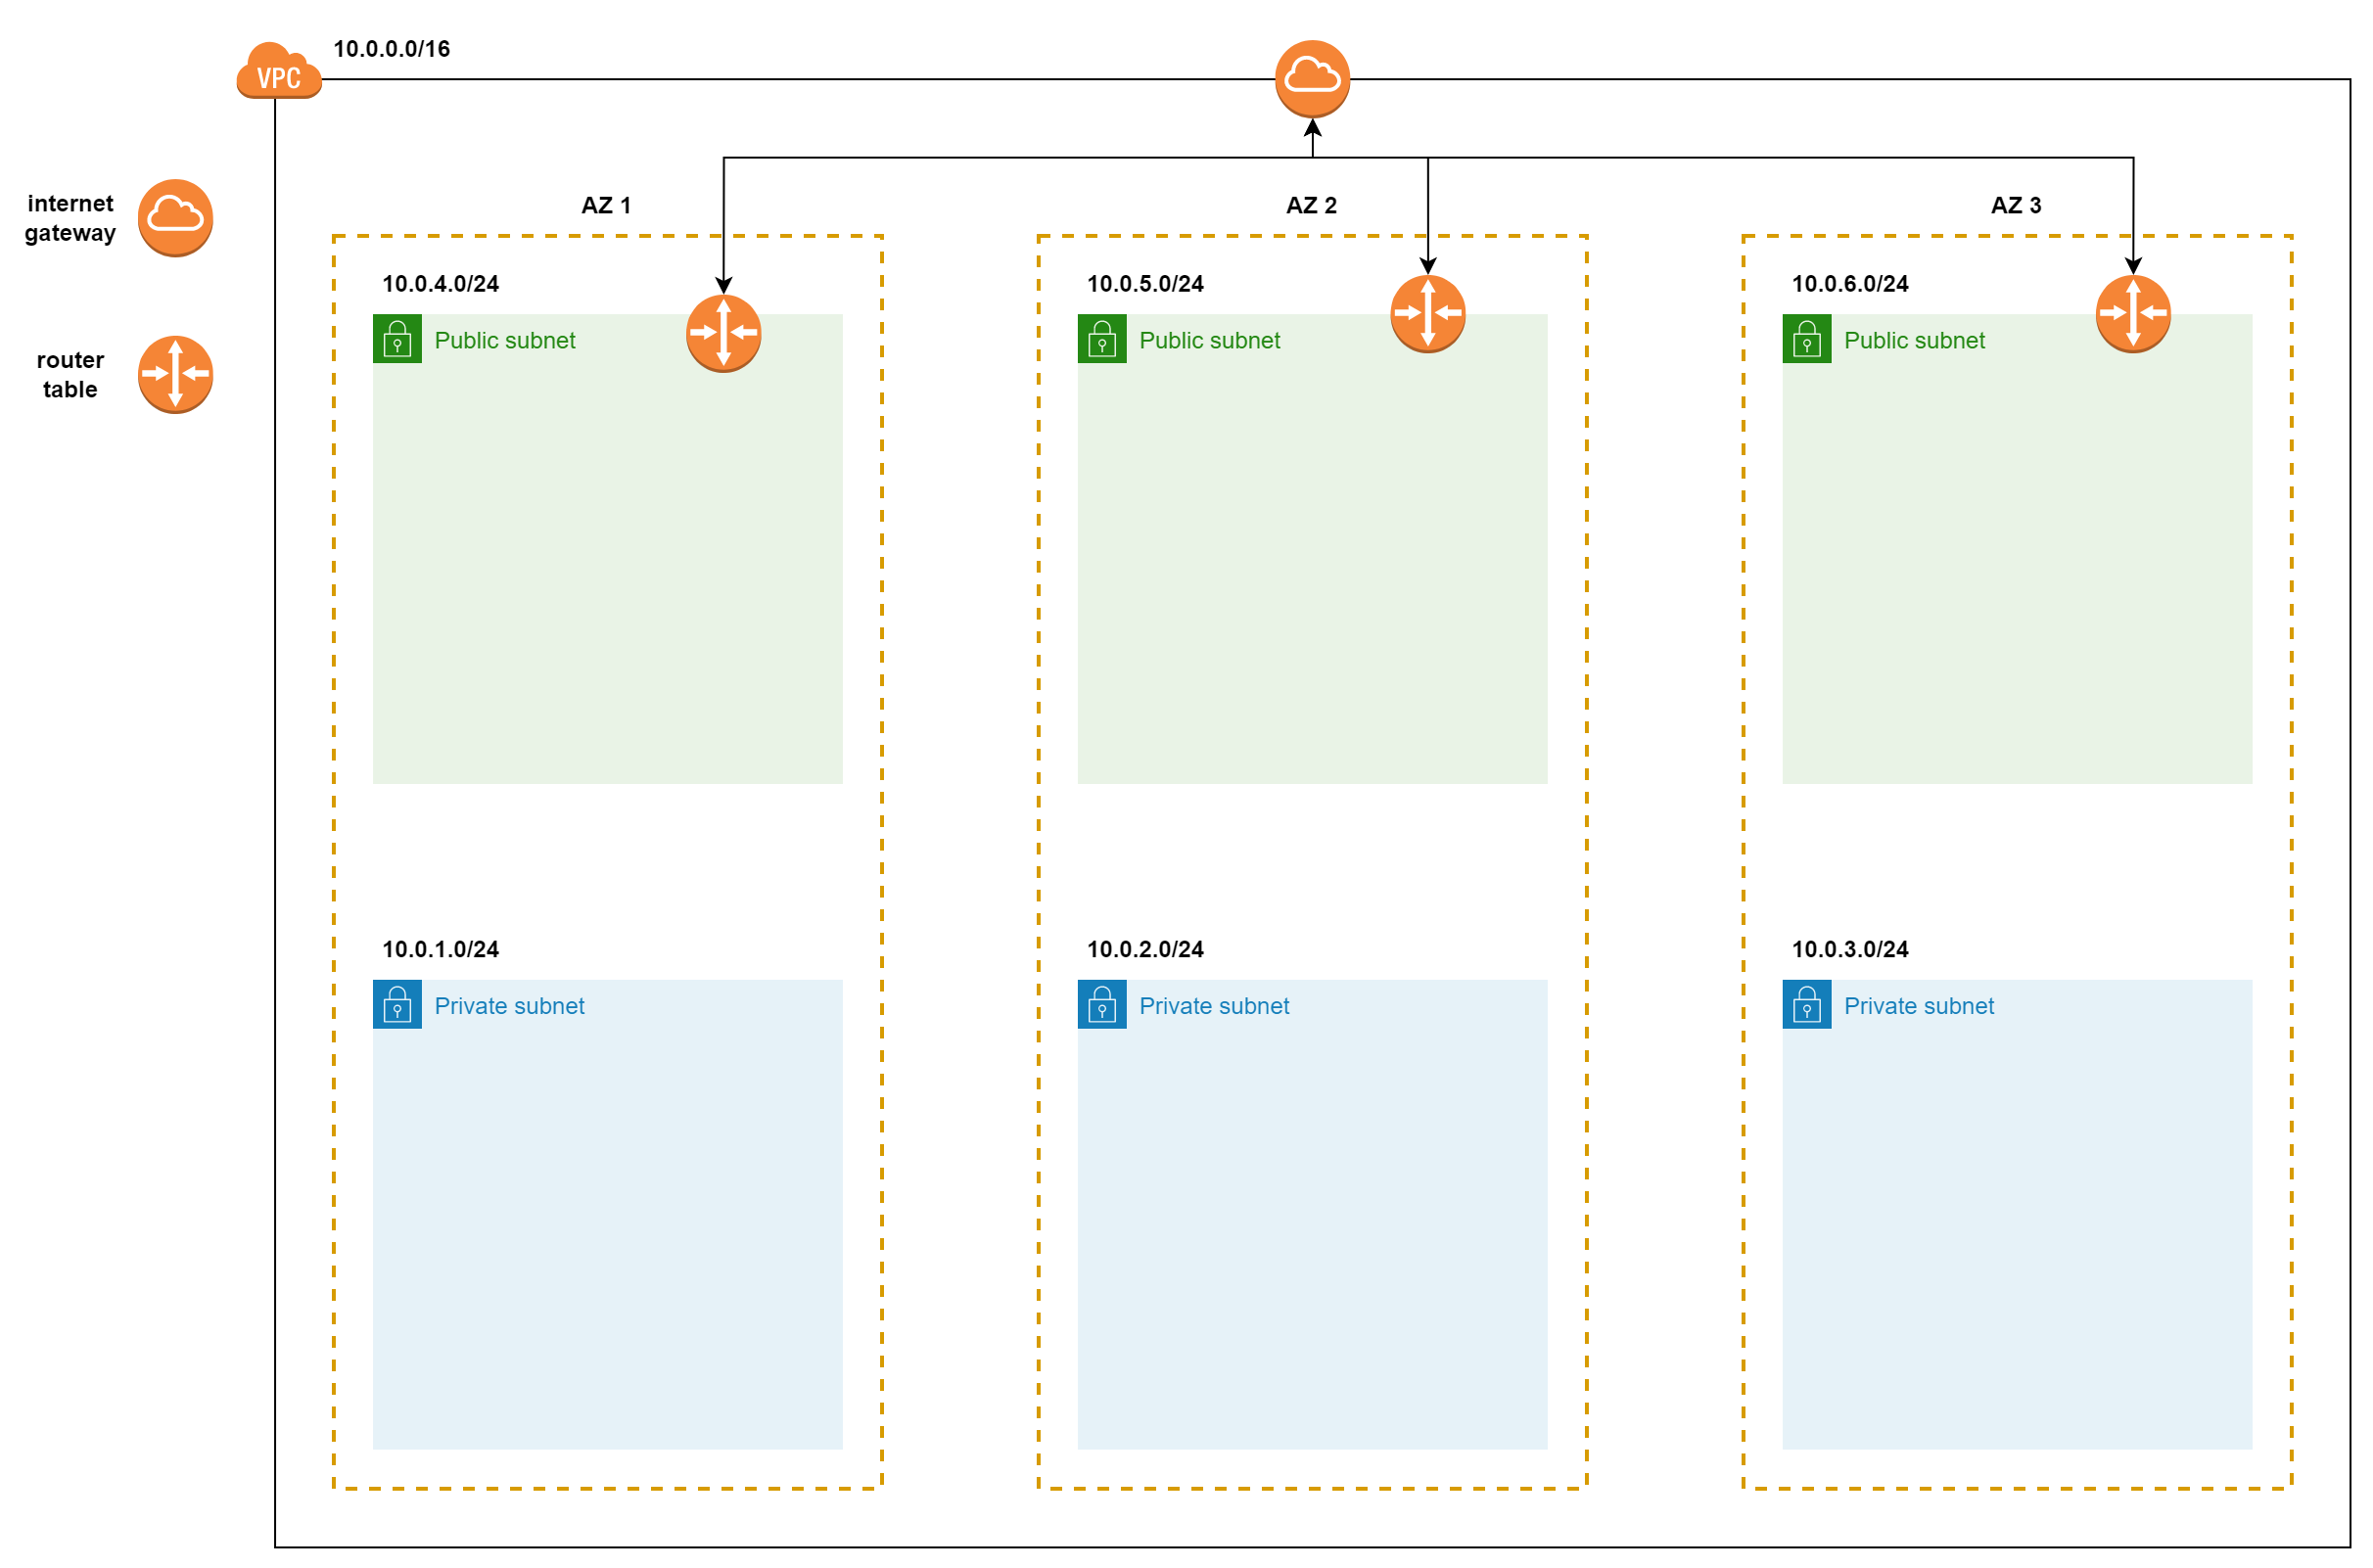
Now our services in the Public Subnet can interact with the outside. What about the Private Subnets?
Currently the services in the Private Subnet can’t communicate with the internet, but we can’t attach the IG to the Private Subnet, because the IG is two-way (in and out), whereas we only want one direction — from inside the Private Subnet out — and not the reverse.
NAT gateway
This is what helps us do that. We deploy a NAT onto a Public Subnet and attach it to a route table, then attach that route table to the Private Subnets.
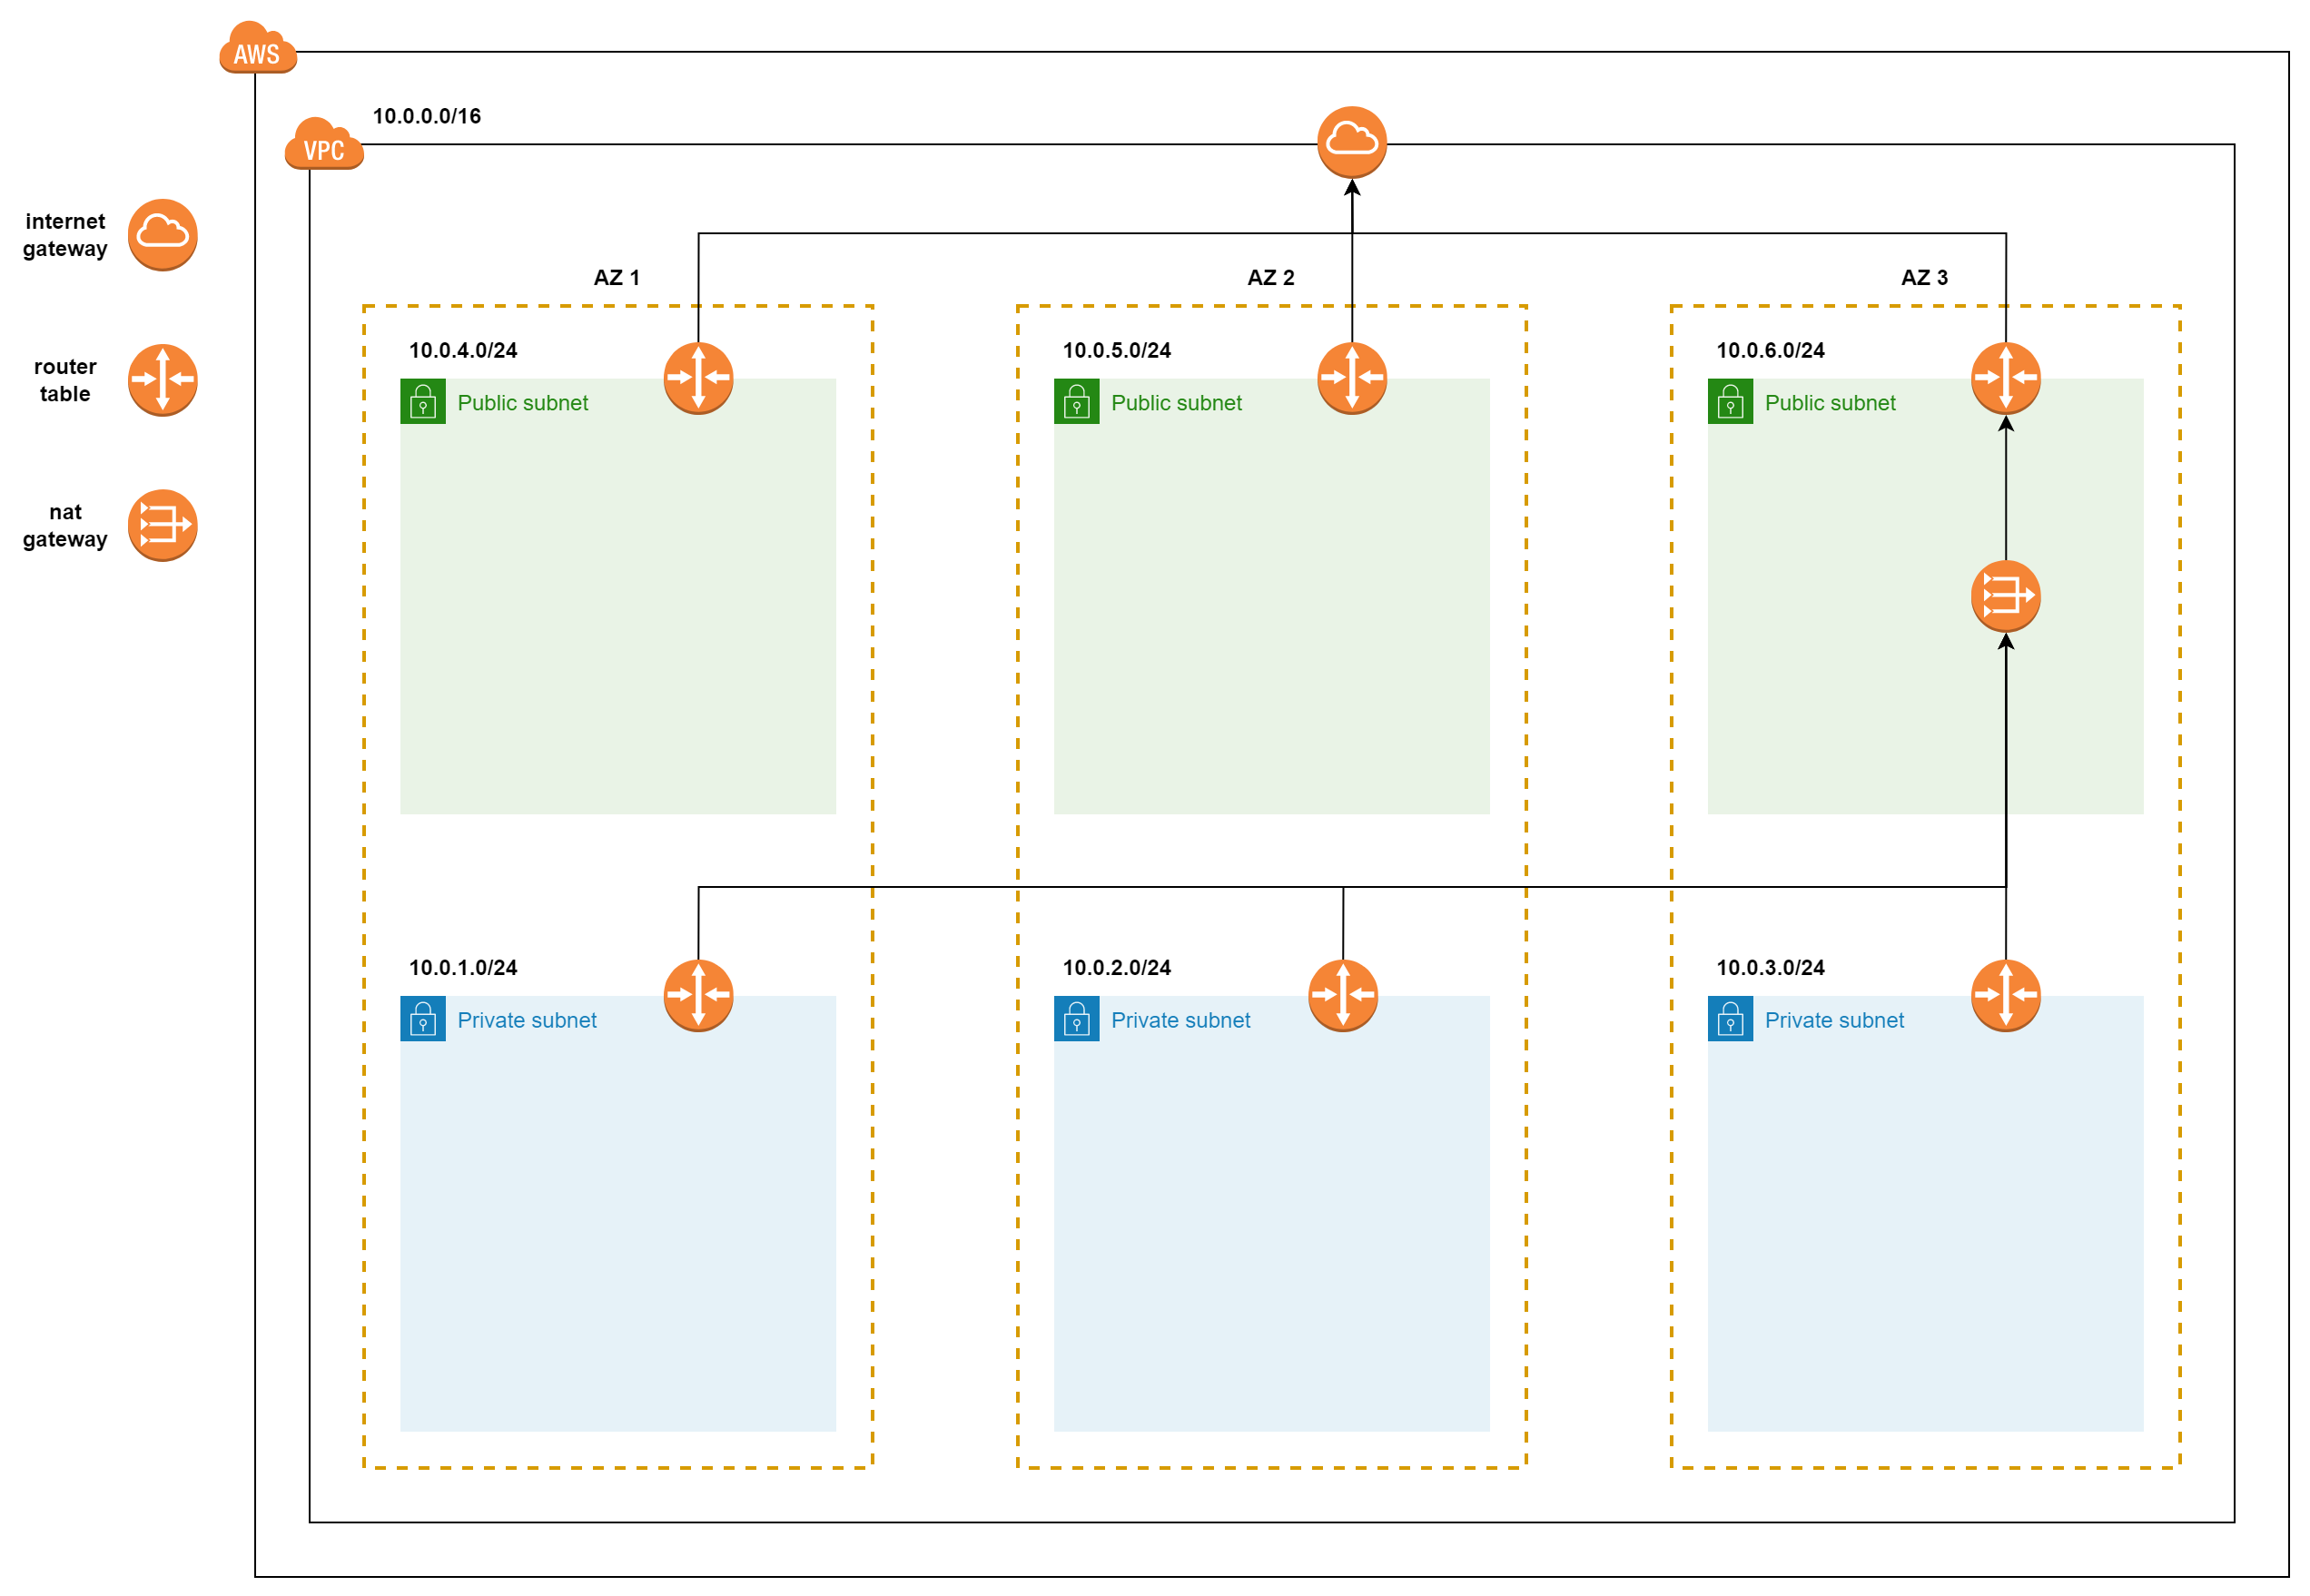
We use Terraform’s aws_nat_gateway resource to create the NAT.
...
resource "aws_eip" "nat" {
  domain = "vpc"
}

resource "aws_nat_gateway" "public" {
  depends_on = [aws_internet_gateway.ig]

  allocation_id = aws_eip.nat.id
  subnet_id     = aws_subnet.public_subnet[0].id

  tags = {
    Name = "Public NAT"
  }
}
Create a Private Route Table and attach the NAT.
...
resource "aws_route_table" "private" {
  vpc_id = aws_vpc.vpc.id

  route {
    cidr_block     = "0.0.0.0/0"
    nat_gateway_id = aws_nat_gateway.public.id
  }

  tags = {
    "Name" = "private"
  }
}
Attach the route table to the Private Subnets.
...
resource "aws_route_table_association" "public_private" {
  for_each       = { for k, v in aws_subnet.private_subnet : k => v }
  subnet_id      = each.value.id
  route_table_id = aws_route_table.private.id
}
The complete code.
provider "aws" {
  region  = "us-west-2"
}

resource "aws_vpc" "vpc" {
  cidr_block           = "10.0.0.0/16"
  enable_dns_hostnames = true

  tags = {
    "Name" = "custom"
  }
}

locals {
  private = ["10.0.1.0/24", "10.0.2.0/24", "10.0.3.0/24"]
  public  = ["10.0.4.0/24", "10.0.5.0/24", "10.0.6.0/24"]
  zone    = ["us-west-2a", "us-west-2b", "us-west-2c"]
}

resource "aws_subnet" "private_subnet" {
  count = length(local.private)

  vpc_id            = aws_vpc.vpc.id
  cidr_block        = local.private[count.index]
  availability_zone = local.zone[count.index % length(local.zone)]

  tags = {
    "Name" = "private-subnet"
  }
}

resource "aws_subnet" "public_subnet" {
  count = length(local.public)

  vpc_id            = aws_vpc.vpc.id
  cidr_block        = local.public[count.index]
  availability_zone = local.zone[count.index % length(local.zone)]

  tags = {
    "Name" = "public-subnet"
  }
}

resource "aws_internet_gateway" "ig" {
  vpc_id = aws_vpc.vpc.id

  tags = {
    "Name" = "custom"
  }
}

resource "aws_route_table" "public" {
  vpc_id = aws_vpc.vpc.id

  route {
    cidr_block = "0.0.0.0/0"
    gateway_id = aws_internet_gateway.ig.id
  }

  tags = {
    "Name" = "public"
  }
}

resource "aws_route_table_association" "public_association" {
  for_each       = { for k, v in aws_subnet.public_subnet : k => v }
  subnet_id      = each.value.id
  route_table_id = aws_route_table.public.id
}

resource "aws_eip" "nat" {
  domain = "vpc"
}

resource "aws_nat_gateway" "public" {
  depends_on = [aws_internet_gateway.ig]

  allocation_id = aws_eip.nat.id
  subnet_id     = aws_subnet.public_subnet[0].id

  tags = {
    Name = "Public NAT"
  }
}

resource "aws_route_table" "private" {
  vpc_id = aws_vpc.vpc.id

  route {
    cidr_block     = "0.0.0.0/0"
    nat_gateway_id = aws_nat_gateway.public.id
  }

  tags = {
    "Name" = "private"
  }
}

resource "aws_route_table_association" "public_private" {
  for_each       = { for k, v in aws_subnet.private_subnet : k => v }
  subnet_id      = each.value.id
  route_table_id = aws_route_table.private.id
}
So we’ve finished writing the code. Next we run apply to create the infrastructure.
terraform apply -auto-approve
...
Plan: 18 to add, 0 to change, 0 to destroy.
...
Apply complete! Resources: 18 added, 0 changed, 0 destroyed.
As we can see, using Terraform to create a VPC is fairly simple. But every time we want to create another VPC, do we have to copy this whole pile of code elsewhere? The answer is no!
To solve the code-organization problem, Terraform gives us a feature called Modules, which helps us organize code into modules that can be reused many times.
Remember to destroy the resources.
terraform destroy -auto-approve
At this point you can relax and bookmark this article to continue later, because the next part is also fairly long.
Terraform Module
A Terraform Module is a feature of Terraform that lets us organize code in one place and use it in many different places.
When we talk about a module, we can think of it as a small piece of a larger picture; we assemble many of these small pieces together to form the final picture, like playing with LEGO.
The structure of a module
A basic module consists of these 3 files:
main.tfcontains the codevariables.tfcontains the module’s input valuesoutputs.tfcontains the module’s output values
There are also a few other, non-required files such as providers.tf and versions.tf. See the full structure here: Standard Module Structure.
Using a module
To use a module, we use a resource named module.
module <module_name> {
  source = <source>
  version = <version>

  input_one = <input_one>
  input_two = <input_two>
}
<source> can be a path on our machine or a URL, <version> specifies the module’s version, and <input_one> are the input values we define in the variables.tf file.
Writing a module
Now we’ll restructure our code above into a module. Before writing a module, we need to define which values in the module are dynamic, so that when we use the module we pass those values in to get different resources.
For example above, the dynamic values we need to pass into our VPC module are:
- vpc_cidr_block
- subnet_cidr_block and zone
We create a directory with the following structure.
.
├── main.tf
└── vpc
    ├── main.tf
    ├── outputs.tf
    └── variables.tf
We define the module’s input values in the variables.tf file.
variable "vpc_cidr_block" {
  type    = string
  default = "10.0.0.0/16"
}

variable "private_subnet" {
  type    = list(string)
}

variable "public_subnet" {
  type    = list(string)
}

variable "availability_zone" {
  type    = list(string)
}
Update the code in the VPC’s main.tf file.
resource "aws_vpc" "vpc" {
  cidr_block           = var.vpc_cidr_block
  enable_dns_hostnames = true

  tags = {
    "Name" = "custom"
  }
}

resource "aws_subnet" "private_subnet" {
  count = length(var.private_subnet)

  vpc_id            = aws_vpc.vpc.id
  cidr_block        = var.private_subnet[count.index]
  availability_zone = var.availability_zone[count.index % length(var.availability_zone)]

  tags = {
    "Name" = "private-subnet"
  }
}

resource "aws_subnet" "public_subnet" {
  count = length(var.public_subnet)

  vpc_id            = aws_vpc.vpc.id
  cidr_block        = var.public_subnet[count.index]
  availability_zone = var.availability_zone[count.index % length(var.availability_zone)]

  tags = {
    "Name" = "public-subnet"
  }
}

resource "aws_internet_gateway" "ig" {
  vpc_id = aws_vpc.vpc.id

  tags = {
    "Name" = "custom"
  }
}

resource "aws_route_table" "public" {
  vpc_id = aws_vpc.vpc.id

  route {
    cidr_block = "0.0.0.0/0"
    gateway_id = aws_internet_gateway.ig.id
  }

  tags = {
    "Name" = "public"
  }
}

resource "aws_route_table_association" "public_association" {
  for_each       = { for k, v in aws_subnet.public_subnet : k => v }
  subnet_id      = each.value.id
  route_table_id = aws_route_table.public.id
}

resource "aws_eip" "nat" {
  domain = "vpc"
}

resource "aws_nat_gateway" "public" {
  depends_on = [aws_internet_gateway.ig]

  allocation_id = aws_eip.nat.id
  subnet_id     = aws_subnet.public_subnet[0].id

  tags = {
    Name = "Public NAT"
  }
}

resource "aws_route_table" "private" {
  vpc_id = aws_vpc.vpc.id

  route {
    cidr_block     = "0.0.0.0/0"
    nat_gateway_id = aws_nat_gateway.public.id
  }

  tags = {
    "Name" = "private"
  }
}

resource "aws_route_table_association" "public_private" {
  for_each       = { for k, v in aws_subnet.private_subnet : k => v }
  subnet_id      = each.value.id
  route_table_id = aws_route_table.private.id
}
Now, when we use this VPC module, we only need to pass in different input values to get different VPCs. In the outermost main.tf file we use the module like so.
...

provider "aws" {
  region = "us-west-2"
}

module "vpc" {
  source = "./vpc"

  vpc_cidr_block    = "10.0.0.0/16"
  private_subnet    = ["10.0.1.0/24", "10.0.2.0/24", "10.0.3.0/24"]
  public_subnet     = ["10.0.4.0/24", "10.0.5.0/24", "10.0.6.0/24"]
  availability_zone = ["us-west-2a", "us-west-2b", "us-west-2c"]
}
Our code is much cleaner when using a module. Let’s run plan to check whether our module is written correctly.
terraform plan
...
Plan: 18 to add, 0 to change, 0 to destroy.
...
If it prints the line above, our module is written correctly, and you can run apply to see.
Pushing a module online
Next we’ll push our module online so everyone can use it. To create a module we need a GitHub account and access to https://registry.terraform.io.
Log into GitHub and create a Public repository, whose name must be in the format terraform-<PROVIDER>-<NAME>, then copy the 3 files from the vpc directory and push them to that GitHub repository. For example, I create a repository named terraform-aws-vpc.
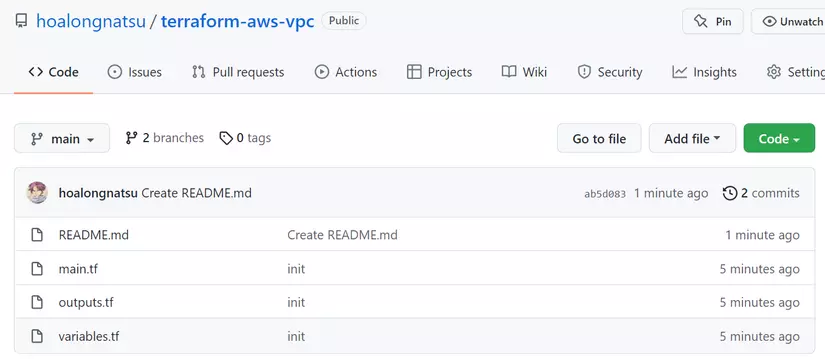
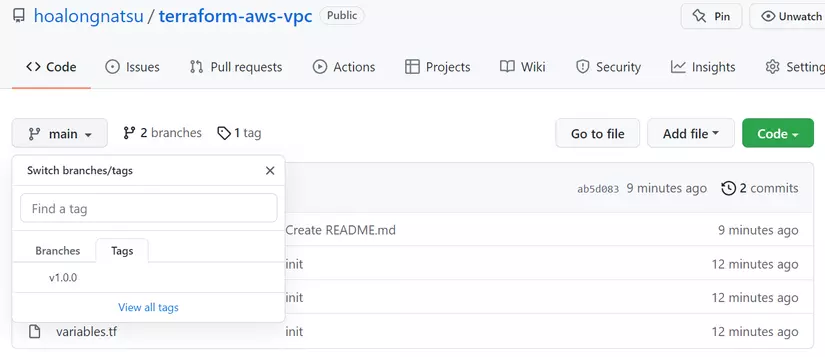
Then we need to create a Tag for this repository, corresponding to the module’s version.
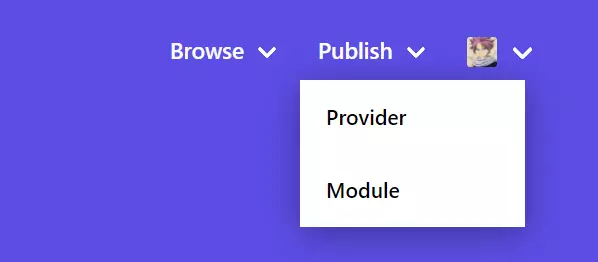
Then visit the Registry page above. After you log in, there’s a Publish menu; click it and choose Module.
Then it takes us to a page to choose the module to publish; choose VPC.
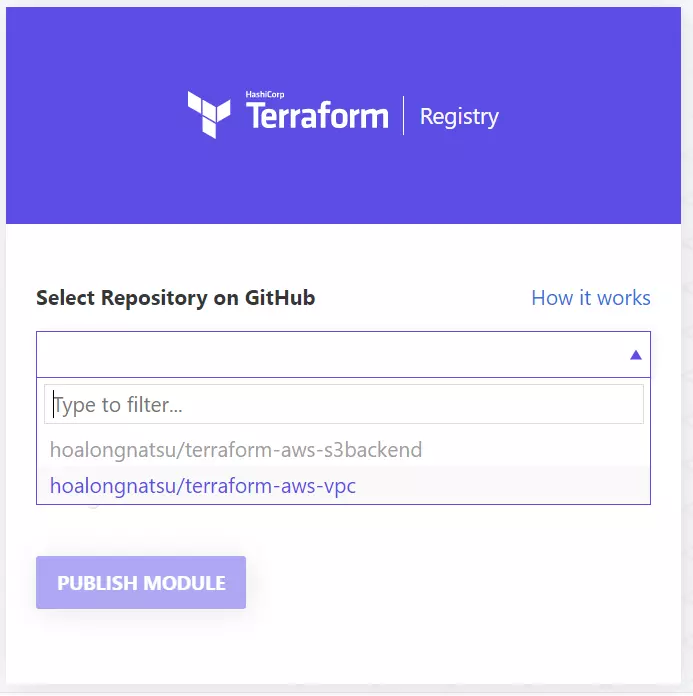
Then click Publish Module and we’ll see our module.
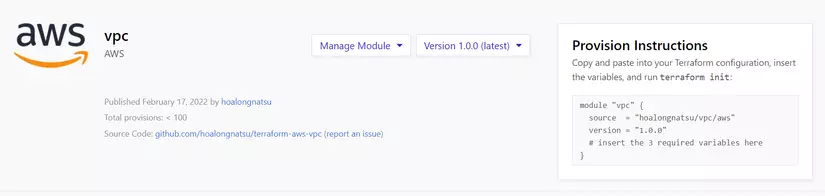
On the right there are instructions for using this module. Now if we want to create a VPC we use the module like so.
module "vpc" {
  source  = "hoalongnatsu/vpc/aws"
  version = "1.0.0"

  vpc_cidr_block    = "10.0.0.0/16"
  private_subnet    = ["10.0.1.0/24", "10.0.2.0/24", "10.0.3.0/24"]
  public_subnet     = ["10.0.4.0/24", "10.0.5.0/24", "10.0.6.0/24"]
  availability_zone = ["us-west-2a", "us-west-2b", "us-west-2c"]
}
Popular modules
Above we wrote code for learning purposes, but for a real production environment we should use modules already available online, since they’re written much more carefully than ours and cover many more cases than we could write ourselves.
For example, for the VPC above we could use an existing module, terraform-aws-modules/vpc/aws.
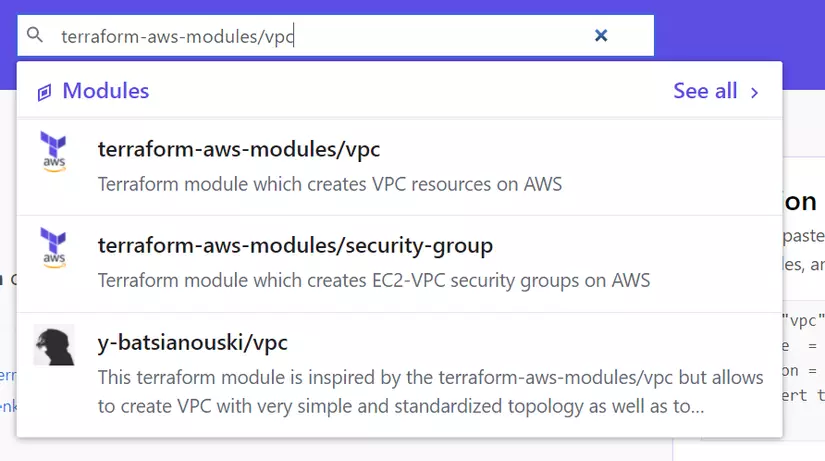
They provide us with many cases. For example, creating a VPC for AWS Kubernetes using the existing module.
module "vpc" {
  source  = "terraform-aws-modules/vpc/aws"
  version = "~> 5.0"

  name = var.cluster_name
  cidr = "10.0.0.0/16"

  azs              = ["${var.region}a", "${var.region}b", "${var.region}c"]
  private_subnets  = ["10.0.1.0/24", "10.0.2.0/24", "10.0.3.0/24"]
  public_subnets   = ["10.0.4.0/24", "10.0.5.0/24", "10.0.6.0/24"]
  database_subnets = ["10.0.7.0/24", "10.0.8.0/24"]

  enable_nat_gateway     = true
  single_nat_gateway     = true
  one_nat_gateway_per_az = false
  enable_dns_hostnames   = true

  # Create a dedicated subnet group / route table for RDS.
  create_database_subnet_group       = true
  create_database_subnet_route_table = true

  # For modern EKS, subnet tags no longer need the cluster name — the
  # role tags below are enough for the AWS Load Balancer Controller.
  public_subnet_tags = {
    "kubernetes.io/role/elb" = 1
  }

  private_subnet_tags = {
    "kubernetes.io/role/internal-elb" = 1
  }

  tags = local.tags
}
Writing so many cases ourselves would be exhausting, not to mention testing and all sorts of other fiddly work that takes a lot of time. So before doing anything, search online to see whether someone has already written that module — it saves us a lot of time.
The GitHub repo for the whole series: Terraform Series.
Conclusion
So we’ve learned how to write code from scratch and then organize it into a module, how to publish a module online, and how to use existing modules. Modules let us reuse existing code and avoid writing the same code over and over. In the next part we’ll continue with modules and go deeper through an example of creating a VPC, an Autoscaling Group, and a Load Balancer on AWS.