In the previous part we learned about the lifecycle of a resource in Terraform. In this part we’ll learn how to program in Terraform.
Terraform lets us program in a functional programming style.
Creating an EC2
We’ll use an EC2 example to learn programming concepts in Terraform. Create a file named main.tf:
terraform {
  required_version = ">= 1.9"

  required_providers {
    aws = {
      source  = "hashicorp/aws"
      version = "~> 6.0"
    }
  }
}

provider "aws" {
  region = "us-west-2"
}

data "aws_ami" "ubuntu" {
  most_recent = true
  owners      = ["099720109477"]

  filter {
    name   = "name"
    values = ["ubuntu/images/hvm-ssd-gp3/ubuntu-noble-24.04-amd64-server-*"]
  }
}

resource "aws_instance" "hello" {
  ami           = data.aws_ami.ubuntu.id
  instance_type = "t3.micro"
}
Run terraform init and terraform apply, then on AWS we’ll see our EC2. With the code above, our EC2 always has instance_type = t3.micro. What if we want to recreate the EC2 with a different instance_type? Edit the code in the Terraform file? That’s not very flexible; instead we’ll use variables (called variable in programming) for this.
Declaring input variables
We can define a variable for Terraform with the syntax below:
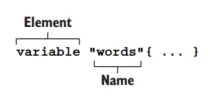
This is the variable block syntax for declaring a variable. In the example above, we create another file named variable.tf (you can name it anything) to declare our variable.
variable "instance_type" {
  type = string
  description = "Instance type of the EC2"
}
The type attribute specifies the variable’s data type, and the description attribute records a description so readers know what it means. Only the type attribute is required. In Terraform, a variable has the following data types:
- Basic Type: string, number, bool
- Complex Type: list(), set(), map(), object(), tuple()
In Terraform, the number and bool data types are converted to string when necessary. That is, 1 becomes “1” and true becomes “true”.
We use the syntax var.<VARIABLE_NAME> to access a variable’s value. Update the main.tf file:
provider "aws" {
  region = "us-west-2"
}

data "aws_ami" "ubuntu" {
  most_recent = true
  owners      = ["099720109477"]

  filter {
    name   = "name"
    values = ["ubuntu/images/hvm-ssd-gp3/ubuntu-noble-24.04-amd64-server-*"]
  }
}

resource "aws_instance" "hello" {
  ami           = data.aws_ami.ubuntu.id
  instance_type = var.instance_type # change here
}
For the instance_type attribute, instead of hard-coding it we now use the variable var.instance_type.
Assigning values to variables
To assign a value to a variable, we create a file named terraform.tfvars.
instance_type = "t3.micro"
When we run terraform apply, Terraform uses the terraform.tfvars file to load default values for variables. If we don’t want to use the defaults, we add the -var-file attribute when running apply. Create a file named production.tfvars.
instance_type = "t3.small"
When running CI/CD for production, we specify the file like so:
terraform apply -var-file="production.tfvars"
Now our instance_type value is much more flexible.
Validating a variable
We can also define a variable so it can only be assigned values we allow by using the validation attribute, like so:
variable "instance_type" {
  type        = string
  description = "Instance type of the EC2"

  validation {
    condition     = contains(["t3.micro", "t3.small"], var.instance_type)
    error_message = "instance_type must be one of: t3.micro, t3.small."
  }
}
In the file above we use the contains function to check that the value of the instance_type variable is only within the array we allow; otherwise, when we run apply we’ll see the error in the error_message field. Edit the terraform.tfvars file to a disallowed (previous-generation) type.
instance_type = "t2.micro"
Run apply.
terraform apply
╷
│ Error: Invalid value for variable
│
│   on variable.tf line 1:
│    1: variable "instance_type" {
│
│ instance_type must be one of: t3.micro, t3.small.
│
│ This was checked by the validation rule at variable.tf:5,3-13.
╵
Use validation to control the variable value you want. Change the terraform.tfvars file back. Usually after creating an EC2, we want to see its IP; to do that we use the output block.
Output values
The value of an output block is printed to the terminal, with the following syntax:
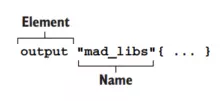
To print the EC2’s public_ip value, we add the following code to main.tf:
...

output "ec2" {
  value = {
    public_ip = aws_instance.hello.public_ip
  }
}
Run apply again and we’ll see the EC2’s IP printed to the terminal.
terraform apply -auto-approve
...

Apply complete! Resources: 1 added, 0 changed, 0 destroyed.

Outputs:

ec2 = {
  "public_ip" = "52.36.124.230"
}
Now we know how to use variables and output. Next, what if we want to add another EC2? In main.tf we’d copy out another EC2.
provider "aws" {
  region = "us-west-2"
}

data "aws_ami" "ubuntu" {
  most_recent = true
  owners      = ["099720109477"]

  filter {
    name   = "name"
    values = ["ubuntu/images/hvm-ssd-gp3/ubuntu-noble-24.04-amd64-server-*"]
  }
}

resource "aws_instance" "hello1" {
  ami           = data.aws_ami.ubuntu.id
  instance_type = var.instance_type
}

resource "aws_instance" "hello2" {
  ami           = data.aws_ami.ubuntu.id
  instance_type = var.instance_type
}

output "ec2" {
  value = {
    public_ip1 = aws_instance.hello1.public_ip
    public_ip2 = aws_instance.hello2.public_ip
  }
}
We add a resource block for the second EC2, and in the output section we update it to print both EC2s’ IPs. Nothing complex, but what if we now want to create 100 EC2s? We could copy out 100 resource blocks, but nobody does that — instead we use the count attribute.
The count attribute
The count attribute is a Meta Argument — an attribute of Terraform rather than of a provider’s resource type. In part 1 we said a resource type only contains the attributes the provider offers, whereas a Meta Argument is a Terraform attribute, meaning we can use it in any resource block. Update main.tf to create 5 EC2s.
provider "aws" {
  region = "us-west-2"
}

data "aws_ami" "ubuntu" {
  most_recent = true
  owners      = ["099720109477"]

  filter {
    name   = "name"
    values = ["ubuntu/images/hvm-ssd-gp3/ubuntu-noble-24.04-amd64-server-*"]
  }
}

resource "aws_instance" "hello" {
  count         = 5
  ami           = data.aws_ami.ubuntu.id
  instance_type = var.instance_type
}

output "ec2" {
  value = {
    public_ip1 = aws_instance.hello[0].public_ip
    public_ip2 = aws_instance.hello[1].public_ip
    public_ip3 = aws_instance.hello[2].public_ip
    public_ip4 = aws_instance.hello[3].public_ip
    public_ip5 = aws_instance.hello[4].public_ip
  }
}
Now when we run apply, Terraform creates 5 EC2s for us. Notice that in the output, to access a resource we use [] and the resource’s index value. Normally to access a resource we use the syntax <RESOURCE TYPE>.<NAME>, but when we use count we access the resource with the syntax <RESOURCE TYPE>.<NAME>[index].
countis great for identical copies, but because resources are tracked by index ([0],[1], …), removing an item in the middle shifts every later resource and can trigger avoidable replacements. When each instance has a stable identity (a name, an AZ, a map key), prefer thefor_eachmeta-argument, which keys resources by a string instead of a positional index.
Now we’ve solved copying resources when we need to create many of them, but in the output section we still have to write out each resource individually. We’ll solve that using the for expression.
The for expression
for lets us iterate over a list. The syntax of for:
for <value> in <list> : <return value>
Examples using for:
- Create a new array whose values are uppercased:
[for s in var.words : upper(s)] - Create a new object whose values are uppercased:
{ for k, v in var.words : k => upper(v) }
We’ll use for to shorten the EC2 output. Update main.tf:
...

resource "aws_instance" "hello" {
  count         = 5
  ami           = data.aws_ami.ubuntu.id
  instance_type = var.instance_type
}

output "ec2" {
  value = {
    public_ip = [ for v in aws_instance.hello : v.public_ip ]
  }
}
The output above prints public_ip as an array of the IPs of all created EC2s. If you want to print the output in the form { public_ip1: <value>, public_ip2: <value> }, we can use the format function.
The format function
The format function helps us concatenate strings. Update output as follows:
...

resource "aws_instance" "hello" {
  count         = 5
  ami           = data.aws_ami.ubuntu.id
  instance_type = var.instance_type
}

output "ec2" {
  value = { for i, v in aws_instance.hello : format("public_ip%d", i + 1) => v.public_ip }
}
Run terraform plan to check and we’ll see the output is now in the form { public_ip1: <value>, public_ip2: <value> }.
terraform plan
...
Changes to Outputs:
  + ec2 = {
      + public_ip1 = (known after apply)
      + public_ip2 = (known after apply)
      + public_ip3 = (known after apply)
      + public_ip4 = (known after apply)
      + public_ip5 = (known after apply)
    }

────────────────────────────────────────────────────────────────────────────────

Note: You didn't use the -out option to save this plan, so Terraform can't guarantee to take exactly these actions if you
run "terraform apply" now.
Now the output value’s format is much easier to read.
Conclusion
So we’ve learned some simple ways to program in Terraform: use variable to hold variables, use output to display output values, and use for to iterate over arrays. In the next part we’ll learn a few more functions through an example of using Terraform to deploy a website to S3.