In the previous part we discussed what Infrastructure as Code is and why we should use Terraform, and we did a first simple Terraform example. In this part we’ll look in more detail at how to initialize a project directory and how to write configuration files for Terraform.
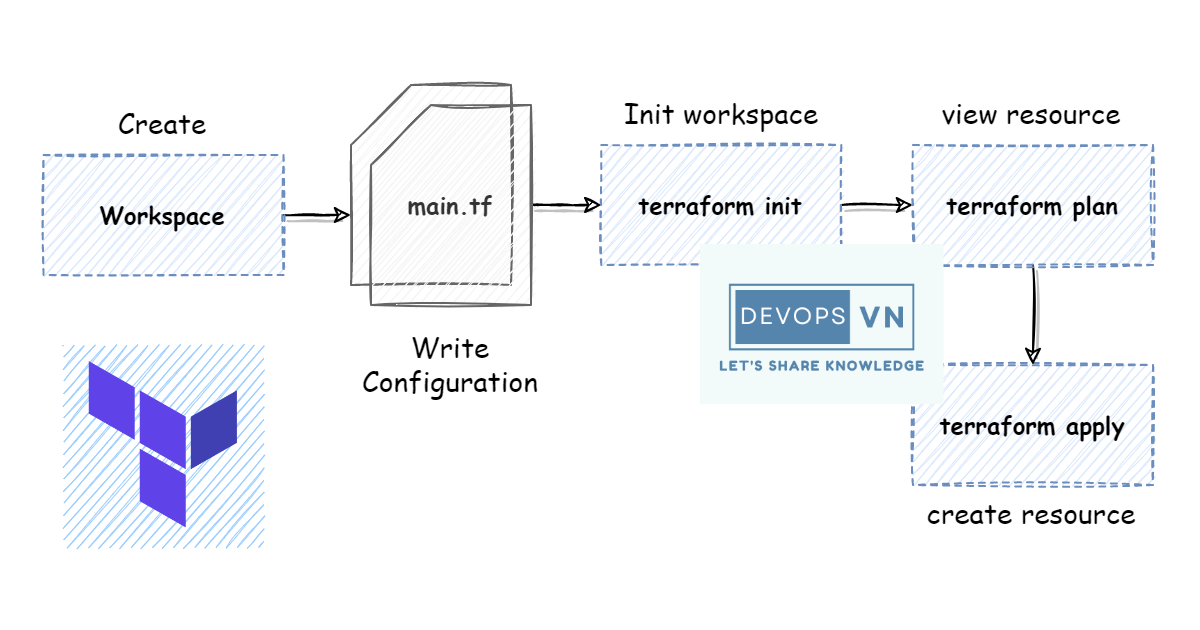
Continuing the simple example, we’ll create an EC2 on AWS Cloud. To create new infrastructure, we follow these steps: create a workspace → write the configuration file → initialize the workspace with terraform init → check which resources will be created with terraform plan → create the resources with terraform apply.
Creating a workspace and writing configuration
First we create a workspace, which is simply a directory. Create a directory named ec2, then create a file named main.tf (you can name it anything) inside the directory. Paste in the following code:
terraform {
  required_version = ">= 1.9"

  required_providers {
    aws = {
      source  = "hashicorp/aws"
      version = "~> 6.0"
    }
  }
}

provider "aws" {
  region = "us-west-2"
}

resource "aws_instance" "hello" {
  ami           = "ami-09dd2e08d601bff67"
  instance_type = "t3.micro"
  tags = {
    Name = "HelloWorld"
  }
}
The terraform block pins the Terraform and provider versions so the project is reproducible for everyone on the team and in CI. Next we run terraform init to download the aws provider into the current directory so Terraform can use these providers and call the AWS API to create resources for us. For the syntax and meaning of the Terraform configuration syntax above, see the previous part.
Initializing the workspace
terraform init
Initializing the backend...

Initializing provider plugins...
- Finding hashicorp/aws versions matching "~> 6.0"...
- Installing hashicorp/aws v6.55.0...
- Installed hashicorp/aws v6.55.0 (signed by HashiCorp)

Terraform has created a lock file .terraform.lock.hcl to record the provider
selections it made above. Include this file in your version control repository
so that Terraform can guarantee to make the same selections by default when
you run "terraform init" in the future.
...
After you run init, you’ll see a directory named .terraform is created — this holds the provider’s code. The directory structure after running init:
├── .terraform
│   └── providers
│       └── registry.terraform.io
│           └── hashicorp
│               └── aws
│                   └── 6.55.0
│                       └── darwin_arm64
│                           └── terraform-provider-aws_v6.55.0_x5
├── .terraform.lock.hcl
└── main.tf
Checking which resources will be created
After initializing the workspace, before creating the actual resources, we should review which resources will be created. This step isn’t required, but to be thorough you should run it, to check what the resources will look like before creating them on your real infrastructure. To check resources, run terraform plan.
terraform plan
Terraform used the selected providers to generate the following execution plan. Resource actions are indicated with the
following symbols:
  + create

Terraform will perform the following actions:

  # aws_instance.hello will be created
  + resource "aws_instance" "hello" {
      + ami                                  = "ami-09dd2e08d601bff67"
      + arn                                  = (known after apply)
      ...
    }

Plan: 1 to add, 0 to change, 0 to destroy.

───────────────────────────────────────────────────────────────────────────────

Note: You didn't use the -out option to save this plan, so Terraform can't guarantee to take exactly these actions if you
run "terraform apply" now.
When you run plan, Terraform shows which resources will be created. Near the bottom you’ll see Plan: 1 to add, 0 to change, 0 to destroy., meaning 1 resource will be added to our current infrastructure.
Besides showing which resources will be created, this command also checks the Terraform configuration file for syntax errors and reports an error if the syntax is wrong.
When there are too many resources and the
plancommand is slow, we can speed it up by adding the-parallelism=nattribute. For example:terraform plan -parallelism=2
If you need to save the result of the plan command, use the -out attribute. For example, we save the plan result in a JSON file.
terraform plan -out plan.out
terraform show -json plan.out > plan.json
Creating resources
After checking, to create the resources we run:
terraform apply
Terraform used the selected providers to generate the following execution plan. Resource actions are indicated with the
following symbols:
  + create

Terraform will perform the following actions:

  # aws_instance.hello will be created
  + resource "aws_instance" "hello" {
      + ami                                  = "ami-09dd2e08d601bff67"
      + arn                                  = (known after apply)
      ...
    }

Plan: 1 to add, 0 to change, 0 to destroy.

Do you want to perform these actions?
  Terraform will perform the actions described above.
  Only 'yes' will be accepted to approve.

  Enter a value:
When we run apply, Terraform first runs plan again to show us a preview of the resources, and then prompts us whether we want to create these resources. If so, enter yes — only when we enter this exact value will our resources be created.
If you’re wondering why apply also runs plan, then why bother running plan separately? These commands are actually designed for the CI/CD process. We can run plan first with the -out attribute to preview resources, then run apply with the result of the earlier plan, like so:
First, run a job to check the resources.
terraform plan -out plan.out
If everything is OK, the job above succeeds and next we run the job to create the resources.
terraform apply "plan.out"
OK, back to the apply command above, enter yes so it creates the EC2 on AWS for us.
...
Plan: 1 to add, 0 to change, 0 to destroy.

Do you want to perform these actions?
  Terraform will perform the actions described above.
  Only 'yes' will be accepted to approve.

  Enter a value: yes

aws_instance.hello: Creating...
aws_instance.hello: Still creating... [10s elapsed]
aws_instance.hello: Still creating... [20s elapsed]
aws_instance.hello: Still creating... [30s elapsed]
aws_instance.hello: Still creating... [40s elapsed]
aws_instance.hello: Creation complete after 42s [id=i-0c0285db1ffe968a2]

Apply complete! Resources: 1 added, 0 changed, 0 destroyed.
When it finishes, you’ll see a new file created: terraform.tfstate.
.
├── .terraform
│   └── providers
│       └── registry.terraform.io
│           └── hashicorp
│               └── aws
│                   └── 6.55.0
│                       └── darwin_arm64
│                           └── terraform-provider-aws_v6.55.0_x5
├── .terraform.lock.hcl
├── main.tf
└── terraform.tfstate
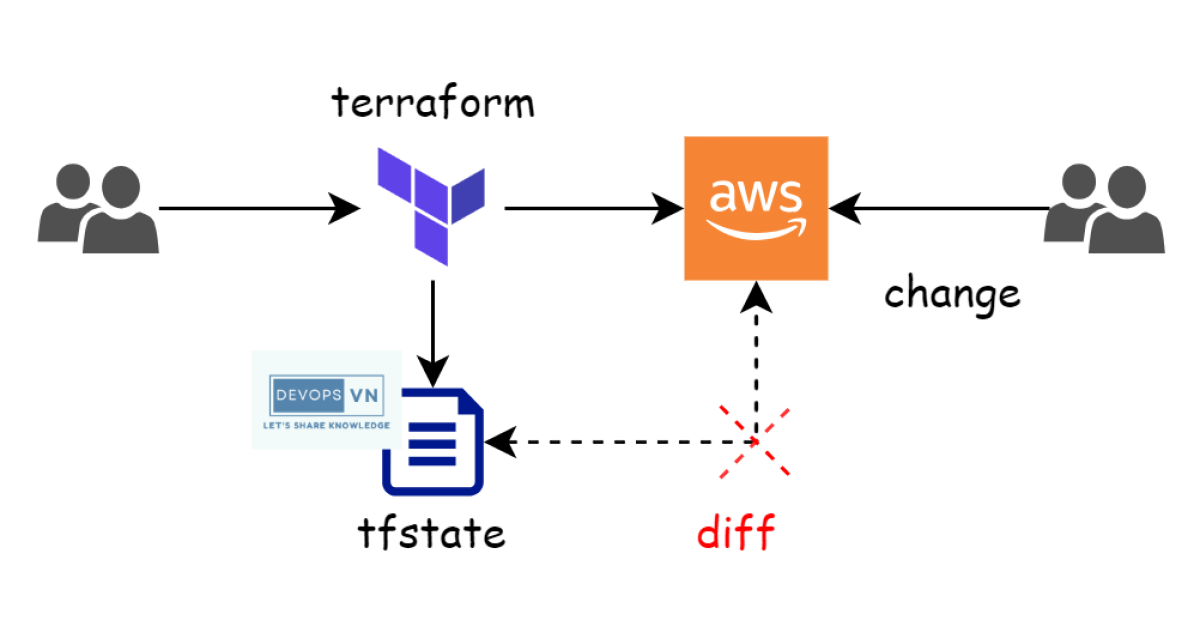
This is the file Terraform uses to record the state of all our resources, so it can manage and track all resources in the infrastructure. If you open it, you’ll see it stores the EC2’s values.
{
  "version": 4,
  "terraform_version": "1.11.3",
  "serial": 1,
  "lineage": "fa28c290-92d6-987f-c49d-bc546b296c2b",
  "outputs": {},
  "resources": [
    {
      "mode": "managed",
      "type": "aws_instance",
      "name": "hello",
      "provider": "provider[\"registry.terraform.io/hashicorp/aws\"]",
      "instances": [
        {
          "schema_version": 1,
          "attributes": {
            "ami": "ami-09dd2e08d601bff67",
            ...
}
We’ve finished creating an EC2 on AWS. To delete the resource, run terraform destroy. When you run it, it also runs plan first to list the resources it will delete and asks whether you want to delete them; enter yes and Terraform deletes the EC2 for us. After Terraform finishes, open the terraform.tfstate file and you’ll see the resources field is now empty.
{
  "version": 4,
  "terraform_version": "1.11.3",
  "serial": 3,
  "lineage": "fa28c290-92d6-987f-c49d-bc546b296c2b",
  "outputs": {},
  "resources": []
}
Those are the steps we need to perform to create new infrastructure. Besides using the resource block to create infrastructure, Terraform provides another block used to query and look up data on AWS. This block helps us create infrastructure much more flexibly instead of hard-coding resource values. For example, above, the EC2’s ami field is hard-coded to ami-09dd2e08d601bff67; to know this value we’d have to look it up on AWS, and if we use this value, whoever reads it won’t know what kind of AMI it is.
The data block
Terraform provides a block named data, used to call the API to our infrastructure through our provider and retrieve information about a resource — this block does not create resources on the infrastructure. We update the main.tf file as follows:
provider "aws" {
  region = "us-west-2"
}

data "aws_ami" "ubuntu" {
  most_recent = true
  owners      = ["099720109477"] # Canonical's AWS account id

  filter {
    name   = "name"
    values = ["ubuntu/images/hvm-ssd-gp3/ubuntu-noble-24.04-amd64-server-*"]
  }

  filter {
    name   = "virtualization-type"
    values = ["hvm"]
  }
}

resource "aws_instance" "hello" {
  ami           = data.aws_ami.ubuntu.id
  instance_type = "t3.micro"
  tags = {
    Name = "HelloWorld"
  }
}
In the configuration above, we use the data block to call the API to AWS Cloud and retrieve information about the AMI (Amazon Machine Images) — here the latest Ubuntu 24.04 LTS (Noble) image — then in the resource block below we change the ami field to the id value we obtained from the block above. The syntax of the data block:
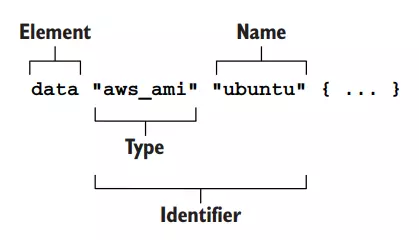
When you run plan, you’ll see the Plan line near the bottom still shows only 1 resource to be added, since the data block doesn’t create a resource; and the AMI field prints the value obtained from the data block.
terraform plan
Terraform used the selected providers to generate the following execution plan. Resource actions are indicated with the
following symbols:
  + create

Terraform will perform the following actions:

  # aws_instance.hello will be created
  + resource "aws_instance" "hello" {
      + ami                                  = "ami-0892d3c7ee96c0bf7"
      ...
    }

Plan: 1 to add, 0 to change, 0 to destroy.

───────────────────────────────────────────────────────────────────────────────

Note: You didn't use the -out option to save this plan, so Terraform can't guarantee to take exactly these actions if you
run "terraform apply" now.
Illustrated as follows.
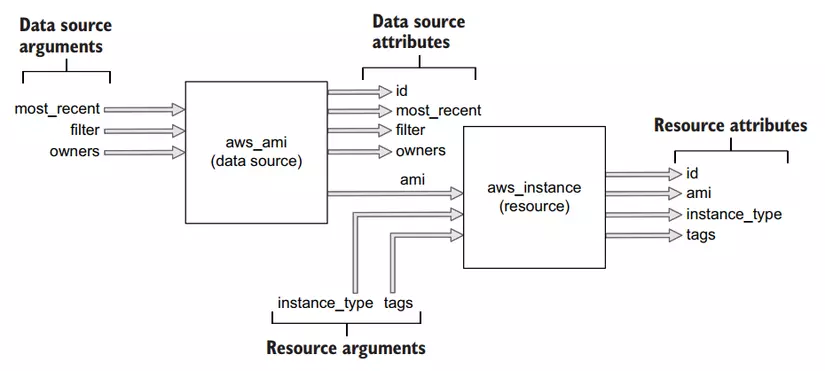
Using the data block makes writing code more flexible.
Conclusion
So now we know how to write Terraform configuration and which commands to run so Terraform can create resources on our infrastructure. To understand better how Terraform creates resources, in the next part we’ll talk about the lifecycle of a resource in Terraform.