A Kubernetes resource is only a declaration until an API server receives it. The Deployment in
Chapter 1 describes two web-server Pods, but a laptop does not become a Kubernetes cluster by
installing kubectl alone. It needs a control plane, nodes, and a container runtime that can
run the node software.
This chapter creates that environment locally with Kind. By the end, you will have a two-node
Kubernetes cluster running on your machine, confirm that kubectl is talking to the intended
cluster, run the Chapter 1 Deployment, and remove the cluster when you are finished. Docker
runs the Kind node containers. The container runtime inside each node then runs the Pods
scheduled by Kubernetes. Docker is therefore a local dependency of Kind, not a replacement for
Kubernetes.
Basics is not required; this chapter introduces the Docker behavior that Kind relies on.
Code for this chapter. The Kind configuration and README are in _resource/kubernetes-basics/02-create-a-local-cluster-with-kind.
What Kind Creates
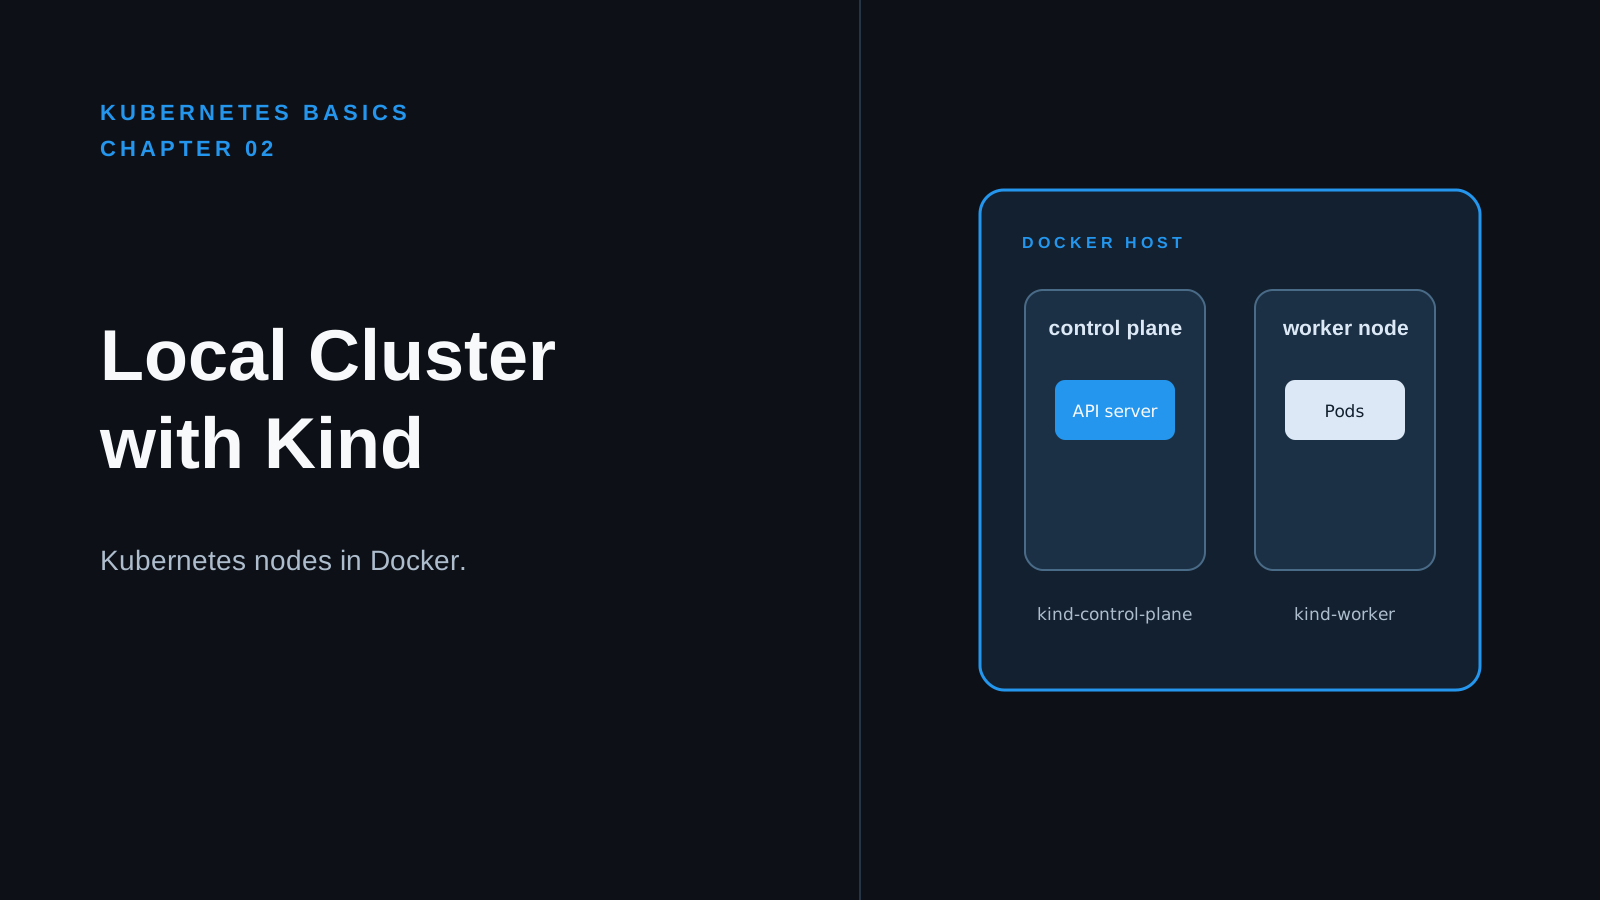
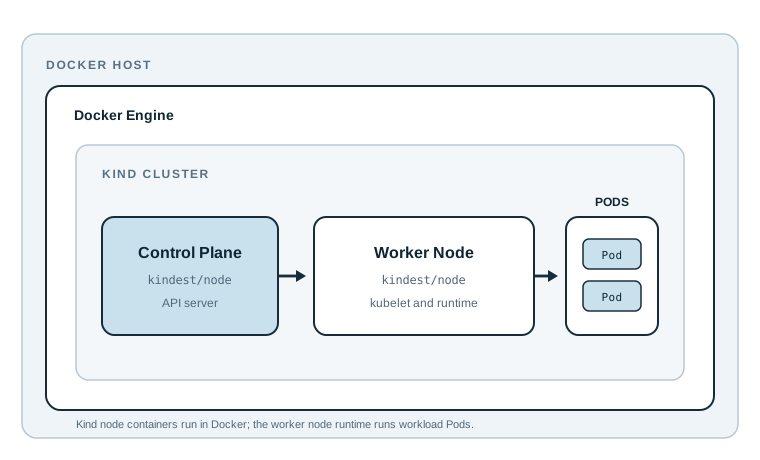
Kind means Kubernetes IN Docker. It creates Kubernetes node machines as Docker containers. Each node container runs the Kubernetes components that would normally run on a virtual machine or physical server. In this chapter, one container is the control-plane node and one is a worker node.
This is a useful local-development tradeoff. Docker starts the node containers quickly and removes them cleanly, so a cluster is inexpensive to recreate. The cluster is still real Kubernetes: it has an API server, schedules Pods, and stores resources. The nodes are only containers, though. They do not reproduce a cloud provider’s load balancers, managed identity, storage behavior, or multi-machine network failures.
Docker runs the Kind node containers. The container runtime inside each node then runs the Pods
scheduled by Kubernetes. kubectl talks to the API server in the control-plane node; the
scheduler can assign workload Pods to the worker node. Docker is therefore a local dependency of
Kind, not a replacement for Kubernetes.
Install the Required Tools
The cluster needs three tools:
| Tool | Purpose | Check |
|---|---|---|
| Docker | Runs the Kind node containers. | docker version must show a Server section. |
| Kind | Creates, lists, and deletes local clusters. | kind version prints a version. |
kubectl |
Sends requests to the Kubernetes API. | kubectl version --client prints a client version. |
Install Docker Desktop from Docker’s official installation page.
Start Docker Desktop and wait until it reports that the engine is running before creating a
cluster. On Linux, Docker Engine is also suitable when the current user can run docker without
sudo; use Docker’s Engine installation documentation
for the distribution-specific setup.
On macOS, Homebrew provides the remaining command-line tools:
brew install kind kubectl
This installs the kind and kubectl commands; it does not create a cluster or start Docker.
The checks later in this section confirm that both commands are available.
On Windows, install Docker Desktop, then run the following in an elevated PowerShell session:
winget install -e --id Kubernetes.kind
winget install -e --id Kubernetes.kubectl
On Linux, package names vary by distribution. Use the official Kind installation guide and kubectl installation guide rather than copying a package command intended for another distribution. Both guides publish version-specific binary downloads and checksum instructions when a package manager is not appropriate.
Run these checks after installation:
docker version
kind version
kubectl version --client
docker version must show both Client and Server sections. A client-only result means the
Docker command is installed but its engine is not running. kind version and kubectl version
--client only check that the commands are available; they do not need a cluster yet.
Warning: Kind cannot create nodes when Docker is stopped or inaccessible. On Linux, adding a user to the
dockergroup grants that user root-equivalent access to the Docker daemon. Follow Docker’s post-install guidance and understand that security tradeoff before doing it.
Define the Local Cluster
Create a working directory and use the configuration from this chapter’s resource folder:
git clone https://github.com/VersusControl/devops-vn-blog.git
cd devops-vn-blog/_resource/kubernetes-basics/02-create-a-local-cluster-with-kind
git clone downloads the chapter configuration and the Chapter 1 Deployment into the same
repository. cd makes this chapter’s resource directory the working directory, so
kind-config.yaml and the later relative path to the Deployment resolve as written. If the
repository is already present, skip the clone and change to this directory in the existing copy.
The complete kind-config.yaml file is deliberately small:
kind: Cluster
apiVersion: kind.x-k8s.io/v1alpha4
nodes:
  - role: control-plane
  - role: worker
kind: Cluster and apiVersion identify this as a Kind configuration. The nodes list asks
Kind for two Docker containers. The control-plane node hosts the API server and other
cluster-management components. The worker node is an additional scheduling target for Pods.
A one-node configuration is enough for simple experiments, but two nodes make node inspection
meaningful and show that the control plane and workload capacity are separate roles. No
extraPortMappings appear here because the Chapter 1 Deployment is not exposed outside the
cluster. Adding a host port before a Service needs it creates configuration without a use.
Create and Verify the Cluster
Run Kind from the directory containing the configuration:
kind create cluster --name kubernetes-basics --config kind-config.yaml
--name kubernetes-basics gives the cluster a predictable name for later kubectl and Kind
commands. --config kind-config.yaml tells Kind to use the two-node definition instead of its
one-node default.
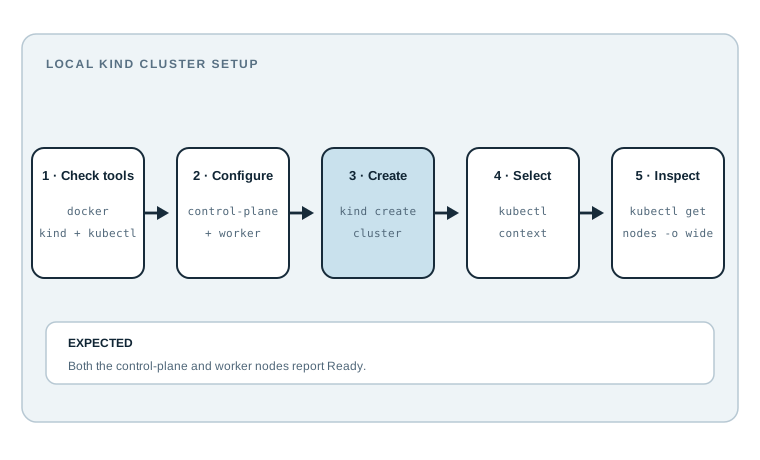
Kind pulls its node image when it is not already cached, creates the two Docker containers, and waits for the control plane to become ready. The command should end with output similar to:
Set kubectl context to "kind-kubernetes-basics"
You can now use your cluster with:

kubectl cluster-info --context kind-kubernetes-basics
Kind writes cluster access details to the standard kubeconfig file, normally ~/.kube/config,
and sets the current context to kind-kubernetes-basics. A context names a cluster, a user,
and an optional namespace for kubectl. Checking it prevents commands from landing on another
cluster that happens to be configured on the same machine.
kubectl config current-context
kubectl cluster-info
kubectl get nodes -o wide
kind get clusters
The first command should print kind-kubernetes-basics. kubectl cluster-info should report
the control plane address. kubectl get nodes -o wide should show the two configured nodes with
Ready in the STATUS column: kubernetes-basics-control-plane and
kubernetes-basics-worker. kind get clusters should list kubernetes-basics. A node can be
present but NotReady while its local networking and system Pods are still starting, so wait for
Ready before treating a workload failure as a manifest problem.
You can inspect the Docker layer too:
docker ps --filter label=io.x-k8s.kind.cluster=kubernetes-basics
The output should show two containers. Their names resemble the node names above. Do not delete
these containers with docker rm; Kind owns their lifecycle, and deleting one creates a broken
cluster rather than a useful Kubernetes failure exercise.
Run the Chapter 1 Deployment
The resource from Chapter 1 is a Deployment that requests two nginx Pods. Apply that existing
file after the context check succeeds:
kubectl apply \
  -f ../01-what-is-kubernetes/hello-web-deployment.yaml
kubectl rollout status deployment/hello-web
kubectl get deployment hello-web
kubectl get pods -l app=hello-web -o wide
The path is relative to this chapter’s resource directory. kubectl apply sends the Deployment
to the Kind API server. The rollout command waits until both replicas are ready. The Deployment
should show 2/2 ready replicas, and the Pod listing should show two Running Pods. The NODE
column shows where Kubernetes scheduled each Pod; placement can differ between runs.
This local cluster is appropriate for learning resource behavior and testing manifests. It is not a production Kubernetes design. Production clusters need decisions about high availability, upgrades, identity, network policy, persistent storage, backups, resource limits, and monitoring. Kind removes its node containers during cleanup, so data stored only in the cluster should be treated as disposable.
Diagnose Common Failures
Docker Is Not Running
kind create cluster can fail with a message that it cannot connect to the Docker daemon. Start
Docker Desktop, wait for its engine to become ready, then run docker version again. On Linux,
also confirm that the current user has permission to use Docker. Do not retry the Kind command
until docker version reports a Server section.
kubectl Uses the Wrong Cluster
If kubectl get nodes shows unexpected nodes, or an API connection error points to a cluster you
did not create, inspect the active context:
kubectl config get-contexts
kubectl config use-context kind-kubernetes-basics
kubectl config current-context
The last command must print kind-kubernetes-basics before applying resources. This is a common
problem on machines that also have Docker Desktop Kubernetes, a work cluster, or another Kind
cluster configured.
Nodes Stay NotReady
Run these commands to collect the state Kind and Kubernetes can report:
kind get clusters
docker ps --filter label=io.x-k8s.kind.cluster=kubernetes-basics
kubectl get nodes
kind export logs --name kubernetes-basics ./kind-logs
The first two checks distinguish a missing Kind cluster from a missing Docker node container.
kubectl get nodes shows whether the API server responds and whether nodes registered. kind
export logs writes diagnostics to ./kind-logs; inspect that directory before deleting the
cluster. Image downloads, a stopped Docker engine, and low available CPU, memory, or disk space
are common local causes.
Pods Remain Pending or ImagePullBackOff
Pending means Kubernetes has not scheduled a Pod. ImagePullBackOff means a node cannot pull
the image after previous attempts failed. Describe the Pod before changing the manifest:
kubectl get pods -l app=hello-web
kubectl describe pod -l app=hello-web
The Events section explains the immediate reason, such as insufficient local resources or an unreachable image registry. If Docker has too little CPU, memory, or disk assigned, increase its resources, recreate the cluster, and apply the Deployment again. A local network or registry problem is different from a Kubernetes YAML error, so the event message determines the next fix.
Clean Up
Delete the example Deployment first when you want to keep the cluster for more practice:
kubectl delete -f ../01-what-is-kubernetes/hello-web-deployment.yaml
Delete the whole cluster when you no longer need it:
kind delete cluster --name kubernetes-basics
kind get clusters
The delete command removes the Kind node containers and their cluster state. The final listing
should no longer include kubernetes-basics. It does not remove the kind or kubectl binaries,
Docker Desktop, or other Kubernetes contexts in your kubeconfig.
Summary
- Kind creates Kubernetes nodes as Docker containers, which makes local clusters quick to create and discard.
- Docker runs the Kind nodes, Kind creates the cluster, and
kubectlcommunicates with its API server. - The two-node configuration provides a control plane and a worker node without adding network configuration that this chapter does not use.
kubectl config current-contextandkubectl get nodesconfirm both the target cluster and its node readiness before applying a resource.- The Chapter 1 Deployment runs unchanged on Kind, while
kind delete clusterremoves the local environment when the experiment is complete.
The cluster is now ready for the next Kubernetes resources in this series.