For easier management and deployment, we usually don’t write Kubernetes resource files directly — instead we package them and use Helm to manage them. For example, to deploy Redis in master-slave mode by writing plain YAML for each resource:
apiVersion: apps/v1
kind: StatefulSet
metadata:
  name: redis
  namespace: default
spec:
  serviceName: "redis"
  replicas: 3  # One master and two replicas
  selector:
    matchLabels:
      app: redis
  template:
    metadata:
      labels:
        app: redis
    spec:
      containers:
        - name: redis
          image: redis:latest
          command: ["redis-server"]
          args: ["/etc/redis/redis.conf"]
          ports:
            - containerPort: 6379
          volumeMounts:
            - name: redis-data
              mountPath: /data
            - name: redis-config
              mountPath: /etc/redis
      initContainers:
        - name: init-redis-config
          image: busybox
          command: ['sh', '-c', 'if [ "$(hostname)" == "redis-0" ]; then cp /etc/redis/master.conf /etc/redis/redis.conf; else cp /etc/redis/slave.conf /etc/redis/redis.conf; fi']
          volumeMounts:
            - name: redis-config
              mountPath: /etc/redis
  volumeClaimTemplates:
    - metadata:
        name: redis-data
      spec:
        accessModes: [ "ReadWriteOnce" ]
        resources:
          requests:
            storage: 1Gi

---
apiVersion: v1
kind: Service
metadata:
  name: redis
  namespace: default
spec:
  clusterIP: None  # Headless service for StatefulSet
  ports:
    - port: 6379
      targetPort: 6379
      protocol: TCP
  selector:
    app: redis

---
apiVersion: v1
kind: ConfigMap
metadata:
  name: redis-configs
data:
  master.conf: |
    bind 0.0.0.0
    protected-mode yes
    port 6379
    dir /data

  slave.conf: |
    bind 0.0.0.0
    protected-mode yes
    port 6379
    dir /data
    replicaof redis-0.default.svc.cluster.local 6379 # Point to the master instance
Instead of copying all the resources into another file and modifying the parameters each time we deploy, we can apply more effective configuration management methods — namely, using Helm.
Helm
We can package all the resources into a single package and use Helm to manage them. For popular software the community publishes ready-made charts we can reuse instead of writing our own. Here we’ll deploy Redis using the community CloudPirates Redis chart, which is distributed as an OCI chart:
helm install my-redis oci://registry-1.docker.io/cloudpirates/redis \
  --version 0.33.0 \
  --set architecture=replication \
  --set replicaCount=3 \
  --set sentinel.enabled=true
Each time we need a new Redis cluster, we just run the command above. However, running Helm manually from the CLI makes changes hard to track. ArgoCD supports deploying Helm through the use of an Application.
ArgoCD with Helm
To deploy Redis with Helm and ArgoCD, we declare a redis-helm.yaml file:
apiVersion: argoproj.io/v1alpha1
kind: Application
metadata:
  name: redis-helm-app
  namespace: argocd
spec:
  project: default
  source:
    repoURL: registry-1.docker.io/cloudpirates
    chart: redis
    targetRevision: 0.33.0  # Use the desired version of the chart
    helm:
      releaseName: redis
      parameters:
        - name: architecture
          value: replication
        - name: replicaCount
          value: "3"
        - name: sentinel.enabled
          value: "true"
  destination:
    server: 'https://kubernetes.default.svc'
    namespace: default
  syncPolicy:
    automated:
      prune: true
      selfHeal: true
Compared to an Application for plain resource files, the part that changes is the
source: section:
- repoURL: the Helm chart repository URL
- chart: the chart to deploy
- targetRevision: the version
- helm.parameters: the parameters we need to pass in
Run apply:
kubectl apply -f redis-helm.yaml
In the UI you’ll see the Application for Redis being created:
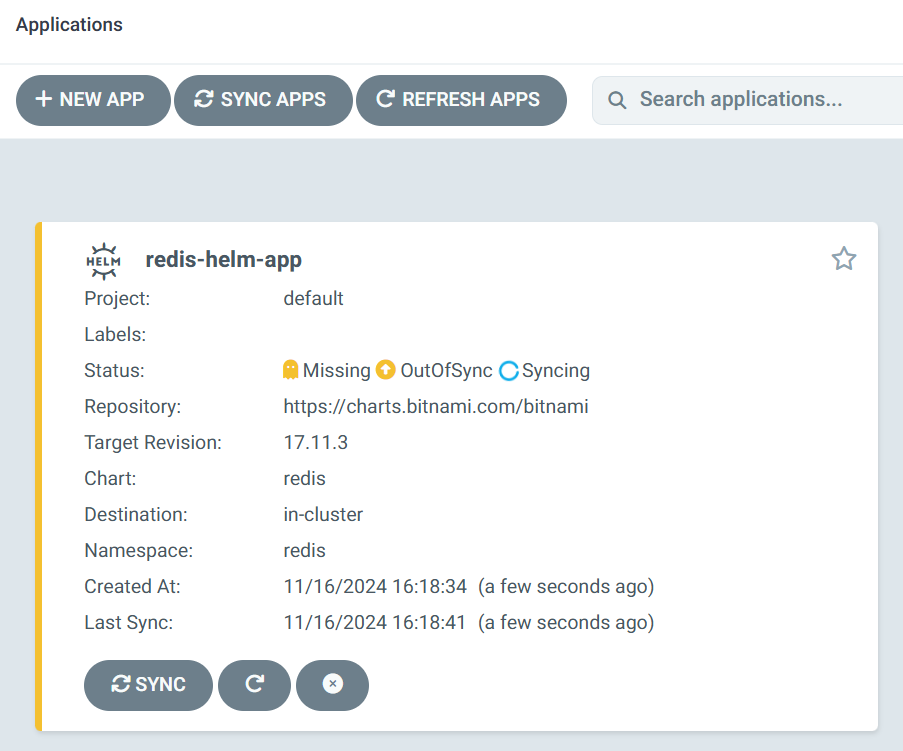
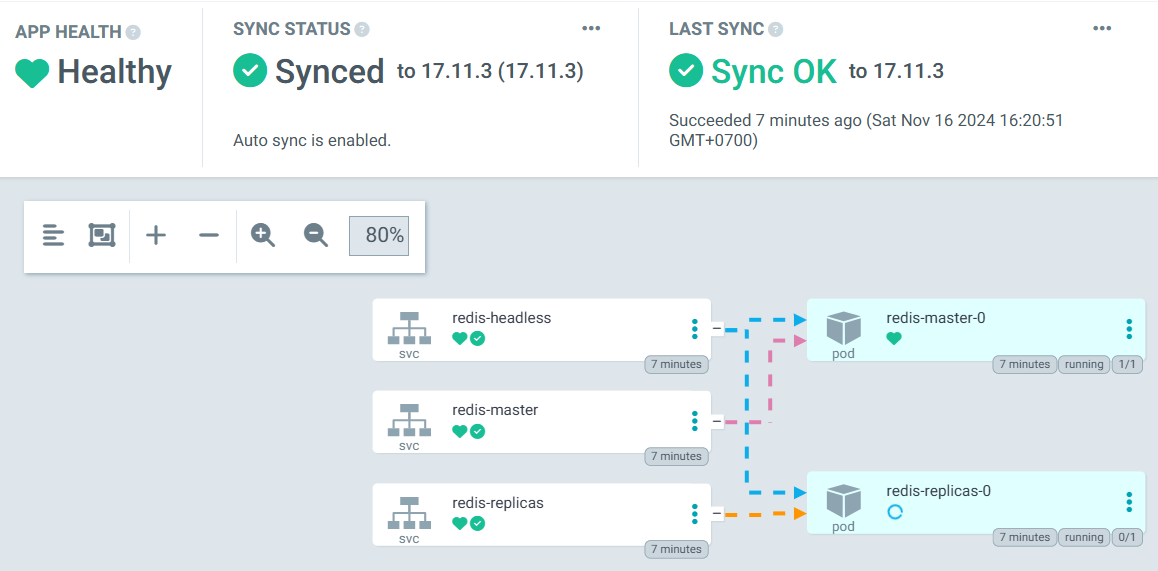
Wait for Redis to sync successfully:
GitOps
Above is how we use an Application to deploy Redis with Helm. However, to manage all changes through Git and properly follow the GitOps standard, we need to do the same steps as when deploying the Book Info application. Specifically, we create a Git repository with the two files below, then create an Argo Application for that repo.
├── Chart.yaml
└── values.yaml
Contents of Chart.yaml — an umbrella chart that depends on the Redis chart:
apiVersion: v2
name: redis
description: A Helm chart that deploys Redis

type: application
version: 0.1.0

dependencies:
  - name: redis
    version: 0.33.0
    repository: oci://registry-1.docker.io/cloudpirates
Contents of values.yaml:
redis:
  architecture: replication
  replicaCount: 3
  sentinel:
    enabled: true
See 05-with-helm/gitops.
Create an app.yaml file to declare the Argo Application:
apiVersion: argoproj.io/v1alpha1
kind: Application
metadata:
  name: redis
  namespace: argocd
spec:
  project: default
  source:
    repoURL: 'https://github.com/VersusControl/devops-vn-blog'
    targetRevision: HEAD
    path: '_resource/argocd-series/05-with-helm/gitops'
  destination:
    server: 'https://kubernetes.default.svc'
    namespace: default
  syncPolicy:
    automated:
      prune: true
      selfHeal: true
Run apply:
kubectl apply -f app.yaml
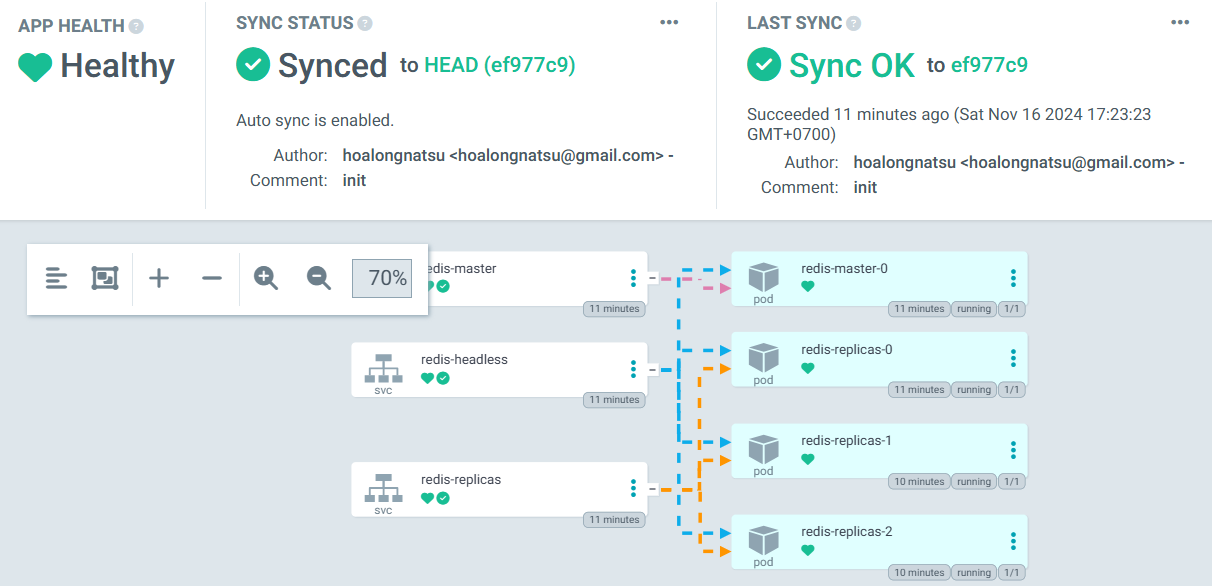
Wait for Redis to be created successfully:
Any change to Redis now requires editing the values.yaml file and merging it into
Git. Using Helm makes it easy to deploy applications, and combined with ArgoCD to
manage Helm chart changes through Git ⇒ managing and deploying applications becomes
more professional.
In the next post, we’ll learn how to use ArgoCD with Kustomize.