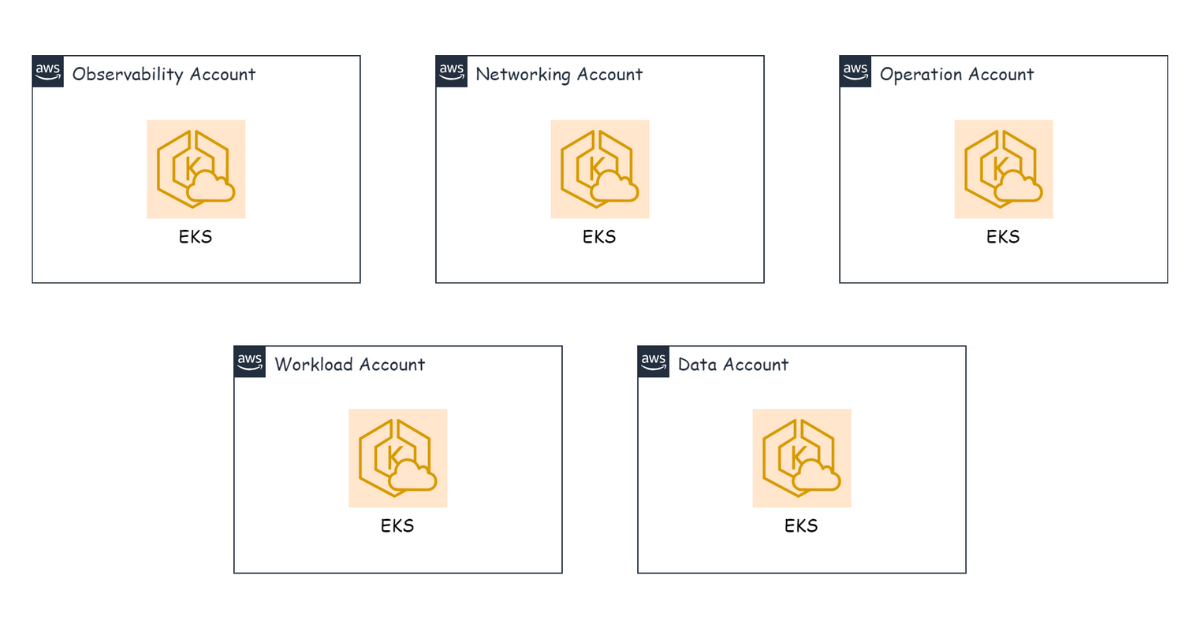
The Kubernetes for Multiple AWS Accounts topic has two parts:
- Kubernetes Infrastructure for Scale
- Kubernetes Communication Between Multiple AWS Accounts
AWS provides the Elastic Kubernetes Service (EKS), which lets us deploy Kubernetes on AWS quickly. A few important questions about EKS: How do we deploy EKS in each account? How do we configure EKS autoscaling? Cluster Autoscaler or Karpenter? And how do we use nodes in the most cost-effective way?
Deploying EKS in each account
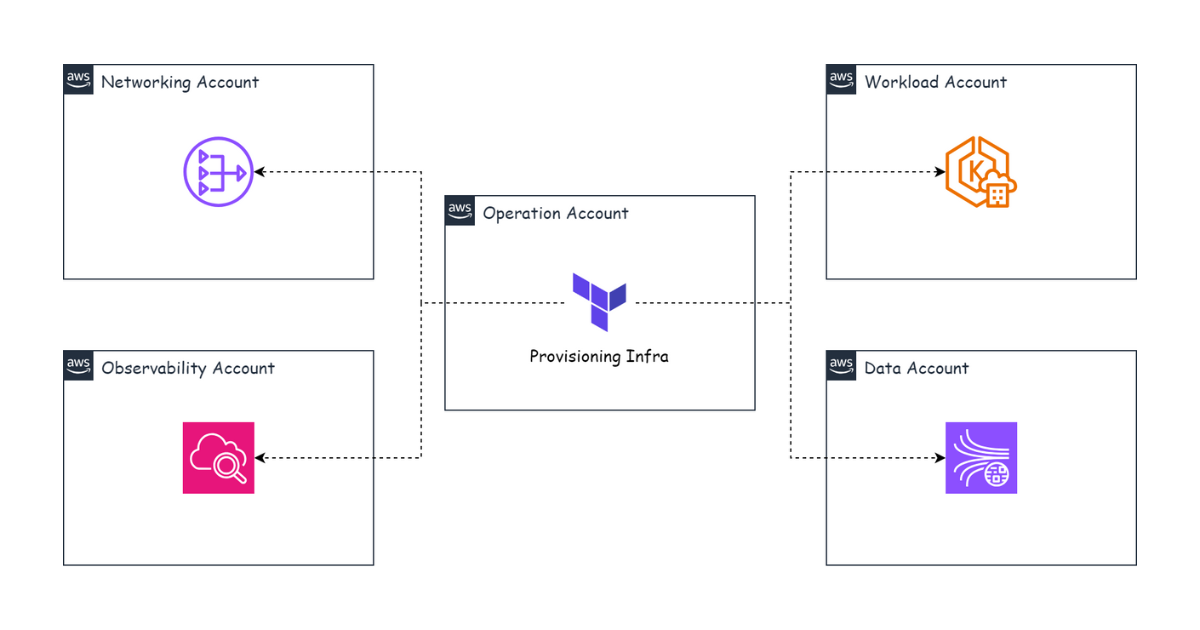
In the Provisioning Infrastructure for Multiple AWS Accounts part, we discussed using Terraform to provision infrastructure — specifically, using the Operation account’s credentials to run Terraform and provision infrastructure for the different accounts. Here is the directory structure for creating EKS in the dev environment:
└── nonprod-terraform
    ├── data-nonprod
    │   ├── dev
    │   │   ├── eks
    ├── networking-nonprod
    │   ├── dev
    │   │   ├── eks
    ├── observability-nonprod
    │   ├── dev
    │   │   ├── eks
    ├── operation-nonprod
    │   ├── dev
    │   │   ├── eks
    └── workload-nonprod
        ├── dev
        └── ├── eks
Scaling
After deploying EKS in each account, the next concern is how to configure scaling for EKS. AWS EKS has two main parts: the Control Plane, managed by AWS, and the EKS Node Group (the EC2 instances that Kubernetes Pods are deployed onto). The part we need to scale is the Node Group. Before discussing how to scale the Node Group, let’s review the techniques for scaling applications in Kubernetes — there are 4:
- Application Tuning: scale the processes within a Pod or optimize through code.
- Horizontal Pod Autoscaling: scale horizontally by adding more Pods.
- Vertical Pod Autoscaling: scale vertically by increasing a Pod’s CPU or memory.
- Cluster Autoscaling: scale horizontally by adding more Nodes.
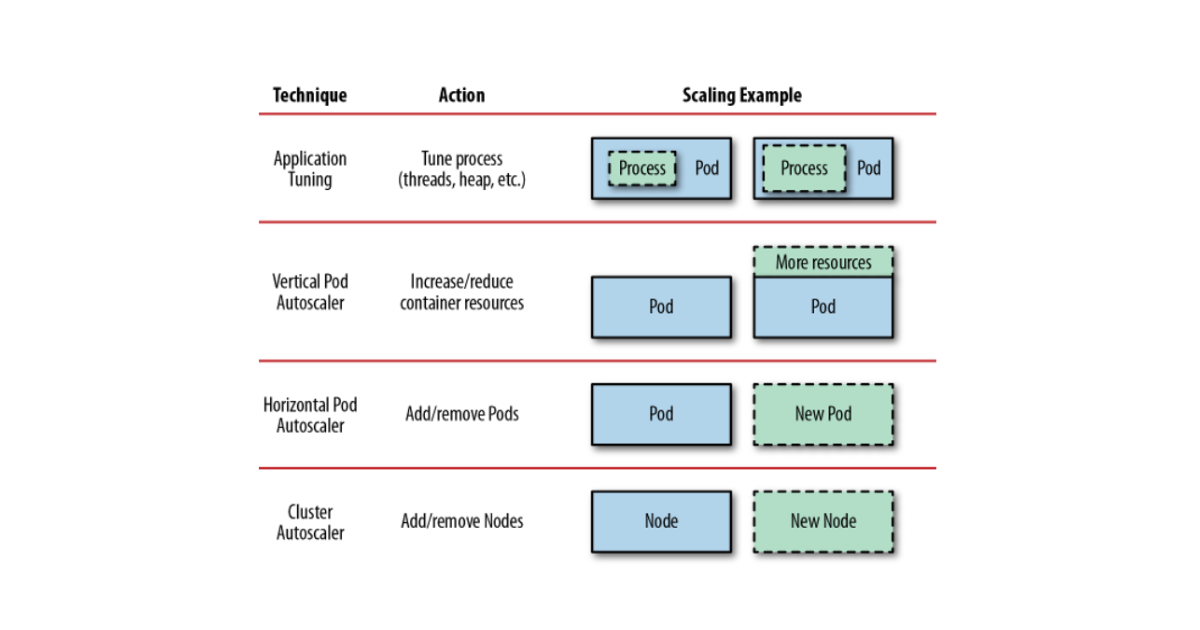
In this part I focus mainly on Cluster Autoscaling. For Horizontal Pod Autoscaling, see Kubernetes Event-driven Autoscaling; for Vertical Pod Autoscaling, see the Vertical Pod Autoscaler.
Cluster Autoscaling
EKS provides two solutions for scaling a cluster:
- Cluster Autoscaler: works based on Auto Scaling Groups (ASG).
- Open-source Karpenter: works directly with Amazon EC2 instances.
Both Cluster Autoscaler and Karpenter scale by adjusting the number of EC2 instances in the Node Group. If a new Pod is deployed and the current number of EC2 instances isn’t enough, the autoscaler automatically creates more EC2 instances. Likewise, when the number of Pods drops, if an EC2 instance has no Pods deployed on it, the autoscaler automatically deletes that instance to save resources.
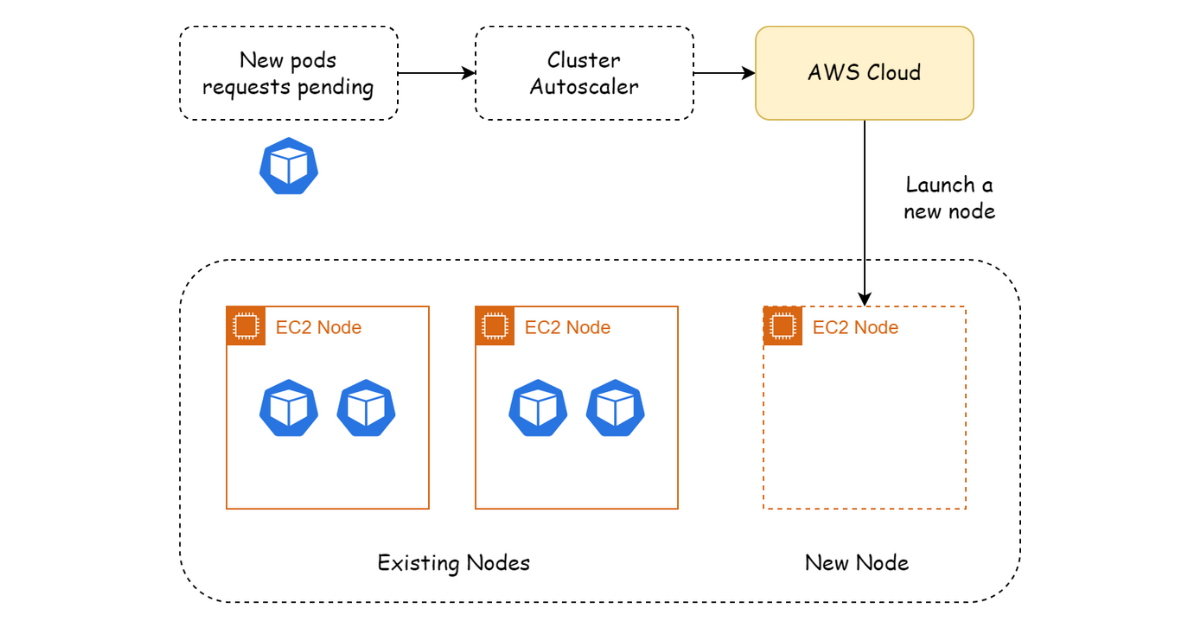
However, Cluster Autoscaler was the first solution for scaling EKS, so it has some limitations. Cluster Autoscaler works based on ASGs, and an ASG works based on a Launch Template. With each Launch Template, we can only define a single EC2 instance type, and each instance type has fixed CPU and memory. This often leads to wasted resources when scaling the Node Group.
For example, in an ASG we use the EC2 type m5a.large (2 vCPUs, 8 GiB). EKS is currently running 16 Pods, each Pod needing 0.5 vCPUs and 2 GiB, so we need 4 m5a.large instances. When the system receives more requests, Kubernetes automatically scales up by one Pod. However, since there aren’t enough EC2 instances, Cluster Autoscaler creates a new one. Because it uses an ASG, the created instance must be m5a.large. The new Pod is deployed on this new instance. Since each Pod only needs 0.5 vCPUs and 2 GiB, we end up with 1.5 vCPUs and 6 GiB of leftover resources.
We can avoid this limitation by creating multiple different ASGs, but that makes the configuration more complex and harder to optimize. Karpenter was created to solve Cluster Autoscaler’s problem.
Karpenter is an open-source project developed by AWS. Like Cluster Autoscaler, Karpenter adjusts the number of EC2 instances as Pods are deployed, but it doesn’t work based on ASGs — it works directly with EC2, so it creates instances in the most resource-optimal way.
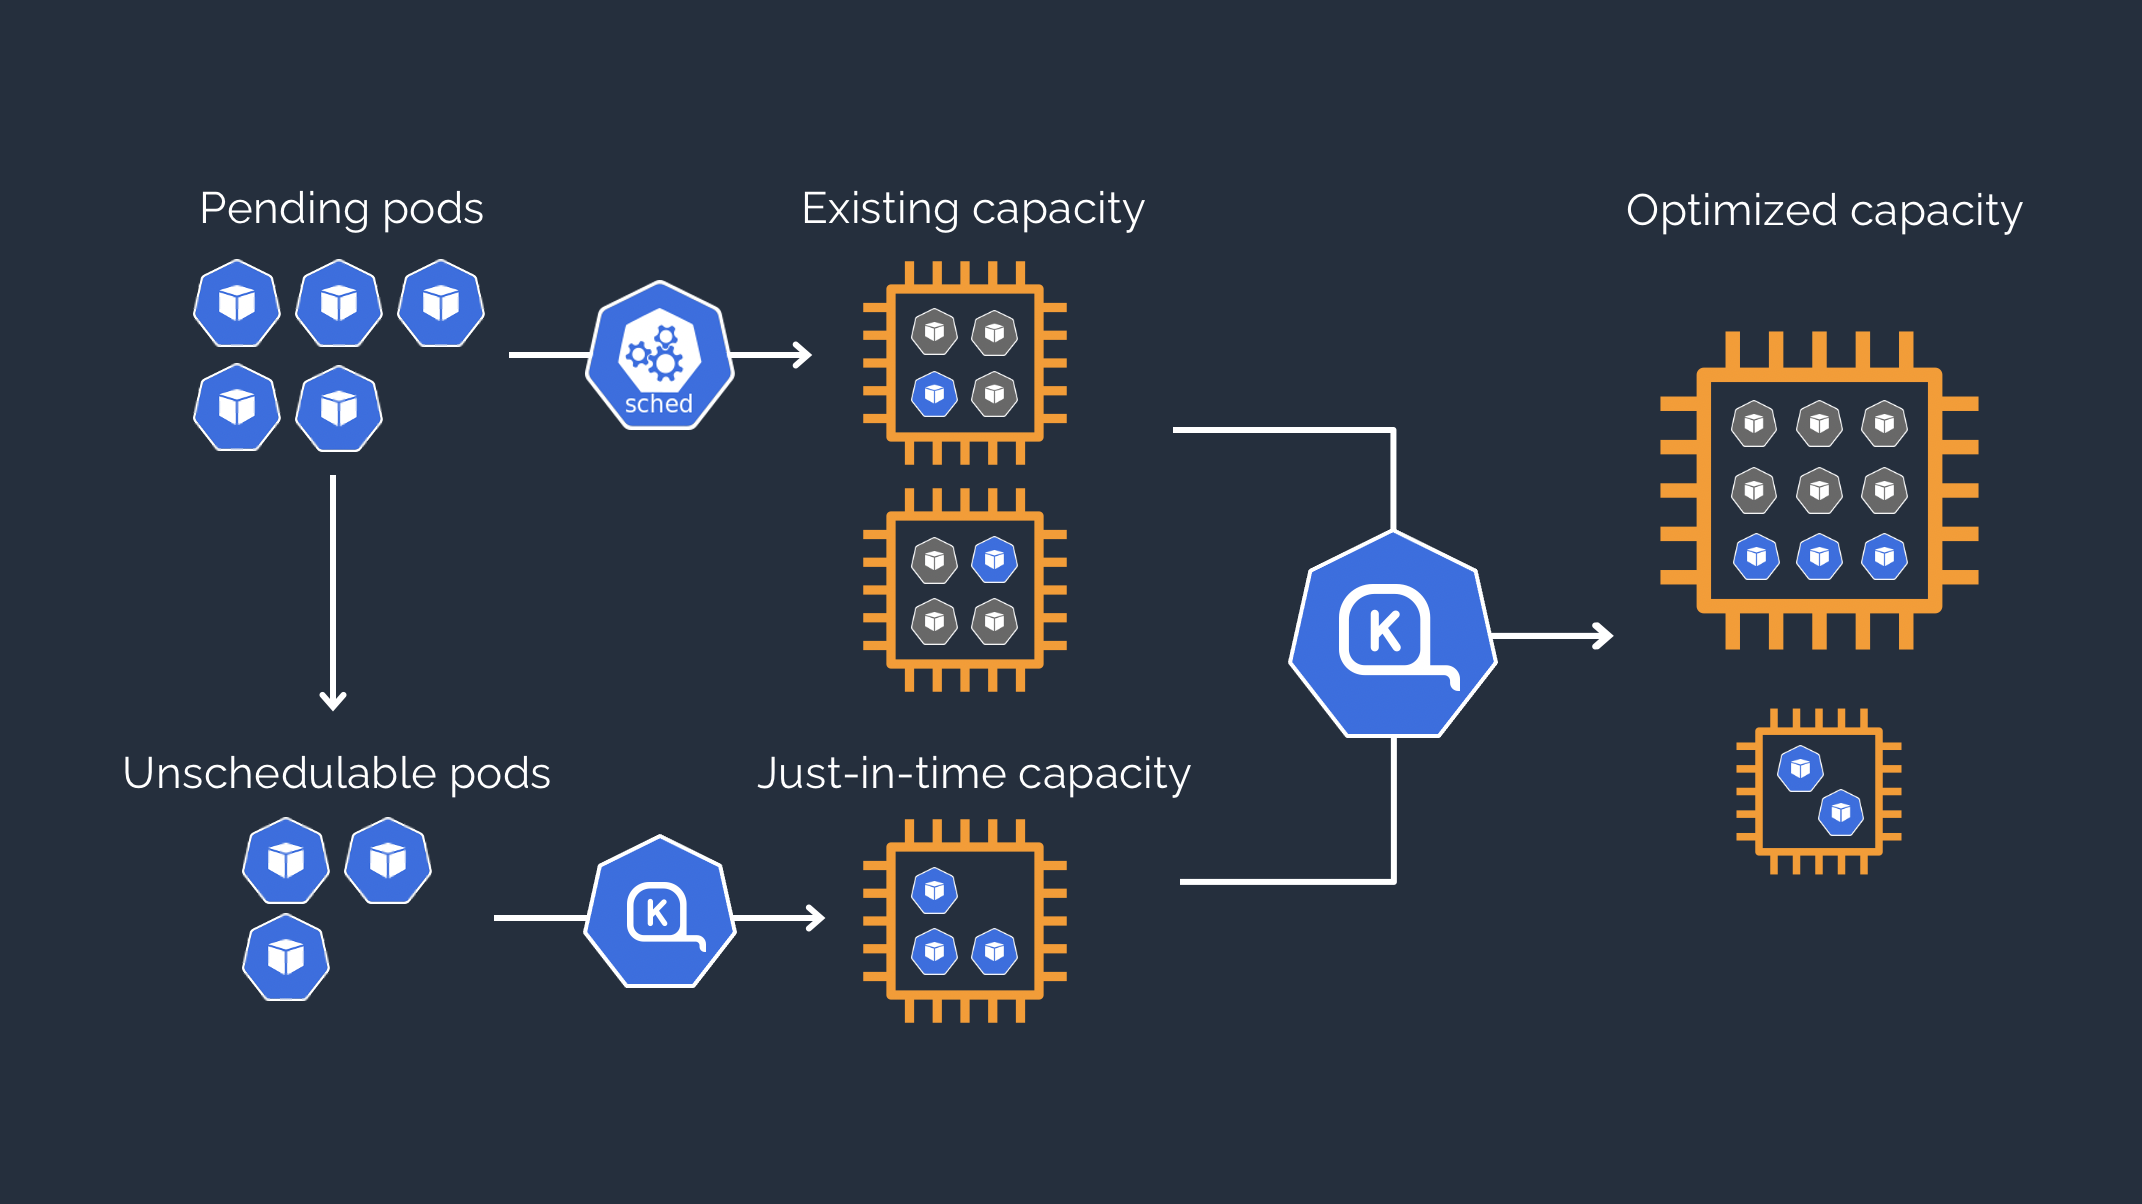
As in the picture above, consider this example: 5 Pods (0.75 vCPUs, 1.5 GiB) are pending deployment. The current number of EC2 instances is 2 (1 vCPU, 2 GiB), so each can host only 1 Pod, leaving 3 Pods pending. With Cluster Autoscaler we’d need 3 more instances, wasting 1.25 vCPUs (0.25 vCPU per instance). Karpenter, on the other hand, initially — to minimize deployment delay — looks for a suitable EC2 instance to deploy the remaining 3 Pods. After all Pods are deployed, Karpenter takes more time to compute and re-select the most optimal EC2 instances for the Pods; after the new instance is created, it launches the Pods on the new instance and only then deletes the old instances. Read more about Karpenter here: Getting Started.
For new EKS infrastructure, you should use Karpenter for the best cost optimization; for older EKS infrastructure, if you have the time, you can migrate from Cluster Autoscaler to Karpenter. The Vikki infrastructure uses Karpenter to scale EKS.
Using nodes cost-effectively
AWS EC2 has four pricing models:
- On-Demand Instances: pay per hour, e.g. $0.01/hour.
- Savings Plans: buy a discount plan, saving 20–30% compared to On-Demand.
- Reserved Instances: similar to Savings Plans and saving even more, but limited to an instance type — for example, if you buy the
m5family you can only use that family. - Spot Instances: with this model, EC2 saves up to 90% compared to On-Demand, but our instances can be reclaimed at any time. Spot instances are created from AWS’s spare capacity when no other customer is using it. However, if that capacity is requested by another customer, our instance is reclaimed.
I won’t cover how to buy Savings Plans and Reserved Instances in this part. AWS EKS Node Groups let us combine On-Demand and Spot Instances. In dev and UAT environments, if our application can tolerate 5–10 minutes of downtime without much impact, we should combine running nodes in both modes. Karpenter makes this simpler.
We create EKS with an On-Demand Node Group for the applications in Kubernetes’s kube-system namespace — these are usually critical applications that shouldn’t go down — and we deploy the Karpenter Controller onto this On-Demand Node Group to ensure it doesn’t stop working midway. Then we configure Karpenter to create Spot Instance Node Groups for the remaining Pods.
To limit downtime when AWS reclaims Spot instances, we can run an application with 2 Pods and configure Spread Constraints so the 2 Pods are not deployed on the same EC2 instance. If one Spot instance is reclaimed, one Pod is still running while Karpenter recreates another instance. In addition, Karpenter supports configuring a Node Termination Handler to run certain tasks before a Spot instance is reclaimed.
As for deciding which applications should run on On-Demand Node Groups and which can run on Spot Instances to best optimize infrastructure cost, let me use the example of EKS running CI/CD in the Operation account. For CI/CD, we can summarize two important areas: CI/CD for Workload and CI/CD for Data.
CI/CD for Workload typically only includes the steps: run lint, run tests, build the Docker image, security scan, push the image to ECR, and run CD. These steps, even if interrupted midway, don’t matter much — we just rerun from the start — so for CI/CD in the Workload account we can use Spot Node Groups.
CI/CD for Data, on the other hand, usually includes very important tasks such as data aggregation, data partitioning, and data migration. If these steps die midway, the impact is large, so for CI/CD in the Data account we should use On-Demand Node Groups.
In the next part, we’ll talk about how applications in EKS communicate across different accounts.