Sooner or later, you stop being the only person who touches the cluster. When that
happens, you need a way to hand out access that is scoped, safe, and self-service.
This guide walks through creating a Kubernetes user and authorizing exactly what they
can do using Role-Based Access Control (RBAC) and kubectl.
The Problem
Imagine the following situation. Your company has a Kubernetes cluster with two
environments, pro and dev — pro for real production and dev for product
development. Until now you’ve worked alone and hold full permissions over the
cluster, so every time a developer needs to do anything — even just view logs — they
have to go through you. That bottleneck slows everyone down, and your boss asks you to
let developers list applications and view logs themselves in the dev environment,
without touching production.
How RBAC Fits Together
Before jumping into commands, it helps to know the four pieces RBAC gives us and how they connect:
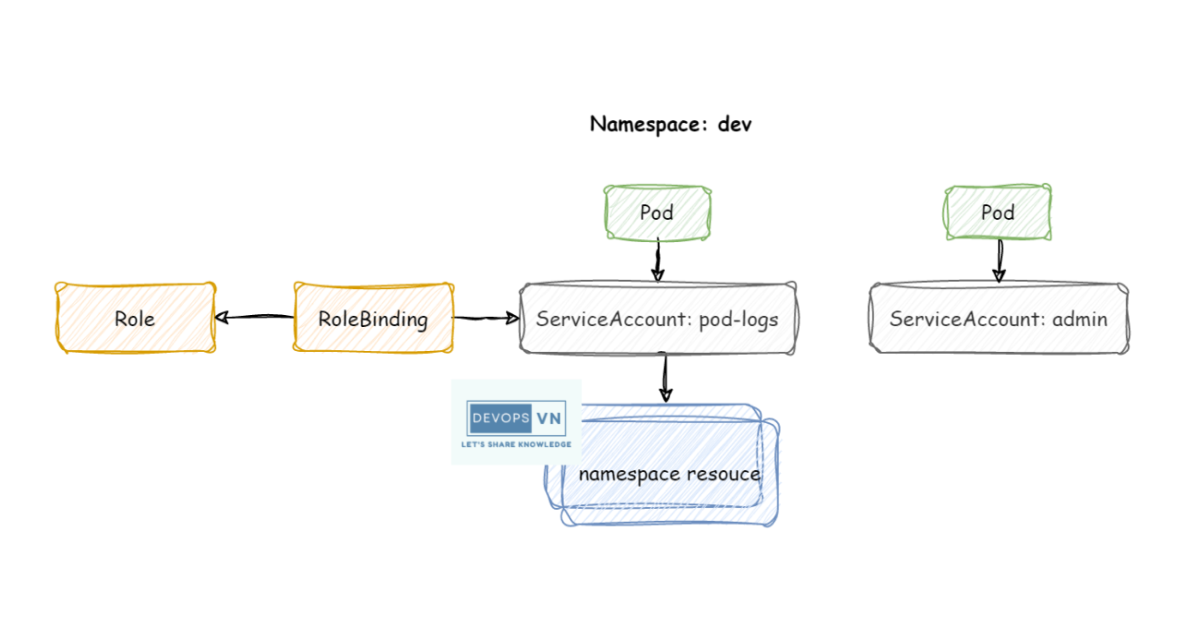
- Subject — who is asking. This can be a User, a Group, or a ServiceAccount. Kubernetes has no built-in “user” object, so we’ll lean on a ServiceAccount and hand its token to the developer.
- Role — what is allowed, scoped to a single namespace. A
ClusterRoleis the same idea but cluster-wide. - RoleBinding — the glue that grants a Role’s permissions to a Subject inside a
namespace. A
ClusterRoleBindinggrants them cluster-wide. - Verbs & Resources — the concrete actions (
get,list,create, …) on concrete resources (pods,pods/log, …) that a Role permits.
In short: a RoleBinding connects a ServiceAccount to a Role that lists the
allowed verbs on specific resources — all within one namespace. Because we
bind inside dev only, the permissions can never leak into pro.
Prerequisites
kubectlconfigured with an admin (cluster-admin) context.- A namespace named
dev. Create it if it doesn’t exist:kubectl create namespace dev.
The Solution
We solve this with RBAC: grant a ServiceAccount a narrow set of permissions in the
dev namespace, then hand its token to the developer. The steps are as follows.
1. Create the ServiceAccount and its token
Create a pod-logs-sa.yaml file for the ServiceAccount:
apiVersion: v1
kind: ServiceAccount
metadata:
  name: pod-logs
  namespace: dev
secrets:
  - name: pod-logs

---
apiVersion: v1
kind: Secret
metadata:
  name: pod-logs
  namespace: dev
  annotations:
    kubernetes.io/service-account.name: pod-logs
type: kubernetes.io/service-account-token
kubectl apply -f pod-logs-sa.yaml
Note for Kubernetes 1.24+: creating a ServiceAccount no longer generates a long-lived token Secret automatically. That’s exactly why we define the Secret ourselves above — the
kubernetes.io/service-account.nameannotation tells the control plane to populate it with a token for thepod-logsaccount.
2. Define what the account can do
Create a pod-logs-role.yaml file:
apiVersion: rbac.authorization.k8s.io/v1
kind: Role
metadata:
  name: pod-logs
  namespace: dev
rules:
- apiGroups: [""]
  resources: ["pods", "pods/log"]
  verbs: ["get", "list"]
kubectl apply -f pod-logs-role.yaml
The empty apiGroups: [""] refers to the core API group, where pods live. Keeping
the verbs to get and list means the developer can view and list Pods and stream
logs, but cannot create, edit, or delete anything.
3. Bind the Role to the account
Create the RoleBinding that connects the pod-logs Role to the pod-logs
ServiceAccount, inside the dev namespace:
kubectl -n dev create rolebinding pod-logs --serviceaccount=dev:pod-logs --role=pod-logs
Next, we’ll let the developer log in with the token attached to the pod-logs
ServiceAccount. Read it out:
kubectl -n dev describe secrets "$(kubectl -n dev describe serviceaccount pod-logs | grep -i Tokens | awk '{print $2}')" | grep token: | awk '{print $2}'
Note: run kubectl with the correct namespace. In this example it’s -n dev.
Assign that value to a TOKEN variable so we can reuse it:
TOKEN=$(kubectl -n dev describe secrets "$(kubectl -n dev describe serviceaccount pod-logs | grep -i Tokens | awk '{print $2}')" | grep token: | awk '{print $2}')
5. Create the user context
Register a user (any name works) that authenticates with that token:
kubectl config set-credentials devopsvn --token=$TOKEN
User "devopsvn" set.
Then point the current context at the devopsvn user:
kubectl config set-context $(kubectl config current-context) --user=devopsvn
Heads up: this command overwrites the user on your current context, so your own admin access in this context is replaced by the limited
devopsvnuser. If you want to keep your admin session intact, build a separate kubeconfig for the developer instead — for example exportKUBECONFIG=./devopsvn.kubeconfigbefore running theset-credentials/set-contextcommands, then share only that file.
6. Verify the permissions
At this point the user exists. Confirm the boundaries with kubectl auth can-i:
$ kubectl auth can-i get pods --namespace=dev
yes

$ kubectl auth can-i get pods --namespace=pro
no

$ kubectl auth can-i delete pods --namespace=dev
no
Exactly what we wanted: read access in dev, nothing in pro, and no destructive
actions anywhere.
7. Hand off the kubeconfig
Finally, open ~/.kube/config (or the separate file from step 5), remove any other
users and unnecessary entries, and keep only the devopsvn user. For example:
apiVersion: v1
clusters:
- cluster:
    certificate-authority-data: ...
    server: ...
  name: devopsvn-cluster
contexts:
- context:
    cluster: devopsvn-cluster
    user: devopsvn
  name: devopsvn-cluster
kind: Config
preferences: {}
users:
- name: devopsvn
  user:
    token: ...
Then send this file to your developers. They set KUBECONFIG to it (or drop it in
~/.kube/config) and immediately have scoped, self-service access to the dev
environment.
Conclusion
There are many ways to solve this problem, and some of them are far more elaborate. The approach here is manual, but it’s the simplest to reason about and a great way to learn how RBAC’s building blocks — ServiceAccounts, Roles, and RoleBindings — click together, which makes it ideal for beginners. Once the concepts feel natural, you can grow into more scalable options: bind to OIDC groups from your identity provider so you’re not managing tokens by hand, or layer on a GitOps tool like ArgoCD to manage these RBAC manifests declaratively.